
Installation Guide
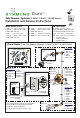


Page 3
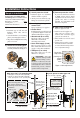
2) Attach escutcheon
3) Attach dome cover
4) Attach handle
5) Attach showerhead
6) Attach tub spout
1) Attach escutcheon
mounting plate
factory
installed
gasket
1/8"
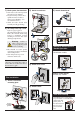
7) Flush system, check for leaks
■ Turn valve to the warm position
and run for a few minutes.
■ If system is dirty, remove valve
spindle in center of valve to
ensure proper ushing. (See
service instructions.)
■ Check for leaks around valve
assembly and all pipe ttings.
8) Set Temp Limit stop screw
Reference page 2, gure 3
e temperature limit stop screw
limits valve handle from being
turned to maximum position
resulting in excessive hot water
discharge temperatures.
Warning: Failure to
adjust Temp Limit stop
screw properly may result
in serious scalding.
■ Place handle on control spindle
stem and open valve to maximum
desired temperature.
■ Turn Temp Limit stop screw
clockwise until it seats.
Note:
Do not install positive shut-
o devices on control valve outlet or
devices that do not allow the valve to
ow at least 1.5 gpm.
Diverter handle
Tub-Shower models
Volume control handle
Shower only models
Tub
Shower
High
Low
Clean nished area using mild
soap and water or a non-abrasive
cleaner and then
quickly rinse. A
non-abrasive wax
may be used to
preserve nish
area.
Care and Cleaning
Diverter & Volume Control
Handle Operation
Trim Installation