
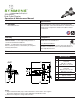
Installation Guide


3
Installation
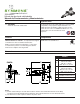
1) Reference rough-in dimension for
shower application with diverter
for proper installation of diverter
valve.
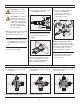
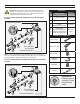
5) Sweat 1/2" copper tubing from
inlet port on diverter valve
to water source. Sweat 1/2"
copper tubing from outlet ports
to desired accessories.
Important: Do not plug
outlet ports. Do not use
diverter as shut-off valve.
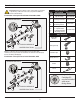
2) Shut-off water supplies.
4) Secure stringer mounts on diverter
valve (E) to wood blocking for
support.
E
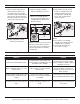
6) Turn on water supplies to ush
plumbing lines free of debris
.
Check for leaks.
!
E
3) Position diverter valve (E) so port
marked IN is facing down.
3
2
Optional: Apply plumber tape to
male IPS threads on the inlet and
outlet ports of diverter valve. Install
1/2"-14 NPT copper ttings to the
inlet and outlet ports. Connect
outlets to desired accessories.
Note: Securing stringer mounts is
necessary for applications where
PEX, or other non rigid tubing, is
used to install diverter valve.
Note: Diverter valve can be installed
in wall with shower valve or in an
adjoining wall to shower valve.
Important: Do not expose
diverter valve to heat for
longer than 2 minutes when
sweating in copper tubing.
Doing so may damage the
internal components of
the valve and will void the
product warranty.
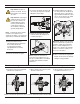
Operation (for diverter valves purchased after August 17, 2016)
1
POSITION 1
1) Cartridge is factory set to divert
to function 1.
2) Turn handle to position 2 to divert
to function 2.
3) Turn handle to position 3 to share
functions 1 and 2.
Note: Additional handle positions for same output are illustrated.
2
POSITION 2
1
2
POSITION 3