
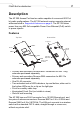
User's Manual


8
AP 300 Quick Reference Guide FINAL.Not for distribution.
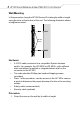
Suspended Ceiling Tile (Plenum) Mount
In this procedure, place the AP 300 above a suspended ceiling.
Note: Notes or warnings about suspended ceiling mounts apply to
all installations where the unit is placed on suspended ceiling
tile. The AP 300 case has a safety cable tie point for a
standard safety cable.
Caution: Symbol does not recommend mounting the AP 300 directly to
any suspended ceiling tile with a thickness less than 1.27cm
(0.5in.) or a suspended ceiling tile with an unsupported span
greater than 66cm (26in.). Symbol does strongly recommend
fitting the AP 300 with a safety cable suitable for the specific
installation. The safety cable should be steel—a steel wire
rope to the standard ceiling suspension cable—and in
diameter at least .159cm (.062in.) to .25cm (.10in.).
This placement requires installation of the provided light pipe for viewing
the status lights of the unit.
Hardware
• A CAT-5 cable connected to a compatible Symbol wireless
switch—for example, the WS 2000 or WS 5000—with sufficient
slack—optimally, to reach a work surface from the ceiling
• Light pipe
• Badge for light pipe
• Decal for badge
• Safety cable (recommended)
• Security cable (optional)
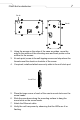
Procedure
1. If possible, remove the ceiling tile from its frame and place it,
finished side down, on a work surface.
2. If required, install in the ceiling space the recommended safety
cable—steel at least .15cm (.06in.) to .25cm (.10in.) in diameter—
and a security cable.
3. Mark a point on the upper or unfinished side of the tile.
4. Push the lightpipe through the tile at the mark. If necessary, use a
drill to make a hole in the tile.