
User's Manual
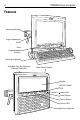

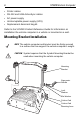

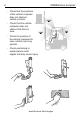
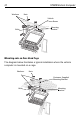
Table Of Contents
- Warranty
- Patents
- Introduction
- About This Guide
- Features
- Unpacking
- Optional Accessories
- Mounting Bracket Installation
- Installing the Desiccant Bags
- Installing the VC5090 in a Forklift
- Installing the VC5090 on a Wall or Desktop
- Installing the Optional Keyboard
- Powering the VC5090 On/Off
- Charging the Internal Backup Battery
- Calibrating the Touch Screen
- Controlling Screen Brightness
- Controlling Keyboard Backlight
- Resetting the Vehicle Computer
- Programmable Keys
- Connecting Accessories
- Maintenance
- Troubleshooting
- Regulatory Information
- Products Equipped with Bluetooth® Wireless Technology
- Country Approvals
- Health and Safety Recommendations
- FCC / EU RF Exposure Guidelines
- Power Supply
- Batteries
- Taiwan - Recycling
- Wireless Devices - Countries
- Radio Frequency Interference Requirements
- Radio Frequency Interference Requirements - Canada
- Marking and European Economic Area (EEA)
- Waste Electrical and Electronic Equipment (WEEE)

Quick Reference Guide 9
Mounting the Vehicle Computer
Important Fixing Information
Any modification to supplied mounting bracket could cause early failure
of the unit/mountings.
• A minimum of four fixing positions must be used.
• All nuts and bolts must be checked periodically and tightened if
required.
• When installing the vehicle computer, care must be taken to ensure
that the mounting bracket footprint is fully supported. Additional plates
may be required to achieve this.
Mounting Bracket Template
Refer to the VC5090 Product Reference Guide for mounting template.
Mounting onto an Over-Head Cross-Beam Example
The diagram below illustrates a typical installation where the vehicle
computer is mounted onto a cross-beam.
Optimum Wrist Position