
User's Manual
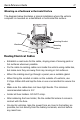
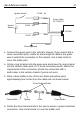
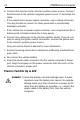
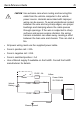
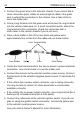
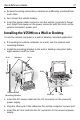
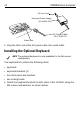

Table Of Contents
- Warranty
- Patents
- Introduction
- About This Guide
- Features
- Unpacking
- Optional Accessories
- Mounting Bracket Installation
- Installing the Desiccant Bags
- Installing the VC5090 in a Forklift
- Installing the VC5090 on a Wall or Desktop
- Installing the Optional Keyboard
- Powering the VC5090 On/Off
- Charging the Internal Backup Battery
- Calibrating the Touch Screen
- Controlling Screen Brightness
- Controlling Keyboard Backlight
- Resetting the Vehicle Computer
- Programmable Keys
- Connecting Accessories
- Maintenance
- Troubleshooting
- Regulatory Information
- Products Equipped with Bluetooth® Wireless Technology
- Country Approvals
- Health and Safety Recommendations
- FCC / EU RF Exposure Guidelines
- Power Supply
- Batteries
- Taiwan - Recycling
- Wireless Devices - Countries
- Radio Frequency Interference Requirements
- Radio Frequency Interference Requirements - Canada
- Marking and European Economic Area (EEA)
- Waste Electrical and Electronic Equipment (WEEE)

Quick Reference Guide 17
4. Ensure the wiring connections created are sufficiently insulated from
each other.
5. Re-connect the vehicle battery.
6. Insert the power cable connector into the vehicle computer's Power
port. Align the keyway on the power connector with the notch on the
vehicle computer’s power port.
Installing the VC5090 on a Wall or Desktop
To use the vehicle computer in a wall or desktop mounted application:
1. If mounting the vehicle computer on a wall, use the optional wall
mounting bracket.
2. Install the mounting bracket to the wall or desktop using four bolts,
eight washers and four nuts.
1. Insert the DC power cable into the DC connector on the universal
power supply.
2. Plug the other end of the cable into the vehicle computer’s power port.
3. Insert the AC line cord into the AC connector on the universal power
supply.
Bolts
Washers
Nuts
Bolts
Washers
Nuts
Optional Wall
Mounting Bracket