S P T 1 8 0 0 S e r i e s
S P T 1 8 0 0 S e r i e s © 2001 SYMBOL TECHNOLOGIES, INC. All rights reserved. Symbol reserves the right to make changes to any product to improve reliability, function, or design. Symbol does not assume any product liability arising out of, or in connection with, the application or use of any product, circuit, or application described herein.
FCC RF EXPOSURE INFORMATION WARNING! Read this information before using your phone In August 1996 the Federal Communications Commission (FCC) of the United States with its action in Report and Order FCC 96-326 adopted an updated safety standard for human exposure to radio frequency electromagnetic energy emitted by FCC regulated transmitters. Those guidelines are consistent with the safety standard previously set by both U.S. and international standards bodies.
Q u i c k R e f e r e n c e Introduction Congratulations on your purchase of Symbol Technologies’ SPT 1800 Series Terminal! The unique combination of capabilities offered by this product makes it superior for use in a wide range of applications: • • • • • Personal Information Management software RF communication via Symbol’s Spectrum24® wireless network (SPT 184X) or wide area network (SPT 183X) pocket size printing support 1-D and 2-D scanning capability.
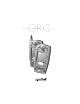
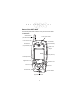
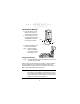
S P T 1 8 0 0 S e r i e s Parts of the SPT 1800 The following illustration indicates each part of the SPT 1800.
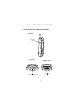
Q u i c k R e f e r e n c e Parts of the SPT 1800 (continued) Left View Left Scan Trigger Top View Bottom View Serial Port Scanner Exit Window 3
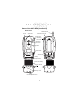
S P T 1 8 0 0 S e r i e s Parts of the SPT 1800 (continued) Back View Stylus Stylus Silo WAN Antenna WAN Antenna Headset Connector Infrared Port Handstrap Connector Handstrap Connector Speaker Reset Button SIM Socket Battery Compartment Lithium-Ion Battery Battery Latches Battery Cover Handstrap Connectors 4
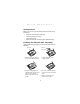
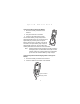
Q u i c k R e f e r e n c e Getting Started Before you can use your SPT 1800, perform the basic setup procedures: • • • • Install the SIM card (SPT 1834 only) Install and charge the battery Start the SPT 1800 Initiate the network connection (SPT 183X/184X only). Installing the SIM Card (SPT 1834 Only) Open the latches on the battery cover and lift it away from the SPT1834. Metal Clip SIM C ard C ontact Area 2. Lift the cardholder to an upright position. 1.
S P T 1 8 0 0 S e r i e s Installing the Battery 1. Open the latches on the battery cover and lift it away from the SPT 1800. 2. Insert the lithium-ion (Liion) battery into the battery compartment, ensuring that it snaps into place. Latch Latch 3. Replace the battery cover and close the latches. Note: Keep the battery latches completely open while securing the battery cover. Charging the Battery Note: The SPT 1800 battery (p/n 20-36098-01) must be used only with the SPT 1800.
Q u i c k R e f e r e n c e Using the Cradle to Charge the Battery 1. Ensure the battery is installed in the terminal. 2. Plug the cradle into a wall outlet. 3. Insert the SPT 1800 into the cradle. The terminal’s battery is fully charged after approximately two hours. You can also charge a spare battery by inserting it into the spare battery charging slot on the back of the single slot cradle. The spare battery fully charges in approximately two hours.
S P T 1 8 0 0 S e r i e s 3. Plug the power cable into a wall outlet and plug the other end into the battery charging receptacle on the side of the Synchronization/Charging Cable. Battery Charging Receptacle Power Supply Serial Cable The battery is fully charged after approximately two hours. Starting the SPT 1800 Press the red power button to power on the terminal. If the terminal does not power on, perform a hard reset. See Performing a Hard Reset on page 12.
Q u i c k R e f e r e n c e 1. Press the power button on the front panel of your SPT 1800 to display the Welcome utility. (This also displays following a hard reset). Power Button Note: If necessary, adjust the contrast control on the SPT 1800 so the screen is clear and readable. See Contrast Control on page 10 for instructions. 2. Follow the instructions on the screen. 3. Tap the exact center of each target that appears on the screen with the tip of the stylus.
S P T 1 8 0 0 S e r i e s Contrast Control The contrast control button is located on the lower right-hand side of the SPT 1800. Contrast Control 1. Press the contrast control button to display the contrast adjusting bar on the screen. 2. Using your stylus, adjust the contrast by scrolling the contrast bar until the contrast is set to the desired level, or use either of the scroll buttons on the top of the terminal to adjust the contrast level. 3.
Q u i c k R e f e r e n c e 3. Tap the left target to open the Alpha keyboard, or tap the right target to open the Numeric keyboard. Tap here for numbers keyboard Tap here for letters keyboard Icon Descriptions Applications Icon Calculator Icon Exits the current application and lists available applications for selection. Displays the calculator application. Menu Icon Tap from within an application to display the options menu for the application.
S P T 1 8 0 0 S e r i e s Resetting the SPT 1800 If your SPT 1800 stops responding to input, you may need to perform a reset. Performing a Soft Reset A soft reset restarts the SPT 1800 and saves all records and entries stored in your SPT 1800 terminal. After a soft reset, the Palm Computing Platform® Logo screen appears followed by the General Preferences screen. Reset button To perform a soft reset, remove the battery cover and gently press the reset button located under the battery cover.
Q u i c k Note: R e f e r e n c e With a hard reset, the current date and time are retained. Formats, preferences and other settings are restored to their factory default settings. Attaching the Handstrap The SPT 1800 has a handstrap which increases comfort when holding it for extended periods of time. 1. Thread round metal piece through this connector. 2. Slide flat metal piece up and into this connector. 3. Adjust the velcro strap to fit your hand. To attach the handstrap for the SPT 1834: 1.
S P T 1 8 0 0 S e r i e s Scanning 1-D Bar Codes The SPT 1800 has an integrated laser bar code scanner which allows you to collect data by scanning bar codes if your unit is configured with a scanning application. To scan bar codes: 1. Start your scanning application. 2. Aim the scanner at a bar code. 3. Press either the right, left or center scan trigger. Make sure the red scan beam covers the entire bar code. The green scan LED lights and a beep sounds to indicate a successful decode.
Q u i c k R e f e r e n c e A clicking noise lets you know the 2-D bar code is being decoded. If there is no clicking noise when you are scanning, the bar code is not being scanned properly. When decoding a very long 2-D bar code, you may notice a slight delay between the time when the terminal completes the decode and the time when the data is displayed on the screen. The first beep you hear indicates a successful decode. The second beep you hear indicates the data has been received by the host.
S P T 1 8 0 0 S e r i e s connection. A cursor does not appear if you are not connected to the radio. Maintaining the SPT 1800 For trouble-free service, observe the following tips when using your SPT 1800: • • • • • • Do not scratch the screen. Use the supplied stylus or a plastic-tipped pen intended for use with a touch-sensitive screen. Never use a pen or pencil or other sharp object on the screen.
Q u i c k R e f e r e n c e Troubleshooting Problem SPT 1800 terminal does not turn on. Cause Solution Contrast is set too light. Adjust the contrast control. Battery is not fully charged. Make sure the battery is fully charged and installed properly. Battery is defective. Replace the battery. If your SPT 1800 terminal still does not operate, try a soft reset; see Resetting the SPT 1800 on page 12. Low battery warning after replacing the battery. A normal condition.
S P T 1 8 0 0 S e r i e s Problem Cause Solution SPT 1800 doesn’t recognize my handwriting. You are not using Graffiti character strokes. For your SPT 1800 to recognize handwriting input with the stylus, you need to use the Graffiti® character strokes. See the SPT 1800 Product Reference Guide for information about how to write Graffiti character strokes. You are not writing character strokes in the correct area.
Q u i c k R e f e r e n c e Problem Cause Solution SPT 1800 does not accept scan input. Scan application not present. Verify that the SPT 1800 is loaded with a scanning application. See your System Administrator. Bad bar code. Check to be sure the bar code symbol is not defaced. Too far away from bar code. Be sure you are within proper scanning range. Bar code type is not enabled. Be sure the SPT 1800 is programmed to accept the type of bar code you are scanning. Beep is not enabled.
S P T 1 8 0 0 S e r i e s Regulatory Information Radio Frequency Interference Requirements This device has been tested and found to comply with the limits for a Class B digital device pursuant to Part 15 of the Federal Communications Commissions Rules and Regulations. These limits are designed to provide reasonable protection against harmful interference when the equipment is operated in a commercial environment.
Q u i c k R e f e r e n c e CE Marking and European Union Compliance Products intended for sale within the European Union are marked with the CE Mark which indicates compliance to applicable Directives and European Normes (EN), as follows.
S P T 1 8 0 0 S e r i e s • PAN European Frequency Range: 2.400 - 2.4835 GHz, identified by -EU suffix to the model number found on the product label. • France - Restrict Frequency Range for use in France: 2.4465 - 2.4835 GHz, identified on SPT 1842 by the -FR suffix to the model number found on the product label. • Belgium - Operation in an out-of-doors environment in Belgium must be restricted to 2.460 - 2.4835 GHz band. • Italy - Operation in Italy requires a user license.
Q u i c k R e f e r e n c e particular, it is recommended that you do not grasp the antenna while the GSM version is operating as this will not only significantly degrade its performance, but also expose your hand to the maximum radio frequency power emitted by the GSM version. Safety on the Road The GSM version should not be used by the driver of a vehicle when in motion. Always safely park your vehicle before turning your attention to your device.
S P T 1 8 0 0 S e r i e s If you have any reason to suspect that interference is taking place, turn off the GSM version immediately. This may be achieved most rapidly by switching off the device using its on/off button. Other Medical Devices The GSM version transmits radio frequency energy and as such has the potential to interfere with inadequately protected medical devices. Consult your physician or the manufacturer of the device to see if any particular device has sufficient protection.
Q u i c k R e f e r e n c e Class 1 Laser devices are not considered to be hazardous when used for their intended purpose. The following statement is required to comply with US and international regulations: Caution: Use of controls, adjustments or performance of procedures other than those specified herein may result in hazardous laser light exposure. Class 2 laser scanners use a low power, visible light diode.
S P T 1 8 0 0 S e r i e s In accordance with Clause 5, IEC 0825 and EN60825, the following information is provided to the user: ENGLISH CLASS 1 CLASS 2 DANISH KLASSE 1 KLASSE 2 DUTCH KLASSE 1 KLASSE 2 FINNISH LUOKKA 1 LUOKKA 2 FRENCH CLASSE 1 CLASSE 2 GERMAN KLASSE 1 KLASSE 2 HEBREW CLASS 1 LASER PRODUCT LASER LIGHT DO NOT STARE INTO BEAM CLASS 2 LASER PRODUCT KLASSE 1 LASERPRODUKT LASERLYF SE IKKE IND I STRÅLEN KLASSE 2 LASERPRODUKT KLASSE-1 LASERPRODUKT LASERLICHT NIET IN STRAAL STAREN KLASSE-
Q u i c k R e f e r e n c e DECLARATION OF CONFORMITY We, Symbol Technologies, Inc. of One Symbol Plaza, Holtsville, NY 11742-1300, USA declare under our sole responsibility that the product(s) Spectrum24, LA302T, Type II Radio Card Spectrum24HR, LA411T, Type II Radio Card Spectrum24HR, LA412T, Type II Radio Card to which this declaration relates, are in conformity with the following standards and/or other normative documents.
S P T 1 8 0 0 28 S e r i e s
Q u i c k R e f e r e n c e Warranty Symbol Technologies, Inc. (“Symbol”) manufactures its hardware products in accordance with industry-standard practices. Symbol warrants that for a period of twelve (12) months from date of shipment, products will be free from defects in materials and workmanship. This warranty is provided to the original owner only and is not transferable to any third party.
Service Information Before you use the unit, it must be configured to operate in your facility’s network and run your applications. If you have a problem running your unit or using your equipment, contact your facility’s Technical or Systems Support.