
User Manual

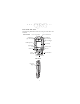
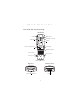


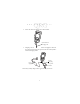
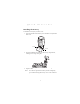

Table Of Contents
- Introduction
- About This Guide
- Getting Started with the SPT 1700
- Installing the Battery
- Starting the SPT 1700
- Using the SPT 1700
- Scanning with the SPT 1700
- Initiate the Spectrum24 Network Connection
- Resetting Your SPT 1700 Terminal
- Attaching the Handstrap
- Maintaining the SPT 1700
- Troubleshooting
- SPT 1700 terminal does not turn on:
- Low battery warning after replacing the battery:
- No sound:
- SPT 1700 terminal turns itself off:
- SPT 1700 terminal doesn’t recognize my handwriting:
- Tapping the screen buttons or icons does not activate the corresponding feature:
- When I tap the icon, nothing happens:
- Beamed data does not transmit:
- When receiving beamed data an out of memory message appears:
- Your SPT 1700 unit does not accept scan input:
- Service Information
- Warranty
- Ergonomic Recommendations
- Regulatory Information

8
SPT 1700 Series
Starting the SPT 1700
After charging and installing the battery, start the terminal by
pressing the red power button. If the terminal does not power on,
perform a hard reset by following the instructions on page 14.
Calibrating the Screen
The first time you start your SPT 1700, the calibration screen
appears. Follow the steps in this section to align the internal
circuitry of your SPT 1700 with its touch-sensitive screen.
Note: If your SPT 1700 unit came pre-loaded with a custom
software application, you may not need to calibrate
your screen, in which case you will not see the calibra-
tion screen.
To calibrate your SPT 1700:
1. Press the power button on the front panel of your SPT 1700
to display the calibration screen. (This screen also displays fol-
lowing a hard reset).
Note: If necessary, adjust the contrast control on the SPT 1700
so the screen is clear and readable. See
Using the Con-
trast Control
on page 10 for instructions.
2. Remove the stylus from its storage silo on the back of the SPT
1700.
Power
Button