S P T 1 7 0 0 S e r i e s
S P T 1 7 0 0 S e r i e s 1999 SYMBOL TECHNOLOGIES, INC. All rights reserved. Symbol reserves the right to make changes to any product to improve reliability, function, or design. Symbol does not assume any product liability arising out of, or in connection with, the application or use of any product, circuit, or application described herein.
Q u i c k R e f e r e n c e Introduction Congratulations on your purchase of Symbol Technologies’ SPT 1700 Series Terminal! The unique combination of pocket size, Personal Information Management software, RF communication via Symbol’s Spectrum24® wireless network, printing support and scanning capability make this product superior for use in a wide range of applications. About This Guide This guide covers the procedures for the basic set up and use of the terminal.
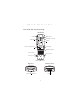
S P T 1 7 0 0 S e r i e s Parts of the SPT 1700 The following illustration indicates each part of the SPT 1700 Terminal.
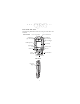
Q u i c k R e f e r e n c e Parts of the SPT 1700 (continued) Back View Stylus Infrared Port Handstrap Connector Stylus Silo Speaker Reset Button Battery Compartment Lithium-Ion Battery Battery Latch Battery Latch Battery Cover Handstrap Connector Bottom View Top View Scanner Exit Window Serial Port 3
S P T 1 7 0 0 S e r i e s Getting Started with the SPT 1700 Before you can use your SPT 1700, perform the basic set up procedures covered on the following pages. Specifically: • • • Charge and Install the Battery Start the SPT 1700 Initiate the Spectrum24 network connection (SPT 1740 only). Charging the Battery Before using your SPT 1700 for the first time, charge and install the lithium-ion battery.
Q u i c k R e f e r e n c e 3. Insert the SPT 1700 terminal in the cradle as shown: The terminal’s battery is fully charged after approximately two hours. You can also charge a terminal’s spare battery by inserting it in the spare battery charging slot on the back of the cradle. Once inserted, the spare battery will be fully charged after approximately two hours. See the SPT 1700 Cradle Quick Reference Guide (p/n 70-37840-xx) for more information.
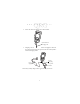
S P T 1 7 0 0 S e r i e s 2. Insert the cable into the bottom of the terminal. Synchronization/ Charging Cable 3. Plug the power cable into a wall outlet and plug the other end into the battery charging receptacle on the side of the Synchronization/Charging Cable. Battery Charging Receptacle Power Supply Serial Cable The battery is fully charged after approximately two hours.
Q u i c k R e f e r e n c e Installing the Battery To install the battery in your SPT 1700: 1. Open the latches on the battery cover and lift it away from the SPT 1700. Latch Latch 2. Insert the lithium-ion battery in the battery compartment, making sure it snaps into place. 3. Replace the battery cover and re-secure the latches. Note: Be careful to position the battery latches completely open while securing the battery cover on the terminal.
S P T 1 7 0 0 S e r i e s Starting the SPT 1700 After charging and installing the battery, start the terminal by pressing the red power button. If the terminal does not power on, perform a hard reset by following the instructions on page 14. Calibrating the Screen The first time you start your SPT 1700, the calibration screen appears. Follow the steps in this section to align the internal circuitry of your SPT 1700 with its touch-sensitive screen.
Q u i c k R e f e r e n c e 3. Tap the exact center of each target that appears on the screen with the tip of the stylus. If, at any time, you need to recalibrate the digitizer, open the Preferences application, tap on the top right corner of the screen, and select the digitizer option from the pull down menu. Using the SPT 1700 Using the Power Button/Backlight Control The power button turns the SPT 1700 on and off. This button also serves as your backlight control for low-light conditions.
S P T 1 7 0 0 S e r i e s Using the Contrast Control The contrast control button is located on the lower right-hand side of the terminal. Contrast Control To adjust the contrast: 1. Press the contrast control button, which displays the contrast adjusting bar on the terminal’s screen. 2. Using your stylus, adjust the contrast by scrolling the contrast bar until the contrast is set to the desired level, or use either of the scroll buttons on the top of the terminal to adjust the contrast level. 3.
Q u i c k R e f e r e n c e Using the Onscreen Keyboard You can activate the on-screen keyboard any time you need to enter text or numbers on your SPT 1700. Note that you cannot enter Graffiti characters while using the on-screen keyboard. To use the on-screen keyboard: 1. Open any SPT 1700 application. 2. Tap any record name, or tap the New button with the tip of the stylus. 3. Tap the left target to open the Alpha keyboard, or tap the right target to open the Numeric keyboard.
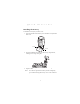
S P T 1 7 0 0 S e r i e s Scanning with the SPT 1700 The SPT 1700 has an integrated laser bar code scanner which, if your unit has been configured to use scanning input, allows you to collect data by scanning bar codes. To scan bar codes with the SPT 1700: 1. Start your scanning application. 1. Aim the scanner at the bar code. 2. Press either the right, left or center scan trigger. Make sure the red scan beam covers the entire bar code.
Q u i c k R e f e r e n c e Initiate the Spectrum24 Network Connection Before the SPT 1740 can be used, the Spectrum24 network must be properly set up. For information about configuring the SPT 1740 terminal for use in a Spectrum24 environment, please refer to the SPT 1700 Series Product Reference Guide, part number 70-37544xx. Resetting Your SPT 1700 Terminal Under normal circumstances, you will never have to use the reset button.
S P T 1 7 0 0 S e r i e s Performing a Hard Reset A hard reset tells your SPT 1700 terminal to start over again and erase all records and entries stored in your SPT 1700 terminal. Therefore, never perform a hard reset unless a soft reset does not solve your problem. Note: You can restore any data previously synchronized with your computer during the next HotSync operation. To perform a hard reset: 1. Remove the battery cover. 2. Hold down the power button on the front of the SPT 1700 terminal. 3.
Q u i c k R e f e r e n c e Attaching the Handstrap The SPT 1700 has an optional handstrap which increases comfort when holding the terminal for extended periods of time. To attach the handstrap to the back of the terminal: 1. Thread the round metal piece through the metal handstrap connection on the back of the terminal. 2. Slide the flat metal piece into the handstrap connection on the bottom of the terminal.
S P T 1 7 0 0 S e r i e s Maintaining the SPT 1700 Your SPT 1700 is designed to be reliable and to provide years of trouble-free service. However, you should observe the following general tips when using your SPT 1700: • • • • • • Take care not to scratch the screen of your SPT 1700. When working with your SPT 1700, use the supplied stylus or plastic-tipped pens intended for use with a touch-sensitive screen.
Q u i c k R e f e r e n c e Troubleshooting SPT 1700 terminal does not turn on: • • • Adjust the contrast control. Make sure the battery is fully charged and installed properly. Replace the battery. If your SPT 1700 terminal still does not operate, try a soft reset; see Resetting Your SPT 1700. Low battery warning after replacing the battery: • The battery warning message may appear immediately after replacing the battery.
S P T • • • 1 7 0 0 S e r i e s Make the Graffiti character strokes in the Graffiti writing area — not on the display part of the screen. Make sure you are writing the strokes for letters in the lefthand side, and the strokes for numbers in the right-hand side of the Graffiti writing area. Make sure that Graffiti is not shifted into extended or punctuation modes. See the SPT 1700 Product Reference Guide for information about shifting into and out of punctuation modes.
Q u i c k R e f e r e n c e • Be sure the unit is programmed to accept the type of bar code you are scanning. • If you are expecting a beep on a good decode and don’t hear one, check that the application is set to generate a beep on good decode. • If the scanner stops emitting a laser beam when you press the trigger, check your battery level. When the battery is low, the scanner shuts off before the terminal notifies you of the low battery condition.
S P T 1 7 0 0 S e r i e s Service Information Before you use the unit, it must be configured to operate in your facility’s network and run your applications. If you have a problem running your unit or using your equipment, contact your facility’s Technical or Systems Support.
Q u i c k R e f e r e n c e Warranty Coverage and Procedure During the warranty period, Symbol will repair or replace defective products returned to Symbol’s manufacturing plant in the US. For warranty service in North America, call the Symbol Support Center at 1-800-659-2240. International customers should contact the local Symbol office or support center. If warranty service is required, Symbol will issue a Return Material Authorization Number.
S P T • • • • • • • • 1 7 0 0 S e r i e s Keep objects that are used frequently within easy reach Perform tasks at correct heights Reduce or eliminate vibration Reduce or eliminate direct pressure Provide adjustable workstations Provide adequate clearance Provide a suitable working environment Improve work procedures.
Q u i c k R e f e r e n c e • Low Voltage Directive 73/23/EEC Applicable Standards • EN 55 022 - Limits and Methods of Measurement of Radio Interference Characteristics of Information technology Equipment • EN 50 082-1:1997 - Electromagnetic Compatibility - Generic Immunity Standard, Part 1: Residential, commercial, Light Industry • IEC 1000-4-2(1995-01) - Electromagnetic compatibility (EMC) - Part 4:Testing and measurement techniques - Section 2: Electrostatic discharge immunity test.
S P T 1 7 0 0 Scanner Labeling 24 S e r i e s
Q u i c k R e f e r e n c e In accordance with Clause 5, IEC 0825 and EN60825, the following information is provided to the user: ENGLISH CLASS 1 CLASS 2 DANISH KLASSE 1 KLASSE 2 DUTCH KLASSE 1 KLASSE 2 FINNISH LUOKKA 1 LUOKKA 2 FRENCH CLASSE 1 CLASSE 2 GERMAN KLASSE 1 KLASSE 2 HEBREW CLASS 1 LASER PRODUCT LASER LIGHT DO NOT STARE INTO BEAM CLASS 2 LASER PRODUCT KLASSE 1 LASERPRODUKT LASERLYF SE IKKE IND I STRÅLEN KLASSE 2 LASERPRODUKT AL LASER DI CLASSE 2 ITALIAN CLASSE 1 CLASSE 2 KLASSE-1 LASER
For Frequently Asked Questions and tips on SPT 1700 operation, please visit the Symbol Palm website at http://www.symbol.com/palm. 70-37543-01 Revision B—June 1999 Symbol Technologies, Inc.