6598801a.
6598801a.fm Page 0 Monday, December 8, 2003 2:01 PM w 2 i 0 P D t h 0 3 T 8 W f i o 1 n r 0 d 0 o P S w o s c e r i e s M o b i l k e t P C e s © 2002 - 2003 SYMBOL TECHNOLOGIES, INC. All rights reserved. Symbol reserves the right to make changes to any product to improve reliability, function, or design. Symbol does not assume any product liability arising out of, or in connection with, the application or use of any product, circuit, or application described herein.
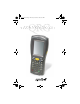
6598801a.fm Page 1 Monday, December 8, 2003 2:01 PM Q u i c k R e f e r e n c e Introduction Congratulations on purchasing a Symbol Technologies’ PDT 8100 Series Terminal with Windows® Mobile 2003 Software for Pocket PCs! Its unique combination of features make this product superior for use in a wide range of applications.
6598801a.
6598801a.
598801a.
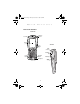
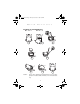
6598801a.fm Page 5 Monday, December 8, 2003 2:01 PM Q u i c k R e f e r e n c e Parts of the Terminal (continued) TOP VIEW Exit Window (terminals with scanner/imager) 15-Pin Serial Port (terminals without scanner) BOTTOM VIEW Serial port Getting Started Before you can use your terminal, perform these basic setup procedures: • Insert the Compact Flash card (optional). • Install and charge the battery. • Start the terminal. • Initiate the network connection (PDT 814x only).
6598801a.fm Page 6 Monday, December 8, 2003 2:01 PM w 2 i 0 P D t h 0 3 T 8 W f i o 1 n r 0 d 0 o P S w o s c e r i e s M o b i l k e t P C e s 2. Remove the flash card cover at the top of the battery compartment by pulling the top out, and lifting the cover up. 3. Insert the flash card into the compartment with the pins facing forward, and the main label facing down. It only fits one way. The two metal tabs on the locking mechanism will prevent you from pushing the card all the way in.
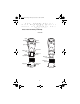
6598801a.fm Page 7 Monday, December 8, 2003 2:01 PM Q u i c k R e f e r e n c e Installing the 1950 mAh Battery 1 5 4 6 Caution: 3 2 7 8 Do not expose the battery to temperatures in excess of 140°F (60°C). Do not disassemble, incinerate, or short circuit the battery.
6598801a.fm Page 8 Monday, December 8, 2003 2:01 PM w 2 i 0 P D t h 0 3 T 8 W f i o 1 n r 0 d 0 o P S w o s c e r i e s M o b i l k e t P C e s Charging the Battery Charging the Main Battery and Memory Backup Battery for the First Time Before using your terminal for the first time, charge the lithium-ion battery in the terminal for a minimum of 12 hours, with the terminal off. Charge the battery using the Serial/Charging Cable or the appropriate cradle.
6598801a.fm Page 9 Monday, December 8, 2003 2:01 PM Q u i c k R e f e r e n c e Charging the Battery Using the Serial/Charging Cable 1. Insert the battery charging receptacle into the bottom of the terminal. 2. Plug the power cable into a wall outlet. 3. Plug the other end of the power cable into the battery charging receptacle.
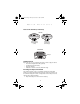
6598801a.fm Page 10 Monday, December 8, 2003 2:01 PM w 2 i 0 P D t h 0 3 T 8 W f i o 1 n r 0 d 0 o P S w o s c e r i e s M o b i l k e t P C e s Attaching the Handstrap 1 3 2 Starting the Terminal Press the red Power button to turn the terminal on and off. Power button As the terminal initializes its Flash File System, the Symbol splash screen displays for about 30 seconds. When the Welcome screen appears, tap anywhere on the screen to continue to the Align screen.
6598801a.fm Page 11 Monday, December 8, 2003 2:01 PM Q u i c k R e f e r e n c e Aligning the Screen To align your terminal so the cursor on the touch screen aligns with the tip of your stylus: 1. Remove the stylus from its storage silo on the back of the terminal. 2. Tap the center of each target that appears on the screen with the tip of the stylus. Tap the target firmly and accurately at each location on the screen. The target will continue to move until the screen is aligned. 3.
6598801a.
6598801a.fm Page 13 Monday, December 8, 2003 2:01 PM Q u i c k R e f e r e n c e Using the Keyboard Note: Key functions can be changed by an application. Your keyboard may not function exactly as described. For more detailed keyboard information, refer to the PDT 8100 Series with Windows Mobile 2003 Software for Pocket PCs Product Reference Guide.
6598801a.fm Page 14 Monday, December 8, 2003 2:01 PM w 2 i 0 P D t h 0 3 T 8 W f i o 1 n r 0 d 0 o P S w o Key s c e r i e s M o b i l k e t P C e s Action Note: 1. Press Func, then another key to produce the value or function above that key. See individual key descriptions in this table for additional Function key usage. 2.Press Func + Ctrl + Clear to close applications. Alpha Press Alpha to toggle between alpha and numeric mode.
6598801a.fm Page 15 Monday, December 8, 2003 2:01 PM Q u i c k R e f e r e n c e Using the 37-Key Keyboard The 37-key keyboard uses an alphanumeric keypad that produces the 26character alphabet (A-Z), numbers (0-9), and assorted characters. The keyboard is color-coded to indicate which modifier key (Alpha-Numeric, Func) to press to produce a particular character or action. The keyboard default is numeric, producing the gray number or white character on that key.
6598801a.fm Page 16 Monday, December 8, 2003 2:01 PM w 2 i 0 P D t h 0 3 T 8 W f i o 1 n r 0 d 0 o P S w o Key s c e r i e s M o b i l k e t P C e s Action Note: 1. Press Func, then another key to produce the value or function above that key. See individual key descriptions in this table for additional Function key usage. 2.Press Func + Ctrl + Clear to close applications. Alpha Press Alpha to toggle between alpha and numeric mode.
6598801a.fm Page 17 Monday, December 8, 2003 2:01 PM Q u i c k R e f e r e n c e Using the 47-Key Keyboard The 47-key keyboard uses an alphanumeric keypad that produces the 26character alphabet (A-Z), numbers (0-9), and assorted characters. The keyboard is color-coded to indicate which modifier key (Alpha-Numeric, Func) to press to produce a particular character or action. The keyboard default is the key value, producing the gray number or lower case yellow letter on that key.
6598801a.fm Page 18 Monday, December 8, 2003 2:01 PM w 2 i 0 P D t h 0 3 T 8 W f i o 1 n r 0 d 0 o P S w o Key s c e r i e s M o b i l k e t P C e s Action Note: 1. Press Func, then another key to produce the value or function above that key. See individual key descriptions in this table for additional Function key usage. 2.Press Func + Ctrl + Clear to close applications. Backlight See Controlling the Backlight on page 11.
6598801a.fm Page 19 Monday, December 8, 2003 2:01 PM Q u i c k R e f e r e n c e Using the Stylus Use the stylus as a mouse to select items and enter information. • Tap: Touch the screen once with the stylus to open items and select options. • Drag: Hold the stylus on the screen and drag across the screen to select text and images. Drag in a list to select multiple items. • Tap-and-hold: Tap and hold the stylus on an item to see a list of actions available for that item.
6598801a.fm Page 20 Monday, December 8, 2003 2:01 PM w 2 i 0 P D t h 0 3 T 8 W f i o 1 n r 0 0 d o P S w o s c e r i e s M o b i l k e t P C e s Navigation Bar and Command Bar The navigation bar at the top of the screen displays the active program and current time, and allows you to select programs and close screens. The command bar at the bottom of the screen contains menus and buttons to perform tasks in programs.
6598801a.fm Page 21 Monday, December 8, 2003 2:01 PM Q u i c k R e f e r e n c e To show or hide the input panel, tap the Input Panel button. Tap the arrow next to this button to view input methods. Select input method settings Select an input method Tap to see your choices Input Panel button When you use the input panel, your terminal anticipates the word you are typing or writing and displays it above the input panel.
6598801a.fm Page 22 Monday, December 8, 2003 2:01 PM w 2 i 0 P D t h 0 3 T 8 W f i o 1 n r 0 d 0 o P S w o s c e r i e s M o b i l k e t P C e s When you write a letter, it is converted to typed text on the screen. For instructions on entering Block Recognizer characters, with Block Recognizer open, tap the question mark next to the writing area, or see Block Recognizer Characters on page 22. Using the Letter Recognizer 1.
6598801a.fm Page 23 Monday, December 8, 2003 2:01 PM Q u i c k R e f e r e n c e Scanning Terminals with an integrated laser scanner allow you to collect data by scanning 1-dimensional bar codes. Terminals with an integrated imager allow you to collect data by scanning 1-dimensional bar codes (including RSS) and 2-dimensional bar codes (including PDF417 and DataMatrix). Note: Additional Symbologies for imager scanning will be supported in the near future.
6598801a.fm Page 24 Monday, December 8, 2003 2:01 PM w 2 P D t h 0 3 i 0 T 8 W f i o 1 n r 0 d 0 o P S w o s c e r i e s M o b i l k e t P C e s 2. Press either the right, left, or center scan trigger. (Center scan triggers vary with keypad types.) - For terminals with a laser scanner, ensure the red scan beam covers the entire bar code. The green scan LED lights and a beep sounds to indicate a successful decode.
6598801a.fm Page 25 Monday, December 8, 2003 2:01 PM Q u i c k R e f e r e n c e Resetting Your Terminal If your terminal stops responding to input, reset it. Performing a Soft Reset A soft reset restarts the terminal and saves all stored records and entries. To perform a soft reset press and hold the Power button (for approximately five seconds) and release it as soon as the screen changes and the terminal begins to reboot. Caution: Files that remain open during a soft reset may not be retained.
6598801a.fm Page 26 Monday, December 8, 2003 2:01 PM w 2 i 0 P D t h 0 3 T 8 W f i o 1 n r 0 d 0 o P S w o s c e r i e s M o b i l k e t P C e s To perform a hard reset on the terminal: 1. Remove the battery cover. 2. While holding down the Function key, use the stylus (or similar object without a sharp tip) to gently press the reset button. Func Key (37-key keyboard pictured) Reset Button 3. Replace the battery cover and press the Power button. 4.
6598801a.fm Page 27 Monday, December 8, 2003 2:01 PM Q u i c k R e f e r e n c e Using the Cradle To communicate through the cradle: 1. Ensure all connections between the cradle and the host computer are secure. Refer to the Quick Reference Guide that shipped with your cradle for instructions on setting up the cradle. 2. Power on the host computer, the cradle, and the terminal. 3. Insert the terminal into the cradle. 4. Begin host communications as specified by your application.
6598801a.fm Page 28 Monday, December 8, 2003 2:01 PM w 2 i 0 • P D t h 0 3 T 8 W f i o 1 n r 0 d 0 o P S w o s c e r i e s M o b i l k e t P C e s If the surface of the terminal screen becomes soiled, clean it with a soft cloth moistened with a diluted window-cleaning solution. Troubleshooting Problem Cause Terminal does not turn on. Lithium-ion battery not charged. Charge or replace the lithium-ion battery in the terminal. Lithium-ion battery not installed properly.
6598801a.fm Page 29 Monday, December 8, 2003 2:01 PM Q u i c k Problem Fail to communicate with IrDA printer. During data communication, no data was transmitted, or transmitted data was incomplete. No sound is audible. R e f e r e n c e Cause Solution Distance from printer is more than 1 meter (39 inches). Bring the terminal closer to the printer and attempt communications again. Obstruction interfered with communication. Check the path to ensure no objects were in the way.
6598801a.fm Page 30 Monday, December 8, 2003 2:01 PM w 2 i 0 P D t h 0 3 Problem Terminal turns itself off. T 8 W f i o 1 n r 0 d 0 o P S w o Cause s c e r i e s M o b i l k e t P C e s Solution Terminal is inactive. Your terminal turns off after a period of inactivity. If the terminal is running on battery power, this period can be set from 1 to 5 minutes, in one-minute intervals. If the terminal is running on external power, this period can be set to 1, 2, 5, 10, 15, and 30 minutes.
6598801a.fm Page 31 Monday, December 8, 2003 2:01 PM Q u i c k Problem Tapping the screen buttons or icons does not activate the corresponding feature. A message appears stating that your terminal memory is full. Beamed data does not transmit. R e f e r e n c e Cause Solution Lower- case and upper-case letters, and numbers written on the wrong parts of the LCD screen. Ensure you are writing letters and numbers in the appropriate section of the writing area. LCD screen not aligned correctly.
6598801a.fm Page 32 Monday, December 8, 2003 2:01 PM w 2 i 0 P D t h 0 3 T 8 W f i o 1 n r 0 d 0 o P S w o s c e r i e s M o b i l k e t P C e s Problem Cause Solution When receiving beamed data an out of memory message appears. Not enough free memory available for receiving data. Your terminal requires at least twice the amount of memory available as the data you are receiving. For example, if you are receiving a 30K application, you must have at least 60K free.
6598801a.fm Page 33 Monday, December 8, 2003 2:01 PM Q u i c k Problem R e f e r e n c e Cause Solution Terminals with an integrated imager: The terminal does not save images. The still Image Capture program is not enabled. Enable Image Capture. The still Image Capture program is application dependent. To enable the ImageDemo application, select ImageDemo from the Start menu. Tap the Snap button (in Capture mode) or press the scan trigger to enable the ImageDemo.
6598801a.fm Page 34 Monday, December 8, 2003 2:01 PM w 2 i 0 P D t h 0 3 T 8 W f i o 1 n r 0 d 0 o P S w o s c e r i e s M o b i l k e t P C e s End-user License Agreement • You have acquired a device (“DEVICE”) that includes software licensed by Symbol from Microsoft Licensing Inc. or its affiliates (“MS”).
6598801a.fm Page 35 Monday, December 8, 2003 2:01 PM Q u i c k R e f e r e n c e notify you that a DRM Upgrade is required and then ask for your consent before the DRM Upgrade is downloaded. Third party DRM Software may do the same. If you decline the upgrade, you will not be able to access content that requires the DRM Upgrade; however, you will still be able to access unprotected content and Secure Content that does not require the upgrade. DESCRIPTION OF OTHER RIGHTS AND LIMITATIONS.
6598801a.fm Page 36 Monday, December 8, 2003 2:01 PM w 2 i 0 P D t h 0 3 T 8 W f i o 1 n r 0 d 0 o P S w o s c e r i e s M o b i l k e t P C e s copy of such DEVICE Software onto the DEVICE as a replacement copy for the existing DEVICE Software, and use it in accordance with this EULA. • COMPANION CD.
6598801a.fm Page 37 Monday, December 8, 2003 2:01 PM Q u i c k R e f e r e n c e Battery Information Symbol rechargeable battery packs are designed and constructed to the highest standards within the industry. However, there are limitations to how long your battery can operate or be stored before needing replacement. Many factors affect the actual life cycle of your battery pack, such as heat, cold, harsh environmental conditions and severe drops.
6598801a.fm Page 38 Monday, December 8, 2003 2:01 PM w 2 i 0 P D t h 0 3 T 8 W f i o 1 n r 0 d 0 o P S w o s c e r i e s M o b i l k e t P C e s Radio Modules The PDT 8100 series terminals may contain an approved radio module. These modules are identified below.
6598801a.
6598801a.
6598801a.fm Page 41 Monday, December 8, 2003 2:01 PM Q u i c k R e f e r e n c e Cell Phone/Terminal Warnings Safety on the Road When driving a car, driving is your first responsibility. Check the laws and regulations on the use of wireless phones in the areas where you drive. Always obey them. When using your wireless device / phone behind the wheel of a car, practice good common sense and remember the following tips: 1. Give full attention to driving -- driving safely is your first responsibility; 2.
6598801a.fm Page 42 Monday, December 8, 2003 2:01 PM w 2 i 0 1. 2. 3. P D t h 0 3 T 8 W f i o 1 n r 0 d 0 o P S w o s c e r i e s M o b i l k e t P C e s An air bag inflates with great force. DO NOT place objects, including either installed or portable wireless equipment, in the area over the air bag or in the air bag deployment area. If in-vehicle wireless equipment is improperly installed and the air bag inflates, serious injury could result. Position your device within easy reach.
6598801a.fm Page 43 Monday, December 8, 2003 2:01 PM Q u i c k R e f e r e n c e Hearing Aid Compatibility This device is marked HAC showing compliance with the applicable requirements of FCC Part 68 and CS03-Part 5. Radio Frequency Interference Requirements-FCC Note: This equipment has been tested and found to comply with the limits for a Class B digital device, pursuant to Part 15 of the FCC rules.
6598801a.fm Page 44 Monday, December 8, 2003 2:01 PM w 2 i 0 P D t h 0 3 T 8 W f i o 1 n r 0 d 0 o P S w o s c e r i e s M o b i l k e t P C e s Marking and European Economic Area (EEA) The use of 2.4GHz RLAN’s, for use through the EEA, have the following restrictions: • Maximum radiated transmit power of 100 mW EIRP in the frequency range 2.400 -2.4835 GHz • France, equipment is restricted to 2.4465 -2.4835 GHz frequency range • Belgium outside usage, the equipment is restricted to 2.
6598801a.fm Page 45 Monday, December 8, 2003 2:01 PM Q u i c k R e f e r e n c e Warranty (A) Warranty Symbol Technologies (hereafter “Seller”) hardware Products are warranted against defects in workmanship and materials for a period of twelve (12) months from the date of shipment, unless otherwise provided by Seller in writing, provided the Product remains unmodified and is operated under normal and proper conditions.
6598801a.fm Page 46 Monday, December 8, 2003 2:01 PM Service Information Before you use the unit, it must be configured to operate in your facility’s network and run your applications. If you have a problem running your unit or using your equipment, contact your facility’s Technical or Systems Support.