P P T 2 8 0 0 S e Pocket PC r i e s
P P T 2 8 0 0 S e r i e s 2001 SYMBOL TECHNOLOGIES, INC. All rights reserved. Symbol reserves the right to make changes to any product to improve reliability, function, or design. Symbol does not assume any product liability arising out of, or in connection with, the application or use of any product, circuit, or application described herein.
Q u i c k R e f e r e n c e Introduction Congratulations on your purchase of Symbol Technologies’ PPT 2800 Terminal! Its unique combination of features make this product superior for use in a wide range of applications. These features include: • • • • • • Pocket size Personal Information Management software Microsoft® Windows® Pocket PC operating system RF communication via Symbol’s Spectrum24 wireless network or a wide area network (WAN) Printing support 1-dimensional scanning capability.
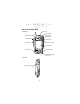
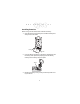
P P T 2 8 0 0 S e r i e s Parts of the PPT 2800 Front View Scan LED Scan Trigger WAN Antenna APP5 Button (Start Menu) Scroll Button Scroll Button Action Button Right Scan Trigger LCD (Screen) Power Button Function Button Application Buttons 1 through 4 Left View Left Scan Trigger 2
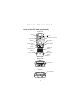
Q u i c k R e f e r e n c e Parts of the PPT 2800 (continued) Back View Stylus IR Port Handstrap Connector Stylus Silo Microphone Speaker Battery Cover Switch Reset Button Battery Compartment Lithium Ion Battery Battery Door Latch Battery Door Latch Battery Door Bottom View Serial Port Top View Scan Window 3
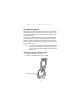
P P T 2 8 0 0 S e r i e s Installing Batteries Before using your PPT 2800, install a lithium-ion battery: 1. Open the latches on the battery door and lift the battery door away from the PPT 2800. Latch Latch 2. Insert the lithium-ion battery in the battery compartment with the battery tether positioned properly (as shown below), making sure the battery snaps into place. Tether 3. Replace the battery cover, pressing down firmly while securing the latches.
Q u i c k R e f e r e n c e Charging the Battery Before using your PPT 2800 for the first time, charge the lithiumion battery in the terminal for about 2 1/2 hours, using the cradle or the synchronization cable. Follow these same procedures to recharge the battery. Your terminal is equipped with a memory backup battery which automatically charges from the fully-charged lithium-ion battery.
P P T 2 8 0 0 S e r i e s 3. The Terminal Charge LED turns red (may take up to one minute) to indicate charging, then green when the battery is fully charged. The terminal’s battery is fully charged after approximately 2 1/2 hours. Charging a Spare Battery To recharge a terminal’s spare battery, insert it in the spare battery charging slot in the back of the cradle, oriented so the contacts are facing down and toward the back of the cradle. Press the battery down into the slot until firmly seated.
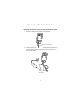
Q u i c k R e f e r e n c e Charging the Battery Using the Synchronization Cable 1. Insert the cable into the bottom of the terminal. Synchronization Cable 2. Plug the power cable into a wall outlet and plug the other end into the battery charging receptacle on the side of the synchronization cable.
P P T 2 8 0 0 S e r i e s Starting the PPT 2800 Press the red power button to start the terminal. If the terminal does not power on, perform a hard reset. See Performing a Hard Reset on page 17. Power Button As the terminal initializes its unique Flash File system, the Symbol splash screen displays for about a minute. When the Welcome screen appears, tap anywhere on the screen to continue to the Align screen. Note that these screens also appear every time you perform a hard reset.
Q u i c k R e f e r e n c e 3. Tap the center of each target that appears on the screen with the tip of the stylus. Tap the target firmly and accurately at each location on the screen. The target will continue to move until the screen is aligned. 4. Follow the directions on the screen which explain how to use the stylus and pop-up menus, and allow you to set your city and time zone.
P P T 2 8 0 0 S e r i e s To adjust the contrast: 1. Press and hold the Function button. 2. Press the “up” scroll button at the top of the terminal to darken the screen, or the “down” scroll button to lighten the screen. To turn the backlight on or off: 1. Press and hold the Function button. 2. Press any application button. Using the Stylus The stylus selects items and enters information. The stylus functions as a mouse.
Q u i c k R e f e r e n c e Today Screen When you turn on your terminal for the first time each day (or after 4 hours of inactivity), the Today screen appears. You can also display it by tapping , then Today. On the Today screen, you can see important information for the day.
P P T 2 8 0 0 S e r i e s Navigation Bar and Command Bar The navigation bar at the top of the screen displays the active program and current time, and allows you to switch to programs and close screens. The command bar at the bottom of the screen contains menus and buttons to perform tasks in programs.
Q u i c k R e f e r e n c e Input Methods Enter information in any program by typing with the soft keyboard or writing using Character Recognizer. The Character Recognizer input panel is divided into three writing areas. Letters written in the left area (labeled ABC) create uppercase letters and letters written in the middle area (labeled abc) create lowercase letters. The right area (labeled 123) is for writing numbers, symbols, special characters, and punctuation.
P P T 2 8 0 0 S e r i e s Recognizer and for demos of all characters, tap on the Character Recognizer input panel.
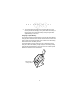
Q u i c k R e f e r e n c e Scanning with the PPT 2800 The PPT 2800 has an integrated scanner which collects data by scanning bar codes. See the PPT 2800 Product Reference Guide for information on configuring your terminal for scanning. To scan bar codes with the PPT 2800: 1. Aim the scanner at the bar code. 2. Press either the right, left, or center scan trigger. Make sure the red scan beam covers the entire bar code. The green scan LED lights and a beep sounds to indicate a successful decode.
P P T 2 8 0 0 S e r i e s Resetting Your PPT 2800 Terminal If your PPT 2800 terminal stops responding to input, reset it. Performing a Soft Reset A soft reset restarts the terminal and saves all stored records and entries. Caution: Files that remain open during a soft reset may not be retained. Caution: DO NOT perform a soft reset if the terminal is suspended. Press the Power button to wake the terminal.
Q u i c k R e f e r e n c e Performing a Hard Reset A hard reset also restarts your PPT 2800 terminal, but erases all stored records and entries. Therefore, never perform a hard reset unless a soft reset does not solve your problem. Note: You can restore any data previously synchronized with your computer during the next ActiveSync operation. See the PPT 2800 Cradle Quick Reference Guide or the PPT 2800 Product Reference Guide. To perform a hard reset: 1. Remove the battery cover. 2.
P P T 2 8 0 0 S e r i e s Maintaining the PPT 2800 For trouble-free service, observe the following tips when using your PPT 2800: • • • • • • Do not scratch the screen. Use the supplied stylus or plastictipped pens intended for use with a touch-sensitive screen. Never use a pen or pencil or other sharp object on the screen. Although your PPT 2800 is water and dust resistant, do not expose it to rain or moisture for an extended period of time.
Q u i c k R e f e r e n c e sure the volume is not turned down. PPT 2800 terminal turns itself off: • Your PPT 2800 terminal turns off after a period of inactivity. This period can be set from one to five minutes, in oneminute intervals. Check the Power dialog box (in the System tab under Start/Settings), and change the setting if you need a longer delay before the automatic shutoff feature activates.
P P T • 2 8 0 0 S e r i e s If you have installed additional applications on your PPT 2800 terminal, remove them to recover memory. Select Start, then Settings, and select the System tab. Tap Remove Programs, select the unused program and tap Remove. Beamed data does not transmit: • • Confirm that the PPT 2800 terminals are 5” apart, and there is a clear path between the two devices. Adjust the room lighting or move to a different location.
Q u i c k R e f e r e n c e MICROSOFT WINDOWS FOR POCKET PC DATA EXCHANGE COMPONENT: MICROSOFT ACTIVESYNC, VERSION 3.1 IMPORTANT-READ CAREFULLY: This End-User License Agreement (“EULA”) is a legal agreement between you (either an individual or a single entity) and the manufacturer (“Manufacturer”) of the special purpose computing device (“SYSTEM”) with which you acquired the Microsoft software product(s) identified above (“SOFTWARE”).
P P T 2 8 0 0 S e r i e s Microsoft Outlook 2000 on one (1) computer to use, exchange data, share data, access, and interact with the SYSTEM, and (ii) the EULA is between Manufacturer (as defined above) and the end user-not between the PC Manufacturer and end user. 2. DESCRIPTION OF OTHER RIGHTS AND LIMITATIONS. • Speech/Handwriting Recognition.
Q u i c k R e f e r e n c e ware onto the SYSTEM as a replacement copy for the existing SYSTEM Software and use it in accordance with Section 1 of this EULA. • Desktop Software.
P P T 2 8 0 0 S e r i e s refer to the address provided in the documentation for the SYSTEM. FOR THE LIMITED WARRANTIES AND SPECIAL PROVISIONS PERTAINING TO YOUR PARTICULAR JURISDICTION, PLEASE REFERTO YOUR WARRANTY BOOKLET INCLUDED WITH THIS PACKAGE OR PROVIDED WITH THE SOFTWARE PRINTED MATERIALS.
Q u i c k R e f e r e n c e CE Marking and European Union Compliance Products intended for sale within the European Union are marked with the CE Mark which indicates compliance to applicable Directives and European Normes (EN), as follows.
P P T 2 8 0 0 S e r i e s Technologies equipment not expressly approved by Symbol Technologies could void the user’s authority to operate the equipment. The Spectrum24 equipment is intended for use throughout the European Economic Area, but it’s authorization for use in France is restricted as follows: • PAN European Frequency Range: 2.400 - 2.4835 GHz, identified by -EU suffix to the model number found on the product label. • France - Restrict Frequency Range for use in France: 2.447 - 2.
Q u i c k R e f e r e n c e Laser Devices Symbol products using lasers comply with US 21CFR1040.10, and IEC825-1:1993, EN60825-1:1994+A11:1996. The laser classification is marked on one of the labels on the product. Class 1 Laser devices are not considered to be hazardous when used for their intended purpose.
P P T 2 8 0 0 S e r i e s In accordance with Clause 5, IEC 0825 and EN60825, the following information is provided to the user: ENGLISH CLASS 1 CLASS 2 HEBREW CLASS 1 LASER PRODUCT LASER LIGHT DO NOT STARE INTO BEAM CLASS 2 LASER PRODUCT DANISH KLASSE 1 KLASSE 2 KLASSE 1 LASERPRODUKT LASERLYF SE IKKE IND I STRÅLEN KLASSE 2 LASERPRODUKT AL LASER DI CLASSE 2 DUTCH KLASSE 1 KLASSE-1 LASERPRODUKT KLASSE 2 LASERLICHT NIET IN STRAAL STAREN KLASSE-2 LASERPRODUKT ITALIAN CLASSE 1 CLASSE 2 FINNISH LUOKKA 1
Q u i c k R e f e r e n c e Battery Caution Caution: Danger of explosion if battery is incorrectly replaced. Replace only with the same or equivalent type recommended by the manufacturer. Dispose of used batteries according to the manufacturer's instructions.
P P T 2 8 0 0 S e r i e s DECLARATION OF CONFORMITY We, Symbol Technologies, Inc. of One Symbol Plaza, Holtsville, NY 11742-1300, USA declare under our sole responsibility that the product Spectrum24, LA3021, Type II Radio Card Spectrum24, LA302C, Type II Radio Card Spectrum24, LA302T, Type II Radio Card to which this declaration relates, is in conformity with the following standards and/or other normative documents.
Q u i c k R e f e r e n c e DECLARATION OF CONFORMITY We, Symbol Technologies, Inc. of One Symbol Plaza, Holtsville, NY 11742-1300, USA declare under our sole responsibility that the product Spectrum24HR, LA4111, Type II Radio Card Spectrum24HR, LA411T, Type II Radio Card to which this declaration relates, is in conformity with the following standards and/or other normative documents.
P P T 2 8 0 0 32 S e r i e s
Q u i c k R e f e r e n c e Warranty Symbol Technologies, Inc. (“Symbol”) manufactures its hardware products in accordance with industry-standard practices. Symbol warrants that for a period of twelve (12) months from date of shipment, products will be free from defects in materials and workmanship. This warranty is provided to the original owner only and is not transferable to any third party.
Service Information Before you use the unit, it must be configured to operate in your facility’s network and run your applications. If you have a problem running your unit or using your equipment, contact your facility’s Technical or Systems Support.