f P P o r T P o 2 c 8 k 0 e 0 t S P e C Pocket PC r 2 i e s 0 0 2
P P T 2 8 0 0 f o r P o c k e t S e r i e s P C 2 0 0 2 © 2001 SYMBOL TECHNOLOGIES, INC. All rights reserved. Symbol reserves the right to make changes to any product to improve reliability, function, or design. Symbol does not assume any product liability arising out of, or in connection with, the application or use of any product, circuit, or application described herein.
Q u i c k R e f e r e n c e Introduction Congratulations on your purchase of Symbol Technologies’ PPT 2800 Terminal! Its unique combination of features make this product superior for use in a wide range of applications.
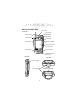
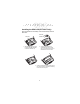
P P T 2 8 0 0 f o r P o c k e t S e r i e s P C 2 0 0 2 Parts of the PPT 2800 Scan LED Front View Scan Trigger WAN Antenna APP5 Button (Start Menu) Scroll Button Scroll Button Action Button Right Scan Trigger LCD (monochrome) TFT LCD (color) Power Button Function Button Application Buttons 1 through 4 Left View Top View Left Scan Trigger Top View Scan Window (2D Scanning Terminal) 2
Q u i c k R e f e r e n c e Parts of the PPT 2800 (continued) Antenna WANWAN Antenna Stylus Headset Connector Stylus Silo Infrared Port Handstrap Connector Battery Cover Switch Handstrap Connector Speaker Reset Button SIM Socket Battery Compartment Lithium-Ion Battery Battery Latches Battery Cover Handstrap Connectors Bottom View Serial Port 3
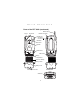
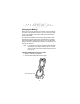
P P T 2 8 0 0 f o r P o c k e t S e r i e s P C 2 0 0 2 Installing the SIM Card (PPT 2837 Only) Open the latches on the battery cover and lift it away from the PPT 2837. SIM Card Contact Area Metal Clip 1. Slide the metal clip to the right to release the SIM cardholder, and lift the cardholder up. 2. Insert the card between the cardholder body and the metal clip; be sure the beveled corner of the SIM card is on the bottom. 3.
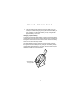
Q u i c k R e f e r e n c e Installing Batteries Before using your PPT 2800, install a lithium-ion battery: 1. Open the latches on the battery door and lift the battery door away from the PPT 2800. Latch Latch 2. Insert the lithium-ion battery in the battery compartment with the battery tether positioned properly (as shown below), making sure the battery snaps into place. Tether 3. Replace the battery cover by inserting the bottom first, then pressing the top in firmly while securing the latches.
P P T 2 8 0 0 f o r P o c k e t S e r i e s P C 2 0 0 2 Charging the Battery Before using your PPT 2800 for the first time, charge the lithiumion battery in the terminal for about 2 1/2 hours, using the cradle or the synchronization cable. Follow these same procedures to recharge the battery. Your terminal is equipped with a memory backup battery which automatically charges from the fully-charged lithium-ion battery.
Q u i c k R e f e r e n c e 3. The Terminal Charge LED turns red (may take up to one minute) to indicate charging, then green when the battery is fully charged. The terminal’s battery is fully charged after approximately 2 1/2 hours. Charging a Spare Battery To recharge a terminal’s spare battery, insert it in the spare battery charging slot in the back of the cradle, oriented so the contacts are facing down and toward the back of the cradle. Press the battery down into the slot until firmly seated.
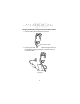
P P T 2 8 0 0 f o r P o c k e t S e r i e s P C 2 0 0 2 Charging the Battery Using the Synchronization Cable 1. Insert the cable into the bottom of the terminal. Synchronization Cable 2. Plug the power cable into a wall outlet and plug the other end into the battery charging receptacle on the side of the synchronization cable.
Q u i c k R e f e r e n c e Attaching the Handstrap The PPT 2800 has an optional handstrap which increases comfort when holding the terminal for extended periods of time. To attach the handstrap to the back of the terminal: 1. Thread the round metal piece through the metal handstrap connector on the back of the terminal. 2. Slide the flat metal piece into the handstrap connection on the bottom of the terminal.
P P T 2 8 0 0 f o r P o c k e t S e r i e s P C 2 0 0 2 Attaching the Wrist Strap An optional wrist strap is available from Symbol which helps prevent damage to the terminal if you drop it. To attach the wrist strap: 1. Thread the elastic band on the wrist strap through the metal handstrap connector on the back of the terminal. 2. Slip the strap through the elastic band on the other side of the connector, and pull it through to secure the strap to the connector.
Q u i c k R e f e r e n c e Starting the PPT 2800 Press the red power button to start the terminal. If the terminal does not power on, perform a hard reset. See Performing a Hard Reset on page 22. Power Button As the terminal initializes its unique Flash File system, the Symbol splash screen displays for about a minute. When the Welcome screen appears, tap anywhere on the screen to continue to the Align screen. Note that these screens also appear every time you perform a hard reset.
P P T 2 8 0 0 f o r P o c k e t S e r i e s P C 2 0 0 2 3. Tap the center of each target that appears on the screen with the tip of the stylus. Tap the target firmly and accurately at each location on the screen. The target will continue to move until the screen is aligned. 4. Follow the directions on the screen which explain how to use the stylus and pop-up menus, and allow you to set your city and time zone.
Q u i c k R e f e r e n c e To adjust the contrast (monochrome LCD) or backlight (color TFT LCD): 1. Press and hold the Function button. 2. Press the “up” scroll button at the top of the terminal to brighten the screen, or the “down” scroll button to darken the screen. To turn the backlight on or off: 1. Press and hold the Function button. 2. Press any application button. Using the Stylus The stylus selects items and enters information. The stylus functions as a mouse.
P P T 2 8 0 0 f o r P o c k e t S e r i e s P C 2 0 0 2 Today Screen When you turn on your terminal for the first time each day (or after 4 hours of inactivity), the Today screen appears. You can also display it by tapping , then Today. On the Today screen, you can see important information for the day.
Q u i c k R e f e r e n c e Navigation Bar and Command Bar The navigation bar at the top of the screen displays the active program and current time, and allows you to select programs and close screens. The command bar at the bottom of the screen contains menus and buttons to perform tasks in programs.
P P T 2 8 0 0 f o r P o c k e t S e r i e s P C 2 0 0 2 Input Methods Use the input panel to enter information in any program. You can either type using the soft keyboard or write using Block Recognizer, or the Letter Recognizer. In any case, the characters appear as typed text on the screen. To show or hide the input panel, tap the Input Panel button. Tap the arrow next to this button to view input methods.
Q u i c k R e f e r e n c e Using the Block Recognizer 1. Tap the arrow next to the Input Panel button, then Block Recognizer. 2. Write a letter in the left side of the box, or a number in the right side, using special character strokes. When you write a letter, it is converted to typed text on the screen. For instructions on entering Block Recognizer characters, with Block Recognizer open, tap the question mark next to the writing area, or see Block Recognizer Characters on page 18.
P P T 2 8 0 0 f o r P o c k e t S e r i e s P C 2 0 0 2 When you write a letter, it is converted to typed text on the screen. For instructions on using Letter Recognizer, with Letter Recognizer open, tap the question mark next to the writing area. Block Recognizer Characters The following chart is a partial display of the characters you can write while using the Block Recognizer (the dot on each character is the starting point for writing).
Q u i c k R e f e r e n c e Scanning with the PPT 2800 The PPT 2800 has an integrated scanner which collects data by scanning bar codes. See the PPT 2800 Series for Pocket PC 2002 Product Reference Guide for information on configuring your terminal for scanning. To scan bar codes with the PPT 2800: 1. Aim the scanner at the bar code. 2. Press either the right, left, or center scan trigger. Make sure the red scan beam covers the entire bar code.
P P T 2 8 0 0 f o r P o c k e t S e r i e s P C 2 0 0 2 4. The terminal indicates a successful scan by changing the LED from red to green, beeping one or more times, and/or displaying the bar code data on the screen. If the PDF417 symbol is too “tall” where the vertical scan pattern is not high enough to cover it, move the scan pattern slowly down toward the bottom of the symbol, keeping the beam horizontal to the rows, then slowly back up toward the top.
Q u i c k R e f e r e n c e Resetting Your PPT 2800 Terminal If your PPT 2800 terminal stops responding to input, reset it. Performing a Soft Reset A soft reset restarts the terminal and saves all stored records and entries. Caution: Files that remain open during a soft reset may not be retained. DO NOT perform a soft reset if the terminal is suspended. Press the Power button to wake the terminal. To perform a soft reset, hold down both the up and down scroll buttons, then press the App 4 button.
P P T 2 8 0 0 f o r P o c k e t S e r i e s P C 2 0 0 2 Performing a Hard Reset A hard reset also restarts your PPT 2800 terminal, but erases all stored records and entries. Therefore, never perform a hard reset unless a soft reset does not solve your problem. Note: You can restore any data previously synchronized with your computer during the next ActiveSync operation. See the PPT 2800 Cradle Quick Reference Guide or the PPT 2800 Series for Pocket PC 2002 Product Reference Guide.
Q u i c k R e f e r e n c e Maintaining the PPT 2800 For trouble-free service, observe the following tips when using your PPT 2800: • • • • • • Do not scratch the screen. Use the supplied stylus or plastictipped pens intended for use with a touch-sensitive screen. Never use a pen or pencil or other sharp object on the screen. Although your PPT 2800 is water and dust resistant, do not expose it to rain or moisture for an extended period of time.
P P T 2 8 0 0 f o r P o c k e t S e r i e s P C 2 0 0 2 the volume is not turned down. PPT 2800 terminal turns itself off: • Your PPT 2800 terminal turns off after a period of inactivity. This period can be set from one to five minutes, in oneminute intervals. Check the Power dialog box (in the System tab under Start/Settings), and change the setting if you need a longer delay before the automatic shutoff feature activates.
Q u i c k • R e f e r e n c e If you have installed additional applications on your PPT 2800 terminal, remove them to recover memory. Select Start, then Settings, and select the System tab. Tap Remove Programs, select the unused program and tap Remove. Beamed data does not transmit: • • Confirm that the PPT 2800 terminals are 5” apart, and there is a clear path between the two devices. Adjust the room lighting or move to a different location.
P P T 2 8 0 0 f o r P o c k e t S e r i e s P C 2 0 0 2 END-USER LICENSE AGREEMENT • You have acquired a device (“DEVICE”) that includes software licensed by Symbol Technologies, Inc. (“SYMBOL”) from Microsoft Licensing Inc. or its affiliates (“MS”). Those installed software products of MS origin, as well as associated media, printed materials, and “online” or electronic documentation (“SOFTWARE”) are protected by international intellectual property laws and treaties. The SOFTWARE is licensed, not sold.
Q u i c k R e f e r e n c e part of a sale or transfer of the DEVICE, provided you retain no copies, you transfer all of the SOFTWARE (including all component parts, the media and printed materials, any upgrades or backup copies, this EULA and, if applicable, the Certificate(s) of Authenticity), and the recipient agrees to the terms of this EULA. If the Software is an upgrade, any transfer must include all prior versions of the SOFTWARE. • Termination.
P P T 2 8 0 0 f o r P o c k e t S e r i e s P C 2 0 0 2 NO LIABILITY FOR CERTAIN DAMAGES. EXCEPT AS PROHIBITY BY LAW, MS SHALL HAVE NO LIABILITY FOR ANY INDIRECT, SPECIAL, CONSEQUENTIAL OR INCIDENTAL DAMAGES ARISING FROM OR IN CONNECTION WITH THE USE OR PERFORMANCE OF THE SOFTWARE. THIS LIMITATION SHALL APPLY EVEN IF ANY REMEDY FAILS OF ITS ESSENTIAL PURPOSE.
Q u i c k R e f e r e n c e • Consult the dealer or an experienced radio/TV technician for help. This device complies with FCC Part 15. Operation is subject to the following two conditions: (1) this device may not cause harmful interference and (2) this device must accept any interference received, including interference that may cause undesired operation. Radio Frequency Interference Requirements - Canada This device complies with RSS 210 of Industry & Science Canada.
P P T 2 8 0 0 f o r P o c k e t S e r i e s P C 2 0 0 2 Part 4:Testing and Measurement techniques;Section 5:Surge Immunity • IEC 1000-4-6:1996/EN61000-4-6:1996:Electromagnetic compatibility (EMC), Part 4:Testing and Measurement techniques;Section 6: Immunity to conducted disturbances, induced by radio frequency fields. • IEC 1000-4-11:1994/EN61000-4-11:1994: Electromagnetic compatibility (EMC), Part 4:Testing and Measurement techniques;Section 11:Voltage Dips, Short Interruptions, and Voltage Variations.
Q u i c k R e f e r e n c e WARNING: FCC RF EXPOSURE GUIDELINES This device was tested for typical body-worn operations with the Holster providing a minimal spacing of 2.0 cm. from the body to the back of the terminal/antenna. To maintain compliance with FCC RF exposure compliance requirements, use only belt-clips, holsters or similar accessories that maintain a 2.0 cm. separation distance between the user’s body and the back of the terminal, including the antenna.
P P T 2 8 0 0 f o r P o c k e t S e r i e s P C 2 0 0 2 The procedure for generating an Emergency Call will depend on the application/ service currently in use and the network you are connected to. It is recommended that you familiarize yourself with the appropriate procedures required to generate an Emergency Call. When connected to the Emergency Operator you should have details of your telephone number and location on hand.
Q u i c k R e f e r e n c e Pacemakers It is recommended by pacemaker manufacturers that a minimum of 20cm (8 inches) be maintained between a handheld wireless phone and a pacemaker to avoid any possible interference with the pacemaker. These recommendations are consistent with the independent research by and recommendations of Wireless Technology Research.
P P T 2 8 0 0 f o r P o c k e t S e r i e s P C 2 0 0 2 Such areas are often, but not always, clearly marked.
Q u i c k R e f e r e n c e Scanner Labeling 35
P P T 2 8 0 0 f o r P o c k e t S e r i e s P C 2 0 0 2 In accordance with Clause 5, IEC 0825 and EN60825, the following information is provided to the user: ENGLISH CLASS 1 CLASS 2 HEBREW CLASS 1 LASER PRODUCT LASER LIGHT DO NOT STARE INTO BEAM CLASS 2 LASER PRODUCT DANISH KLASSE 1 KLASSE 2 KLASSE 1 LASERPRODUKT LASERLYF SE IKKE IND I STRÅLEN KLASSE 2 LASERPRODUKT AL LASER DI CLASSE 2 DUTCH KLASSE 1 KLASSE-1 LASERPRODUKT KLASSE 2 LASERLICHT NIET IN STRAAL STAREN KLASSE-2 LASERPRODUKT ITALIAN CLASSE
Q u i c k R e f e r e n c e EID Number (PPT 2833 Only) To enable CDPD service, contact your service provider to submit your Electronic Identification number (EID). This number is located on the back of your terminal. Battery Caution Caution: Danger of explosion if battery is incorrectly replaced. Replace only with the same or equivalent type recommended by the manufacturer. Dispose of used batteries according to the manufacturer's instructions.
P P T 2 8 0 0 f o r P o c k e t S e r i e s P C 2 0 0 2 DECLARATION OF CONFORMITY We, Symbol Technologies, Inc. of One Symbol Plaza, Holtsville, NY 11742-1300, USA declare under our sole responsibility that the product Spectrum24, LA3021, Type II Radio Card Spectrum24, LA302C, Type II Radio Card Spectrum24, LA302T, Type II Radio Card to which this declaration relates, is in conformity with the following standards and/or other normative documents.
Q u i c k R e f e r e n c e DECLARATION OF CONFORMITY We, Symbol Technologies, Inc. of One Symbol Plaza, Holtsville, NY 11742-1300, USA declare under our sole responsibility that the product Spectrum24HR, LA4121, Type II Radio Card Spectrum24HR, LA412T, Type II Radio Card Spectrum24, LA3021, Type II Radio Card Spectrum24, LA302T, Type II Radio Card to which this declaration relates, is in conformity with the following standards and/or other normative documents.
P P T 2 8 0 0 f o r P o c k e t S e r i e s P C 2 0 0 2 DECLARATION OF CONFORMITY We, Symbol Technologies, Inc. of One Symbol Plaza, Holtsville, NY 11742-1300, USA declare under our sole responsibility that the product(s) PPT 2837, GSM WAN Terminal to which this declaration relates, is in conformity with the following standards and/or other normative documents. Radio GSM: EN 301 419-1 v 4.1.1 EN 301 420 v 4.0.1 EMC: EN 301 489-1 v 1.2.1 EN 301 489-7 v 1.1.
Q u i c k R e f e r e n c e Warranty Symbol Technologies, Inc. (“Symbol”) manufactures its hardware products in accordance with industry-standard practices. Symbol warrants that for a period of twelve (12) months from date of shipment, products will be free from defects in materials and workmanship. This warranty is provided to the original owner only and is not transferable to any third party.
Service Information Before you use the unit, it must be configured to operate in your facility’s network and run your applications. If you have a problem running your unit or using your equipment, contact your facility’s Technical or Systems Support.