f o r P Q u i c k P D o c T k 8 e 1 t 3 8 P C R e f e r e n c e 2 0 G u i d e 0 2
P f o r D P T 8 1 0 P D T o c k 0 S 8 1 e t e 3 P r i e s 8 C 2 0 0 2 © 2001 - 2003 SYMBOL TECHNOLOGIES, INC. All rights reserved. Symbol reserves the right to make changes to any product to improve reliability, function, or design. Symbol does not assume any product liability arising out of, or in connection with, the application or use of any product, circuit, or application described herein.
P D T 8 1 0 0 S e r i e s Introduction Congratulations on your purchase of Symbol Technologies’ PDT 8138 Terminal! Its unique combination of features make this product superior for use in a wide range of applications.
P D T 8 1 0 0 S e r i e s Accessories Each PDT 8138 requires one 1550 mAh lithium-ion battery. The following optional accessories are available from Symbol Technologies: • Additional lithium-ion battery • Stylus for performing pen functions • Cables: - Serial charging cable - DEX cable - Autocharge cable - Snap-on printer cable • Single-slot cradle • Four-slot cradle • Vehicle cradle • IrDA compliant printer • Magnetic stripe reader • Clip on modem module • Headset • Carrying case.
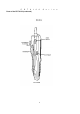
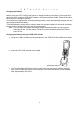
P D T 8 1 0 0 Parts of the PDT 8138 3 S e r i e s
P D T 8 1 Parts of the PDT 8138 (continued) 0 0 4 S e r i e s
P D T 8 1 0 0 Parts of the PDT 8138 (continued) 5 S e r i e s
P D T 8 1 0 0 S e r i e s Getting Started Before you can use your PDT 8138, perform these basic setup procedures: • Install the antenna packaged with the terminal by screwing it into the antenna receptacle on the top of the terminal. • Insert the Compact Flash card (optional). • Install and charge the battery. • Start the PDT 8138. • Initiate the network connection.
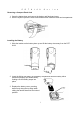
P D T 8 1 0 0 S e r i e s Removing a Compact Flash Card 1. Open the battery door and remove the battery and flash card cover. 2. Use the stylus to press the flash card release button inside the flash card compartment. Installing the Battery 1. Slide the latches on the battery door up and lift the battery door away from the PDT 8138. 2.
P Charging the Battery D T 8 1 0 0 S e r i e s Before using your PDT 8100 for the first time, charge the lithium-ion battery in the terminal for about 2½ hours, using the CRD 8100 Cradle or the Synchronization Cable. Follow these same procedures to recharge the battery. Your terminal is equipped with a memory backup battery, which automatically charges from the fully charged lithium-ion battery.
P D T 8 1 0 0 S e r i e s Charging a Spare Battery To recharge a spare battery, insert it in the spare battery charging slot in the back of the cradle, so the contacts are facing down and towards the back of the cradle. Press the battery down into the slot until firmly seated. The Spare Battery LED turns red to indicate charging, then green when the battery is fully charged. The battery is fully charged after approximately 2½ hours.
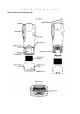
P D T 8 1 0 0 S e r i e s Charging the Battery Using the Synchronization Cable 15-Pin Serial Port Connector Attaching the Hand Strap 10
P D T 8 1 0 0 S e r i e s Starting the PDT 8138 Press the red power button to turn the PDT 8138 on and off. If the terminal does not power on, perform a hard reset. See Performing a Hard Reset on page 23. As the terminal initializes its unique Flash File system, the Symbol splash screen displays for about 10 seconds. When the Welcome screen appears, tap anywhere on the screen to continue to the Align screen. Note that these screens also appear every time you perform a hard reset.
P D T 8 1 0 0 S e r i e s Controlling the Backlight (Color TFT LCD) Turn the backlight on and off by pressing the Backlight button.
P D T 8 1 0 0 S e r i e s Using the 28-Key Keyboard The 28-key keyboard uses an alphanumeric keypad that produces the 26-character alphabet (A-Z), numbers (0-9), and assorted characters. The keyboard is color-coded to indicate which modifier key (Alpha-Numeric, Func) to press to produce a particular character or action. The keyboard default is numeric, producing numbers. Key Action Note: Press Func, then another key to produce the value or function above that key.
P Key Enter/Escape Power Scan Send Space/Backspace Tab D T 8 1 0 0 S e r i e s Action Press Enter after entering data or a command. Press Func + Enter to partially or completely escape from an application level or screen. See Starting the PDT 8138 on 11. Press Scan to scan bar codes. (Also use right and left scan triggers.) The Send key is application dependent. Press Func + Bk-Sp to enter a blank space.
P Key Alpha Backlight Caps/Shift Clear Cursor keys: C, G, H, I End Enter/Escape Power Scan Send Space/Backspace D T 8 1 0 0 S e r i e s Action Press Alpha to toggle between alpha and numeric mode. In alpha mode, pressing a key produces the yellow letter on that key; in another mode, pressing a key produces the number in gray. See Controlling the Backlight (Color TFT LCD) on page 13. Press Shift when in alpha mode, then another key to capitalize the letter on that key.
P D T 8 1 0 0 S e r i e s Using the 47-Key Keyboard The 47-key keyboard uses an alphanumeric keypad that produces the 26-character alphabet (A-Z), numbers (0-9), and assorted characters. The keyboard is color-coded to indicate which modifier key (Alpha-Numeric, Func) to press to produce a particular character or action. The keyboard default is the key value, producing the gray number or lower case yellow letter on that key.
P Key Scan Send Space/Backspace D T 8 1 0 0 S e r i e s Action Press Scan to scan bar codes. (Also use right and left scan triggers.) The Send key is application dependent. Press Func + Bk-Sp to enter a blank space. Press Bk-Sp to erase information entered on the display, one character at a time Using the Stylus The stylus selects items and enters information. The stylus functions as a mouse. • Tap: Touch the screen once with the stylus to open items and select options.
P D T 8 1 Navigation Bar and Command Bar 0 0 S e r i e s The navigation bar at the top of the screen displays the active program and current time, and allows you to select programs and close screens. The command bar at the bottom of the screen contains menus and buttons to perform tasks in programs.
P D T 8 1 0 0 S e r i e s Input Methods Enter information in any program by typing with the 28-, 37-, or 47-key keyboard, or use the input panel to type with the soft keyboard, write using Block Recognizer, or the Letter Recognizer. In any case, the characters appear as typed text on the screen. To show or hide the input panel, tap the Input Panel button. Tap the arrow next to this button to view input methods.
P D T 8 1 0 0 S e r i e s Using the Block Recognizer 1. Tap the arrow next to the Input Panel button, then Block Recognizer. 2. Write a letter in the left side of the box, or a number in the right side, using special character strokes. When you write a letter, it is converted to typed text on the screen. For instructions on entering Block Recognizer characters, with Block Recognizer open, tap the question mark next to the writing area, or see Block Recognizer Characters on page 21.
P D T 8 1 0 0 S e r i e s Block Recognizer Characters The following chart is a partial display of the characters you can write while using the Block Recognizer (the dot on each character is the starting point for writing). Scanning with the PDT 8138 The PDT 8138 has an integrated scanner which collects data by scanning bar codes. See the PDT 8100 Product Reference Guide for Pocket PC 2002 for information on configuring your terminal for scanning. To scan bar codes with the PDT 8138: 1.
P D T Scanning PDF417 Bar Codes 8 1 0 0 S e r i e s The 2-D scanning PDT 8100 terminal supports PDF417 bar code scanning. The raster pattern has multiple scanning rows to accommodate the PDF417 symbol’s multiple rows. 1. Point the scanner at the bar code and press the trigger. 2. Center the aiming pattern on the bar code. 3. As the raster pattern spreads, keep the pattern horizontal to the bar code. 4.
P D T 8 1 0 0 S e r i e s Performing a Soft Reset A soft reset restarts the terminal and saves all stored records and entries. Caution: Files that remain open during a soft reset may not be retained. DO NOT perform a soft reset if the terminal is suspended. Press the Power button to wake the terminal; if the terminal does not turn on, perform a soft reset.
P D T 8 1 0 0 S e r i e s Host Communications The PDT 8138 Series terminal can communicate with a host PC either directly through its communications port using an RS-232 serial cable, the cradle, or wirelessly via Sprint WAN connection. For more information on setting up and performing wireless communications with your PDT 8138 terminal, refer to the PDT 8100 Series Product Reference Guide for Pocket PC 2002.
• • • • P D T 8 1 0 0 S e r i e s The touch-sensitive screen of your PDT 8138 contains glass. Do not drop your PDT 8138 or subject it to strong impact. Protect your PDT 8138 from temperature extremes. Do not leave it on the dashboard of a car on a hot day, and keep it away from heat sources. Do not store or use your PDT 8138 in any location that is extremely dusty, damp or wet.
P Problem No sound is audible. D T 8 1 0 Cause Volume setting is low or turned off. PDT 8138 turns itself off. PDT8138 is inactive. PDT8138 doesn’t recognize my handwriting. Character strokes written incorrectly with the stylus. Or Character strokes written on the wrong part of the LCD screen. 0 S e r i e s Solution Check the System Volume slider in the Sounds & Reminders properties dialog box (under Start > Settings) to make sure the volume is not turned down.
P Problem A message appears stating that your PDT8138 terminal memory is full. Beamed data does not transmit. When receiving beamed data an out of memory message appears. Your PDT8138 terminal does not accept scan input. D T 8 1 0 Cause Too many files stored on the terminal. Memory allocation too low. Too many applications installed on the terminal. PDT8138 terminal too close together. Insufficient room lighting. Not enough free memory available for receiving data.
P D T 8 1 0 0 S e r i e s END-USER LICENSE AGREEMENT • You have acquired a device (“DEVICE”) that includes software licensed by Symbol Technologies, Inc. (“SYMBOL”) from Microsoft Licensing Inc. or its affiliates (“MS”). Those installed software products of MS origin, as well as associated media, printed materials, and “online” or electronic documentation (“SOFTWARE”) are protected by international intellectual property laws and treaties. The SOFTWARE is licensed, not sold. All rights reserved.
P D T 8 1 0 0 S e r i e s • Single DEVICE. The DEVICE Software is licensed with the DEVICE as a single integrated product. The DEVICE Software installed in read only memory (“ROM”) of the DEVICE many only be used as part of the DEVICE. • Single EULA. The package for the DEVICE may contain multiple versions of this EULA, such as multiple translations and/or multiple media versions (e.g., in the user documentation and in the software).
P D T 8 1 0 0 S e r i e s or biological weapons; or (iii) to any person or entity who has been prohibited from participating in U.S. export transactions by any federal agency of the U.S. government. NOTE ON JAVA SUPPORT. The SOFTWARE may contain support for programs written in Java.
P D Laser Devices T 8 1 0 0 S e r i e s Symbol products using lasers comply with US 21CFR1040.10, and IEC825- 1:1993, EN60825-1:1994+A11:1996. The laser classification is marked on one of the labels on the product. Class 1 Laser devices are not considered to be hazardous when used for their intended purpose.
P D T 8 1 0 0 S e r i e s In accordance with Clause 5, IEC 825 and EN60825, the following information is provided to the user: Power Supply Note: Use only a Symbol-approved power supply (p/n 50-14000-107) output rated 9 Vdc and minimum 2A. The power supply is certified to EN60950 with SELV outputs. Hinweis: Benutzen Sie nur eine Symbol Technologies genehmigt Stromversorgung (p/n 50-14000-107) in den Ausgabe: 9 Vdc und minimum 2A. Die Stromversorgung ist bescheinigt nach EN60950 mit SELV Ausgaben.
P D T 8 1 0 0 S e r i e s maintain compliance with FCC RF exposure compliance requirements, use only beltclips, holsters, or similar accessories that maintain a 2.0 cm separation distance between the user’s body and the back of the terminal, including the antenna. The use of third-party belt-clips, holsters, and similar accessories should not contain metallic components in its assembly.
P D T 8 1 0 to all mobile phones and related equipment. 0 S e r i e s Effect on Vehicles RF signals may affect improperly installed or inadequately shielded electronic systems in motor vehicles (including safety systems). Check with the manufacturer or its representative regarding your vehicle. You should also consult the manufacturer of any equipment that has been added to your vehicle. Warning Notices Please observe all warning notices with regard to the usage of mobile phones.
P D T 8 1 0 0 S e r i e s Radio Frequency Interference Requirements - Canada This device complies with RSS 210 of Industry & Science Canada. Operation is subject to the following two conditions: (1) this device may not cause harmful interference and (2) this device must accept any interference received, including interference that may cause undesired operation. This Class B digital apparatus complies with Canadian ICES-003.
P D T 8 1 0 0 S e r i e s Warranty (A) Warranty Symbol Technologies (hereafter “Seller”) hardware Products are warranted against defects in workmanship and materials for a period of twelve (12) months from the date of shipment, unless otherwise provided by Seller in writing, provided the Product remains unmodified and is operated under normal and proper conditions.
P D T 8 1 0 0 S e r i e s Service Information Before you use the unit, it must be configured to operate in your facility’s network and run your applications. If you have a problem running your unit or using your equipment, contact your facility’s Technical or Systems Support.