
Quick Reference Guide

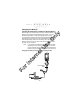
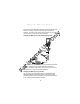
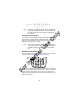

Table Of Contents
- Introduction
- About This Guide
- Accessories
- Parts of the Terminal
- Parts of the Terminal (continued)
- Installing the SIM Card
- Inserting a Compact Flash Storage Card (PDT 8037 only)
- Removing a Compact Flash Storage Card
- Inserting an MMC/SD Storage Card
- Removing an MMC/SD Storage Card
- Installing Batteries
- Charging the Battery
- Starting the Terminal
- Adjusting the Backlight
- Using a Headset
- Using the Keyboard
- Using the Stylus
- Today Screen
- Navigation Bar and Command Bar
- Input Methods
- Scanning with the Terminal
- Resetting Your Terminal
- Host Communications
- LED Indicators
- Maintaining the Terminal
- Troubleshooting
- END-USER LICENSE AGREEMENT
- Regulatory Information
- Ergonomic Recommendations
- Laser Devices
- Power Supply
- FCC RF Exposure Guidelines
- GSM Regulatory Warnings
- Radio Frequency Interference Requirements
- Radio Frequency Interference Requirements - FCC
- Radio Frequency Interference Requirements - Canada
- Marking and European Economic Area (EEA)
- Radio Modules
- Statement of Compliance

13
Quick Reference
Aligning the Screen
To align your terminal so the cursor on the touch screen aligns with
the tip of your stylus:
1. If necessary, adjust the contrast on the terminal so the
screen is readable (see Adjusting the Backlight on page 14).
2. Remove the stylus from the handstrap of the terminal.
3. Tap the center of each target that appears on the Calibration
screen with the tip of the stylus.
4. Follow the directions on the screen which explains how to
use the stylus and pop-up menus, and allows you to set your
city and time zone.
Note: To align your screen at anytime, press Shift + 2 to
launch the calibration screen.
Initiating a Network Connection
Before using the terminal, set up the Spectrum24, GPRS (General
Packet Radio Service) or GSM (Global System for Mobile
Communication) network connection. Refer to the PDT 8000
Series Product Reference Guide for setup instructions.
For Internal Use Only