se lU na nt er rI Fo O nl y P D T 8 0 X X W W A N
P D T 8 0 X X W W A N lU se O nl y © 2003 SYMBOL TECHNOLOGIES, INC. All rights reserved. Symbol reserves the right to make changes to any product to improve reliability, function, or design. Symbol does not assume any product liability arising out of, or in connection with, the application or use of any product, circuit, or application described herein.
Q u i c k R e f e r e n c e Introduction na lU se O nl y Congratulations on your purchase of Symbol Technologies’ PDT 8000 WAN Terminal! Its unique combination of features make this product superior for use in a wide range of applications. These features include: • Microsoft® Windows® Pocket PC 2002 operating system • RF communication via a wide area network (PDT 8037/ 8056) or Symbol’s Spectrum24® wireless network (PDT 8056) • USB Client • 1-Dimensional barcode scanning capability • 3.
W W A N se O nl Using the Keyboard on page 15 Using the Stylus on page 16 Today Screen on page 17 Navigation Bar and Command Bar on page 18 Input Methods on page 19 Scanning with the Terminal on page 22 Resetting Your Terminal on page 22 Host Communications on page 23 LED Indicators on page 24 Maintaining the Terminal on page 25 Troubleshooting on page 26 Regulatory Information on page 33 Service Information on backcover.
Q u i c k R e f e r e n c e Accessories Fo rI nt er na lU se O nl y Each terminal requires one 7.4 volt 1130 mAh prismatic lithium-ion battery.
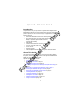
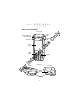
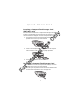
P D T 8 0 X X W W A N Parts of the Terminal O nl Scan LED Ruggedized End Cap (PDT 8056 only) Charge LED se Microphone Speaker rI nt er na lU TFT LCD (color) Power Button Fo PDT 8037 y Front View Top View 1-D Exit Window Audio Jack 4 PDT 8056
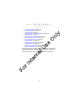
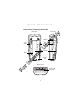
Q u i c k R e f e r e n c e Parts of the Terminal (continued) Side View IrDA Port O nl y Back View Scan Button lU se Scan Button Battery Door Bottom View Fo rI nt er Stylus na Handstrap Serial & USB Charge Port 5
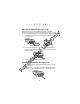
P D T 8 0 X X W W A N Installing the SIM Card se O nl y 1. Slide the latches on the battery door up and lift the battery door away from the terminal. If the battery is installed, remove it (see Installing Batteries on page 9). 2. Slide the metal clip on the SIM cardholder door to the left to release the SIM cardholder. na lU 3. Lift the cardholder door to an upright position nt er 4.
Q u i c k R e f e r e n c e Inserting a Compact Flash Storage Card (PDT 8037 only) lU se O nl y The PDT 8037 has a slot for a compact flash storage card which includes a compartment door that prevents the card from coming out if the terminal is dropped. To insert a compact flash card: 1. Unscrew and remove the compact flash storage card compartment door on the top of the terminal. nt er na 2. Insert a new compact flash storage card into the compartment.
P D T 8 0 X X W W A N Inserting an MMC/SD Storage Card se O nl y The terminal has a slot for an MMC/SD storage card which includes a compartment door that prevents the card from coming out if the terminal is dropped. To insert an MMC/SD storage card: 1. Unscrew and remove the card compartment door on the top of the terminal. PDT8056 lU PDT8037 nt er na 2. Insert a new MMC/SD storage card, with the card label facing down, into the compartment. Ensure it is fully inserted for proper operation.
Q u i c k R e f e r e n c e Installing Batteries O nl y 1. Remove the battery door. se 2. Slide the latches on both sides of the battery down, to ensure they are in the unlock position. Insert the battery into the compartment. nt er na lU Battery Latches Fo rI 3. Lock the battery into place by sliding the latches on the battery up. 4. Replace the battery door. Caution: Do not expose the battery to temperatures in excess of 140°F (60°C).
P D T 8 0 X X W W A N Charging the Battery Charging the Main Battery and Memory Backup Battery lU se O nl y Before using your terminal for the first time, charge the lithium-ion battery in the terminal for approximately four hours, using the Serial Charging Cable or any other appropriate accessory. Your terminal is equipped with a memory backup battery which automatically charges from the fully-charged lithium-ion battery.
Q u i c k R e f e r e n c e O nl y The terminal charge LED blinks amber to indicate that the terminal battery is charging and turns solid amber when charging is complete. The battery fully charges in less than four hours. See LED Indicators on page 24 for other indications.
P D T W W A N You can also charge the battery using the MDM 8000, VCA 8000-01 or MSR 8000. For more information, see the setup instructions in the respective Quick Reference Guides. O nl y Note: 8 0 X X Charging the Spare Battery You can also use a UBC Adaptor (p/n 21-32665-33) to charge spare batteries. Refer to the UBC 2000 Universal Battery Charge Product Guide for more information.
Q u i c k R e f e r e n c e Aligning the Screen nt er na lU se O nl y To align your terminal so the cursor on the touch screen aligns with the tip of your stylus: 1. If necessary, adjust the contrast on the terminal so the screen is readable (see Adjusting the Backlight on page 14). 2. Remove the stylus from the handstrap of the terminal. 3. Tap the center of each target that appears on the Calibration screen with the tip of the stylus. rI 4.
P D T 8 0 X X W W A N Adjusting the Backlight Description O nl Keys y Use the key combinations below to adjust the backlight. Turn backlight on or off. Shift + Left Arrow Decrease backlight (decrease brightness) Shift + Right Arrow Increase backlight (increase brightness) se Shift + App Key 2 or Shift + App Key 3 Using a Headset Fo rI nt er na lU Your terminal is equipped with an audio connector which can be connected to a headset.
Q u i c k R e f e r e n c e Using the Keyboard Key functions can be changed by an application. Your keyboard may not function exactly as described. For more detailed keyboard information, refer to the PDT 8000 Series Product Reference Guide.
P D T 8 0 X X Key W W A N Action Launches application assigned to Button 3. Refer to the PDT 8000 Series Product Reference Guide for more information on assigning applications to button. Also see Adjusting the Backlight on page 14. Backspace Press Shift + 7 to erase information entered on the display, one character at a time. O nl y App Key 3 Press Shift + 9. Action is application dependent. Clear Press Shift + 1. Action is application dependent.
Q u i c k R e f e r e n c e y list of actions available for that item. On the pop-up menu that appears, tap the action you want to perform. O nl Today Screen When you turn on your terminal for the first time each day (or after 4 hours of inactivity), the Today screen appears. You can also display it by tapping Start - Today. On the Today screen, you can see important information for the day. Tap to change volume or mute all sounds. se Tap to switch to a program. lU Tap to change date and time.
P D T 8 0 X X W W A N y Items tab to change the list and order of items that appear on the screen. O nl Navigation Bar and Command Bar The navigation bar at the top of the screen displays the active program and current time, and allows you to switch to programs and close screens. The command bar at the bottom of the screen contains menus and buttons to perform tasks in programs. Tap to switch to a program. se Tap to change the volume or mute the device.
Q u i c k R e f e r e n c e Input Methods O nl y Enter information in any program by typing with the keyboard, or use the input panel to type with the soft keyboard, write using Block Recognizer, Letter Recognizer or Transcriber. In any case, the characters appear as typed text on the screen. To show or hide the input panel, tap the Input Panel button. Tap the arrow next to this button to view input methods. se Select input method settings. lU Select an input method. Tap to see your choices.
P D T 8 0 X X W W A N se O nl y Using the Block Recognizer 1. Tap the arrow next to the Input Panel button, then Block Recognizer. lU 2. Write a letter in the left side of the box, or a number in the right side, using special character strokes. na When you write a letter, it is converted to typed text on the screen. For instructions on entering Block Recognizer characters, with Block Recognizer open, tap the question mark next to the writing area, or see Block Recognizer Characters on page 21.
R e f e r e n c e O nl Using the Transcriber 1. Tap the arrow next to the Input Panel button, then Transcriber. y Q u i c k se 2. Write anywhere on the screen. What you write on the screen will be converted to text. Fo rI nt er na lU Block Recognizer Characters The following chart is a partial display of the characters you can write while using the Block Recognizer (the dot on each character is the starting point for writing).
P D T 8 0 X X W W A N Scanning with the Terminal O nl y The terminal has an integrated scanner which collects data by scanning bar codes. Refer to the PDT 8000 Series Product Reference Guide for information on configuring your terminal for scanning. nt er na lU se To scan bar codes with the terminal: 1. Launch the terminal’s scanning application. The scanning application is part of the Windows CE Software Developer’s Kit for Symbol Terminals, available at http://devzone.symbol.com. 2.
Q u i c k R e f e r e n c e y To perform a soft reset press and hold the power key (for approximately ten seconds) and release it as soon as the screen changes and the terminal begins to reboot. O nl Performing a Hard Reset na Remove the battery door. Press and release Power Key + Scan Button. Replace the battery door. As the terminal reboots, the Symbol splash screen displays for about 60 seconds. 5. Realign the screen as described on page 13. nt er 1. 2. 3. 4.
P D T 8 0 X X W W A N y to-Ethernet Cradle, the Vehicle Cradle or the Snap-On-Modem. For more information, see the communication instructions in the PDT 8000 Series Product Reference Guide. O nl Communicating with Printers se To print from a standard printer: 1. Attach the appropriate snap-on-printer cable to the serial port in the bottom of the terminal. 2. Attach the other end of the cable to the Data Communications Connector on the printer. 3. Run the application’s print function.
Q u i c k R e f e r e n c e Maintaining the Terminal Do not scratch the screen. Use the supplied stylus or plastictipped pens intended for use with a touch-sensitive screen. Never use a pen or pencil or other sharp object on the screen. Although your terminal is water and dust resistant, do not expose it to rain or moisture for an extended period of time. The touch-sensitive screen of your terminal contains glass. Do not drop your terminal or subject it to strong impact.
P D T 8 0 X X W W A N Solution Battery not installed properly. Ensure battery is installed properly. See Installing Batteries on page 9. System crash. Perform a hard reset. See Resetting Your Terminal on page 22. Battery failed. Replace battery. If your terminal still does not operate, try a soft reset, then a hard reset; see Resetting Your Terminal on page 22. O nl Charge or replace the lithium-ion battery in the terminal. se Rechargeable lithium-ion battery did not charge.
Q u i c k Solution Terminal is inactive. Your terminal turns off after a period of inactivity. This period can be set from one to five minutes, in one-minute intervals. Check the Power dialog box (in the System tab under Start/ Settings), and change the setting if you need a longer delay before the automatic shutoff feature activates. Terminal doesn’t recognize my handwriting. Character strokes written incorrectly with the stylus.
P D T Cause Solution Delete unused memos and records. You can save these records on your computer. Memory allocation too low. Adjust the memory allocation. Select Start, then Settings, and select the System tab. Tap Memory and adjust the slider. Too many applications installed on the terminal. If you have installed additional applications on your terminal, remove them to recover memory. Select Start, then Settings, and select the System tab.
Q u i c k Cause Solution Verify that the unit is loaded with a scanning application. See your System Administrator. Unreadable bar code. Ensure the symbol is not defaced. Distance between exit window and bar code is incorrect. Ensure you are within proper scanning range. Terminal is not programmed for the bar code. Ensure the terminal is programmed to accept the type of bar code you are scanning. Terminal is not programmed to generate a beep.
P D T 8 0 X X W W A N END-USER LICENSE AGREEMENT nt er na lU se O nl y MICROSOFT WINDOWS FOR POCKET PC DATA EXCHANGE COMPONENT: MICROSOFT ACTIVESYNC, VERSION 3.1 IMPORTANT-READ CAREFULLY: This End-User License Agreement (“EULA”) is a legal agreement between you (either an individual or a single entity) and the manufacturer (“Manufacturer”) of the special purpose computing device (“SYSTEM”) with which you acquired the Microsoft software product(s) identified above (“SOFTWARE”).
Q u i c k R e f e r e n c e access, and interact with the SYSTEM, and (ii) the EULA is between Manufacturer (as defined above) and the end user-not between the PC Manufacturer and end user. O nl y 2. DESCRIPTION OF OTHER RIGHTS AND LIMITATIONS. • Speech/Handwriting Recognition.
P D T 8 0 X X W W A N y or other means, and labeled “For Upgrade Purposes Only” or “For Recovery Purposes Only”, you may (i) install and use one copy of such component(s) on the computer(s) you use to exchange data with the SYSTEM as a replacement copy for the existing Desktop Software component(s). Fo rI nt er na lU se O nl 4. COPYRIGHT.
Q u i c k R e f e r e n c e Regulatory Information O nl y All Symbol devices are designed to be compliant with rules and regulations in locations they are sold and will be labeled as required. Any changes or modifications to Symbol Technologies equipment, not expressly approved by Symbol Technologies, could void the user’s authority to operate the equipment.
P D T 8 0 X X W W A N Fo rI nt er PDT 8056 na lU se O nl y Scanner Labeling 34 PDT 8037
Q u i c k R e f e r e n c e HEBREW CLASS 1 LASER PRODUCT LASER LIGHT DO NOT STARE INTO BEAM CLASS 2 LASER PRODUCT se ENGLISH CLASS 1 CLASS 2 NORWEGIAN / NORSK KLASSE 1 LASERPRODUKT, KLASSE 1 KLASSE 2 LASERLYS IKKE STIRR INN I LYSSTRÅLEN LASERPRODUKT, KLASSE 2 na FINNISH / SUOMI LUOKKA 1 LUOKKA 1 LASERTUOTE LUOKKA 2 LASERVALO ÄLÄ TUIJOTA SÄDETTÄ LUOKKA 2 LASERTUOTE ITALIAN / ITALIANO CLASSE 1 PRODOTTO AL LASER DI CLASSE 1 CLASSE 2 LUCE LASER NON FISSARE IL RAGGIOPRODOTTO AL LASER DI CLASSE 2 lU DAN
P D T 8 0 X X W W A N Power Supply Use only a Symbol-approved power supply 50-14001-005 output rated 15VDC and minimum 2.5A. The power supply is certified to EN60950 with SELV outputs. y Note: FCC RF Exposure Guidelines O nl Hinweis: Benutzen Sie nur eine Symbol Technologies genehmigt Stromversorgung 50-14001-005 in den Ausgabe: 15VDC und minimum 2.5A. Die Stromversorgung ist bescheinigt nach EN60950 mit SELV Ausgaben lU se This device was tested for typical body-worn operations.
Q u i c k R e f e r e n c e O nl y • Should not carry the device in a breast pocket • Should use the ear furthest from the pacemaker to minimize the potential for interference. • If you have any reason to suspect that interference is taking place, turn off your device immediately. Hearing Aids The device may interfere with some hearing aids. In the event of interference you may want to consult your hearing aid supplier to discuss solutions.
P D T 8 0 X X W W A N Radio Frequency Interference Requirements - FCC O nl y This device complies with Part 15 of the FCC Rules. Operation is subject to the following two conditions: (1) this device may not cause harmful interference, and (2) this device must accept any interference received, including interference that may cause undesired operation.
Q u i c k R e f e r e n c e Radio Modules O nl y The PDT8000 WAN terminals contain approved radio modules. These modules are identified below: • PDT8057 Symbol Compact Flash RLAN (11Mbps DSSS) radio card, Type: LA-4137 Motorola Triband GSM GPRS module (G18), Type: MT3-411A21 • PDT8037 Motorola Triband GSM GPRS module (G18), Type: MT3-411A21 Statement of Compliance Fo rI nt er na lU se Symbol Technologies, Inc.
8 0 X X W W A N Fo rI nt er na lU se O nl y P D T 40
Q u i c k R e f e r e n c e Warranty O nl y (A) Warranty Symbol Technologies (hereafter “Seller”) hardware Products are warranted against defects in workmanship and materials for a period of twelve (12) months from the date of shipment, unless otherwise provided by Seller in writing, provided the Product remains unmodified and is operated under normal and proper conditions.
Service Information 1-800-653-5350 1-631-738-2400 Canada United Kingdom 0800 328 2424 Asia/Pacific 905-629-7226 O nl United States1 y Before you use the unit, it must be configured to operate in your facility’s network and run your applications. If you have a problem running your unit or using your equipment, contact your facility’s Technical or Systems Support.