
Reference Guide
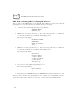
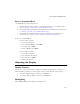
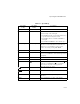
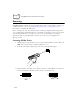
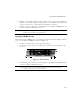
Table Of Contents
- About This Guide
- Chapter 1 Getting Started
- Chapter 2 Accessories Setup
- Chapter 3 Batch and Spectrum One Terminal Setup
- Chapter 4 Spectrum24 RF Terminal Setup
- Chapter 5 Operating the PDT 6800 Series
- Chapter 6 Maintaining the Terminal
- Chapter 7 Error Recovery and Troubleshooting
- Appendix A Null Modem Pin-outs
- Appendix B Keyboard Layouts
- Appendix C Communications Status Codes
- Appendix D Specifications
- Appendix E Boot-Up Quick Reference
- Appendix F 2D Scanner Drivers and Applications
- Numerics
- A
- B
- C
- D
- E
- F
- I
- K
- L
- M
- N
- P
- R
- S
- T
- U
- W

5-12
PDT 6800 Series Product Reference Guide
Scanning
The PDT 6800 has an integrated scanner which allows you to collect data by scanning 1 or
2 dimensional bar codes. See Appendix F, 2D Scanner Drivers and Applications for
information on enabling the 2D scanner.
Before scanning can occur, the terminal must be running an application that supports bar
code scanning. The terminal must also be programmed to scan the type of bar code you want,
such as Universal Product Code (UPC) or Code 3 of 9. For information on scanning
applications and on programming the scanner, refer to the Series 3000 Application
Developer’s Kit.
Scanning 1D Bar Codes
1. Pull the trigger on the handle to power on the terminal and laser scanner. The Scan
LED turns red if scanning is enabled and the laser is on.
2. Point the terminal at a slight angle to the bar code and pull the trigger.
Figure 5-3. Using the Laser Scanner
3. Ensure that the scan beam crosses all bars and spaces on the 1D bar code symbol, as
shown below. Do not hold the scanner directly over the bar code.
Right
Wrong