S P T 1 5 0 0
S P T 1 5 0 0 1998 SYMBOL TECHNOLOGIES, INC. All rights reserved. Symbol reserves the right to make changes to any product to improve reliability function, or design. Symbol does not assume any product liability arising out of, or in connection with, the application or use of any product, circuit, or application described herein.
Q u i c k R e f e r e n c e Introduction Congratulations on your purchase of Symbol Technologies’ SP 1500 Terminal! The unique combination of pocket size, Personal Information Management software, printing support and scanning capability make this product superior for use in a wide range of different applications. This guide covers the procedures for the basic set up and use of the terminal.
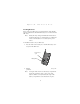
S P T 1 5 0 0 Parts of the SPT 1500 The following illustration indicates each part of the SPT 1500 Terminal.
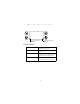
Q u i c k R e f e r e n c e Installing Batteries Before using your SPT 1500, you must install two AAA alkaline batteries. The batteries fit behind the battery door on the back of the SPT 1500. Note: Battery life may change with different manufacturers. Symbol Technologies recommends the use of Duracell “Ultra” brand batteries for best battery life performance. To install the batteries in your SPT 1500: 1. Press the latch on the battery door and lift the battery door away from the SPT 1500 .
S P T 1 5 0 0 3. Replace the battery door so that it is flush with the back of the SPT 1500 and “clicks” into position. Note: Do not force the battery door. When the batteries are correctly installed, the battery door clips smoothly into place. If you feel resistance when replacing the battery door, make sure the door is aligned with the slots on the back of your SPT 1500, and that the batteries are firmly seated in the battery compartment.
Q u i c k R e f e r e n c e To calibrate your SPT 1500: 1. Press the green power button on the front panel of your SPT 1500 to display the calibration screen. Note: If necessary, adjust the contrast control located on the side of the SPT 1500 so the screen is clear and readable. 2. Remove the stylus from its storage slot on the back of the SPT 1500. 3. Tap the exact center of each target that appears on the screen with the tip of the stylus.
S P T 1 5 0 0 Using the SPT 1500 Using the Power/Backlight Control The power button turns the SPT 1500 on and off. This button also serves as your backlight control. With the unit on, press and hold the power button for approximately 2 seconds to turn the backlight on and off. Writing with the Stylus Your SPT 1500 includes Graffiti handwriting software as the primary system for entering text and numbers.
Q u i c k R e f e r e n c e Tap here for numbers keyboard Tap here for letters keyboard Icon Descriptions Applications Icon Tap to display a list of available applications for selection. Calculator Icon Tap to display the calculator application. Menu Icon Tap from within an application t display the appropriate menu of options for the selected application. Find Icon Tap from within an application t enter search criteria to find an entry.
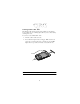
S P T 1 5 0 0 Scanning with the SPT 1500 The SPT 1500 has an integrated scanner which, if your unit has been configured to use scanning input, allows you to collect data by scanning bar codes. To scan bar codes with the SPT 1500: 1. Aim the scanner at the bar code. 2. Press either the right or left scan trigger. Make sure the red scan beam covers the entire bar code. The green scan LED lights and a beep sounds to indicate a successful decode. Caution: Do not look directly into the laser.
Q u i c k R e f e r e n c e Using the Laser Pointer The SPT 1500 has a Laser Pointer application installed which allows you to use the unit as a laser pointer. The laser is emitted from the top of the unit. To use the laser pointer: 1. Select the Laser Pointer Application Icon plication screen. from the ap- The Laser Pointer application screen appears. 2. Use the scanner triggers to activate the laser pointer. Caution: No not look directly into the laser,and do not point the laser into anyone’s eyes.
S P T 1 5 0 0 Maintaining the SPT 1500 Your SPT 1500 is designed to be reliable and to provide years of trouble-free service. However, you should observe the following general tips when using your SPT 1500: • • • • • • Take care not to scratch the screen of your SPT 1500. When working with your SPT 1500, use the supplied stylus or plastic-tipped pens intended for use with a touch-sensitive screen. Never use an actual pen or pencil or other sharp object on the surface of the SPT 1500 screen.
Q u i c k R e f e r e n c e Troubleshooting SPT 1500 terminal does not turn on: • • • Adjust the contrast control. Make sure batteries are installed properly Replace the batteries. If your SPT 1500 terminal still does not operate, try a soft reset; see Resetting Your SPT 1500™. Low battery warning after replacing the batteries: • The battery warning message may appear immediately after replacing the batteries.
S P T • • • 1 5 0 0 Make the Graffiti character strokes in the Graffiti writing area — not on the display part of the screen. Make sure you are writing the strokes for letters in the lefthand side, and the strokes for numbers in the right-hand side of the Graffiti writing area. Make sure that Graffiti is not shifted into extended or punctuation modes. See the SPT 1500 Product Reference Guide for information about shifting into and out of punctuation modes.
Q u i c k R e f e r e n c e Beamed data does not transmit: • Confirm that the SPT 1500 terminals are 5” apart, and that the path between the two devices is clear of obstacles. When receiving beamed data an out of memory message appears: • Your SPT 1500 terminal requires at least twice the amount of memory available as the data you are receiving. For example, if you are receiving a 30K application, you must have at least 60K free.
S P T 1 5 0 0 ResettingYour SPT 1500 Terminal Under normal circumstances, you will never have to use the reset button. However, on rare occasions your SPT 1500 terminal may “hang” (no longer respond to buttons or the screen). In this case, you need to perform a reset to get your SPT 1500 terminal running again. Performing a Soft Reset A soft reset tells your SPT 1500 terminal to stop what it’s doing and start over again.
Q u i c k Note: R e f e r e n c e You can restore any data previously synchronized with your computer during the next HotSync operation. To perform a hard reset: 1. Hold down the green power button on the front panel of the SPT 1500 terminal. 2. While holding down the power button, use the tip of an unfolded paper clip (or similar object without a sharp tip) to gently press the reset button. 3.
S P T 1 5 0 0 Service Information Before you use a terminal, it must be configured to run your applications. If you have a problem with running your terminal or using your equipment, contact your facility’s Technical or Systems Support. If there is a problem with the equipment, they will contact the Symbol Support Center: 1-800-659-2240 Outside North America, contact your local Symbol representative.
Q u i c k R e f e r e n c e Regulatory Information Radio Frequency Interference Requirements This device has been tested and found to comply with the limits for a Class B digital device pursuant to Part 15 of the Federal Communications Commissions Rules and Regulation. These limits are designed to provide reasonable protection against harmful interference when the equipment is operated in a commercial environment.
S P T 1 5 0 0 and measurement techniques - Section 2: Electrostatic discharge immunity test. • IEC 1000-4-3(1995-03) - Electromagnetic compatibility (EMC) - Part 4:Testing and measurement techniques - Section 3: Radiated, radio-frequency, electromagnetic field immunity test.
Q u i c k R e f e r e n c e Scanner Labeling ACHTUNG LASERSTRAHL. LASERKLASSE 2. NICHT IN DEN STRAHL BLICKEN. LUMIERE LASER - NE PAS REGARDER DANS LE FAISCEAU APPAREIL A LASER DE CLASSE 2. CAUTION LASER LIGHT. DO NOT STARE INTO BEAM.CLASS 2 LASER PRODUCT 630 -680nM,1 mW LASER. C A U T I O N LASER BARCODE SCANNER 9B97 19 L I ST E D ACCESSORY I. T. E. C US LASER LIGHT- DO NOT STARE INTO BEAM 630 - 680 nm LASER 1.
S P T 1 5 0 0 In accordance with Clause 5, IEC 0825 and EN60825, the following information is provided to the user: ENGLISH CLASS 1 CLASS 2 DANISH KLASSE 1 KLASSE 2 DUTCH KLASSE 1 KLASSE 2 FINNISH LUOKKA 1 LUOKKA 2 FRENCH CLASSE 1 CLASSE 2 CLASS 1 LASER PRODUCT LASER LIGHT DO NOT STARE INTO BEAM CLASS 2 LASER PRODUCT KLASSE 1 LASERPRODUKT LASERLYF SE IKKE IND I STRÅLEN KLASSE 2 LASERPRODUKT KLASSE-1 LASERPRODUKT LASERLICHT NIET IN STRAAL STAREN KLASSE-2 LASERPRODUKT LUOKKA 1 LASERTUOTE LASERVALO Ä
Q u i c k GERMAN KLASSE 1 KLASSE 2 R e f e r e n c e LASERPRODUKT DER KLASSE 1 LASERSTRAHLEN NICHT DIREKT IN DEN LASERSTRAHL SCHAUEN LASERPRODUKT DER KLASSE 2 HEBREW ITALIAN CLASSE 1 CLASSE 2 1 vnr rzhhk rmun 1 VNR rzhhk rut orzv lu, kt yhcvk iht 2 vnr rzhhk rmun 2 vnr PRODOTTO AL LASER DI CLASSE 1 LUCE LASER NON FISSARE IL RAGGIOPRODOTTO AL LASER DI CLASSE 2 NORWEGIAN KLASSE 1 LASERPRODUKT, KLASSE 1 KLASSE 2 LASERLYS IKKE STIRR INNI LYSSTRÅLEN LASERPRODUKT, KLASSE 2 PORTUGUESE CLASSE 1 PRODUTO L
For Frequently Asked Questions and tips on SPT 1500 operation, please visit the Symbol Palm website at http://www.symbol.com/palm. 70-33756-01 Revision C—September 1998 Symbol Technologies, Inc.