NetVision Data Phone User Guide 70-20530-01 May 1999 www.symbol.
The NetVision Data Phone provides in a small, hand-held unit on-site wireless voice and data communications capability. To use the NetVision Data Phone as a wireless network phone: 1. Press SND to turn on the NetVision Data Phone. To make a call, enter a number and press SND. To answer a call, press SND. 2. Press END to hang up a call. 3. Press and hold END to turn the phone off. To use the NetVision Data Phone as a text messaging pager: 1. Press FCT RCL. 2. Press SND to review messages.
Contents How to use the NetVision Data Phone .......................................................... 1 Getting Familiar ................................................................................ 2 Getting Started.................................................................................. 3 Battery ...................................................................................... 3 Powering on the Phone ............................................................... 4 Phone status Display.
How to use the NetVision Data Phone 1 2 4 5 3 6 8 7 9 11 10 12 13 15 16 14 17 17 18 19 20 21 1
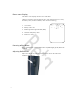
Getting Familiar 1. Antenna – high gain antenna. The antenna does not extend. 2. LED – indicates an incoming call. 3. Laser scanner. Warning: Do not stare into laser scanner. 4. Earpiece. 5. Mini-headset jack plug. headset into phone for hands-free use. 6. Serial port – download software. 7. Volume adjust buttons – adjust the current call volume and scroll phone menus and lists. 8. LCD – displays the phone status, menu options, messages and web client pages. 9.
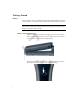
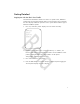
Getting Started Battery Fully charge the Lithium-ion battery for the NetVision Data Phone before first using the phone. Charge the battery attached or detached from the phone. Note: When charging the battery attached to the phone, turn off the phone before inserting it into the charger. Battery attaching/detaching 3 – Attach the battery to the phone by aligning the feet on the battery with the notches on the phone. Push the battery top into the phone until the catch clicks.
Battery charging Place the battery into rear charger slot or battery and phone combination into front charger slot. The LED indicators for each slot on the charger indicate the following Warning: status: do not stare into laser beam. – GREEN – battery is fully charged and ready for use. – RED – battery is charging; wait until LED changes to GREEN before using battery. – AMBER – charger is charging the other battery.
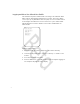
Phone status Display The Phone status display contains these indicators: ((PIC here of phone status display like this: (with callouts for the line icons, the battery icon, the RSSI indicator, status and User Name) )) 1 1. User Name 2. Battery status icon 3. Radio Signal Strength Indicator (RSSI) 3 ---NVPHONE ---IDLE 4 --L1 L2 -- 2 5 4. Network and phone status 5. Phone line icons Powering off the Phone Press and hold seconds).
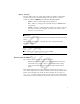
Getting Detailed Logging on with the Basic User Profile The NetVision Data Phone contains the basic user profile name, NVPhone. Symbol ships the telephone without a PIN. Use the telephone when it displays the status display. Follow this procedure if the system administrator assigns a PIN to the NVPhone profile: 1. Press FCT, NAME. The phone displays the User Names directory. NVPhone Setup Support Symbol 2.
Logging on With a Site defined User Profile The NetVision Telephone Administrator can configure the NetVision Data Phone with the Shared Phone Pool feature turned on. This feature allows users to pick up any Data Phone from the pool, select a User Name from a list and logon with a PIN to receive the features the system administrator allocated to that User Name. Obtain a User Name and PIN from the administrator. SiteUser1 SiteUser2 Setup Support Symbol To log on to the phone: 1. Press FCT, NAME.
Making Calls on a NetVision Data Phone Extension Dialing (Gateway Telephony) When a NetVision Data Phone operates in the gateway telephony style, it routes the call through the gateway using the gateway IP address stored in the phone. The gateway completes the call to the extension. To make a call to an extension: 1. Dial the extension number (do not dial * or #). 2. Press SND.
Receiving Calls on a NetVision Data Phone Answering a Call User action to receive calls varies from no action (auto-answer mode) to pressing any key or button. This is a user-selectable option. The NetVision Data Phone caller ID function works only on peer-to-peer calls. Refusing a Call To refuse an incoming call, press the END key. The called phone displays: Call Finished The calling phone displays: Call Declined Note: This feature is disabled in auto answer mode.
Receiving Intercom Calls Telephones not in active conversation automatically answer an intercom call after the first ring. The phone rings with the user-programmed intercom ring. Each phone briefly displays the message Intercom from n. n represents the group channel ID. The phone answers the call automatically and changes the phone status to active. Phones in active conversation give the intercom call-waiting tone (three beeps) through the earpiece.
Name Dialing The NetVision Data Phone name directory contains the user profile names defined using the NetVision Data Phone Administrator. This directory contains up to 25 names. Phone users cannot modify this directory. To make a call using name dialing: 1. Press NAME to activate the NetVision Data Phone name directory or press either side volume button. 2. Use the *< and #> keys to scroll through the NetVision Data Phone name directory.
Note: Pressing the scroll buttons or keys after pressing RCL displays the speed-dial directory. Dialing to Extensions or the PSTN Only phones using gateway telephony can make calls outside to the PSTN either via the PBX or directly via the gateway. To call an outside number: 1. Dial the outside line access code and the number. 2. Press SND. The phone sends the number to the gateway using the IP address for the gateway stored in the phone The gateway picks the call and passes the call to the PSTN.
Setting Telephone Ring Style To adjust the ring style for incoming telephone calls: 1. Press MENU. The phone displays the main menu. 2. Use the *< and #> keys to scroll through the items. 3. Choose User Options. Press SND. The phone displays the User Options menu. 4. Scroll through the user options. 5. Select Phone Ring . Press SND. The phone displays the current setting. 6. Scroll through the ring options. Press SND to set the ring style. The phone rings once using the selected tone.
Setting Intercom Ring Style The phone uses this ring style when the incoming call is an intercom call: 1. Press MENU. The phone displays the main menu. 2. Use the *< and #> keys to scroll through the items. 3. Select User Options and press SND. The phone displays the NetVision Data Phone user options. 4. Scroll through the user options. 5. Select Intrcm Ring and press SND. The LCD displays the current intercom ring style. 6. Scroll and select a ring option. 7.
3. Select User Options and press SND. The phone displays the NetVision Data Phone user options. 4. Scroll through the user options. 5. Select Phone Answr and press SND. 6. Scroll through the phone answer options. 7. Select One Key and press SND. The NetVision Data Phone sets the single-key answer mode and returns to the User Options menu. Press END to cancel. Any-Key Answering In this mode, the NetVision Data Phone answers a call when the user presses any key or button.
with a |. L H [-----|----] 7. Scroll and select the desired volume level. 8. Press SND to set the new volume level. Press END to cancel. Setting the Ring Volume Users can set the ring volume that signals an incoming call. To adjust the ring volume: 1. Press MENU. The phone displays the Main menu. 2. Use the *< and #> keys to scroll through the items. 3. Select User Options and press SND. The phone displays the NetVision Data Phone user options. 4. Scroll through the user options. 5.
Any incoming call automatically unlocks the keypad, so that pressing SND (or other key in any key answer mode) answers the call. To unlock the keypad: 1. Press MENU. Scroll the list to select User Options. 2. Press SND. 3. Scroll the list to Keypad Lock. 4. Press SND. 5. Use scroll keys to toggle to Disabled. 6. Press SND. 7. Press END to return to status display. After about five seconds the phone displays Locked for status.
Pre-Programmed Functions Adjusting the Volume During a Call Use one of these alternative methods to adjust the earpiece volume without going through the phone menu. To make a permanent adjustment: 1. Press 9. FCT, 2. Use the scroll keys *< and #> to adjust the volume. 3. Press SND to set the volume. To make a temporary adjustment for the current call, use the volume buttons on the left side of the phone.
When set to block calls, the phone displays the message: Calls blckd Unblock? Press SND to unblock, press END to cancel. The phone returns to the status display. Maintaining Speed-Dial List Adding a Number to the Speed-Dial List To add or replace a number in the speed-dial list: 1. Dial a number. Do not press SND. 2. Press STO. A field appears for entering or replacing a two-digit speed- dial extension. 3. Key in the two-digit location.
Messages in the NetVision Data Phone The NetVision Data Phone has a built-in messaging facility that accesses a message account. The phone alerts the user to new messages with a special tone. Press FCT, RCL to view any messages. Users cannot access messages from the Web client. To view messages: 1. Press FCT, RCL. The phone displays “n messages” indicating the number of messages ( n is a single digit 2 thru 9). (In the case of one message waiting, the phone automatically displays the message.) 2.
Basic Scanner Operation The NetVision Data Phone contains a built-in laser-scan engine for data applications. The default Uniform Resource Locator (URL), built-in to the phone, contains a scanner-enabled field. Actual Web client phone use depends on the application. Warning: Do not stare into Laser aperture. Test the scanner Follow the procedure below to test the scanner of the NetVision Data Phone. When the NetVision Data Phone first boots up, it goes into phone mode. 1.
NUMERIC Data Directly enter numeric data using the keypad. Alphabetic Data Enter alphabetic data using the FCT key and the keys in the table below. Press and hold the FCT key, press a keypad key to display a list of characters associated with that key, press the corresponding key. Key Characters associated with these keys: 1 2 3 4 5 6 7 8 9 * 0 # 1 Blank .
Basic Web page navigation The Web client maps the keypad to many common browser and field-level functions. The table below lists the keys and the associated functions.
< Page left. Scroll the page towards the left margin. > Page right. Scroll the page towards the right margin. 8 Page up. Scroll the page towards the top margin. 0 Page down. Scroll the page towards the bottom margin. 4 Line left. Scroll the page one column towards the left margin. 6 Line right. Scroll the page one column towards the right margin. 2 Line up. Scroll the page one line towards the top margin. 5 Line down. Scroll the page one line towards the bottom margin.
Related Publications 25 • NetVision Phone Accessory Guide • NetVision Telephone Administrator • NetVision Data Phone Product Reference Guide • NetVision Data Phone Web Client Administrator Guide
Regulatory Compliance To comply with U.S. and international regulatory requirements, the following information has been included. The document applies to the complete line of Symbol products. Some of the labels shown, and statements applicable to other devices might not apply to all products.
Applicable Directives: • Electromagnetic Compatibility Directive 89/336/EEC • Low Voltage Directive 73/23/EEC Applicable Standards: • EN 55 022 - Limits and Methods of Measurement of Radio Interference Characteristics of Information technology Equipment • EN 50 082-1 - Electromagnetic Compatibility - Generic Immunity Standard, Part 1: Residential, commercial, Light Industry • IEC 801.
Telephone Devices (Modems) United States If this product contains an internal modem it is compliant with Part 68 of the Federal Communications Commission Rules and Regulations and there will be a label on the product showing the FCC ID Number and the REN, Ringer Equivalence Number. The REN is used to determine the quantity of devices which maybe connected to the telephone line. Excessive RENs on the telephone line may result in the device not ringing in response to an incoming call.
Repairs to certified equipment should be made by an authorized Canadian maintenance facility designated by the supplier. Any repairs or alterations made by the user to this equipment, or equipment malfunctions, may give the telecommunications company cause to request the user to disconnect the equipment. User should ensure for their own protection that the electrical ground connections of the power utility, telephone lines and internal metallic water pipe system, if present, are connected together.
Use of controls, adjustments or performance of procedures other than those specified herein may result in hazardous visible or invisible laser light exposure. Class 2 laser scanners use a low power, visible light diode. As with any very bright light source, such as the sun, the user should avoid staring directly into the light beam. Momentary exposure to a Class 2 laser is not known to be harmful. Laser information labels are found in the product Quick Reference Guide.
31
Customer Support Symbol Technologies provides its customers with prompt and accurate customer support. Use the Symbol Support Center as the primary contact for any technical problem, question or support issue involving Symbol products. If the Symbol Customer Support specialists cannot solve a problem, access to all technical disciplines within Symbol becomes available for further assistance and support.
33 • 1-800-722-6234, inside North America • +1-516-738-5200, in/outside North America • http://www.symbol.