Introduction R AF T Chapter 2 Using the MC55 This chapter explains the buttons, status icons, and controls on the MC55, and provides basic instructions for using the MC55, including powering on and resetting the MC55, and entering and capturing data. Today Screen The Today screen displays important information, such as upcoming appointments and status indicators. Tap a section on the screen to open the associated program. Alternatively, tap Start > Today to display the Today screen.
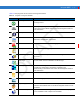
-2 MC55 User Guide Status Icons The Navigation bar at the top of the screen can contain the status icons listed in Table 2-1. Table 2-1 Status Icons Icon Function Notification Description Backup Battery Low. Notification that one or more instant messages were received. T Notification that one or more e-mail/text messages were received. Notification that one or more voice messages were received. There are more notification icons than can be displayed. Tap to display remaining icons.
Using the MC55 Table 2-1 Status Icons (Continued) Icon Function WAN (Continued) Description Speakerphone is on. Antenna/signal icon: wireless on/good signal. Antenna/signal icon: wireless off. Antenna/signal icon: no service or searching. GPRS in use. (MC5504 and MC5574) Roaming. SIM Card not installed. All sounds are on. R AF Speaker T EGPRS in use. (MC5504 and MC5574) All sounds are off. Vibrate is on. Battery Main battery is charging. Battery power completely depleted. Main battery is low.
2-4 MC55 User Guide Programs Table 2-3 lists the default programs on the Start menu. Table 2-3 Programs in the Start Menu Icon Name Office Mobile Description Use the complete suite of Microsoft® Office applications for your mobile device. T Excel Mobile - Create new workbooks or view and edit Microsoft® Excel® workbooks. OneNote Mobile - Create new notes or view existing notes. PowerPoint Mobile - View Microsoft® PowerPoint® slides and presentations.
Using the MC55 2-5 Table 2-4 lists programs that are listed in the Programs window. Table 2-4 Programs in Program Window Icon Name Description Synchronize information between the MC55 and a host computer or the Exchange Server. AirBEAM Allows specially designed software packages to be transferred between a host server and the MC55. Refer to the MC55 Integrator Guide for more information. BTExplorer Manages Bluetooth connections.
2-6 MC55 User Guide Table 2-4 Programs in Program Window (Continued) Icon Description Search contacts, data, and other information on your MC55. SIM Toolkit Manage the contacts that are stored on your SIM card. Copy SIM contents to Contacts on the MC55. Tasks Keep track of your tasks. Windows Live Use this mobile version of Windows Live™ to find information on the web. Windows Media Player Mobile Play back audio and video files.
Using the MC55 2-7 Table 2-5 Settings in the Setting Window (Continued) Icon Name Description Sounds & Notifications Enable sounds for events, notifications, and more, and set the type of notification for different events. Today Customize the appearance and the information to be displayed on the Today screen. About View basic information such as the Windows Mobile® version and type of processor used on the MC55. Backlight Set the display backlight time-out and adjust brightness.
2-8 MC55 User Guide Table 2-5 Settings in the Setting Window (Continued) Icon Name Description Check battery power and set the time-out for turning off the display to conserve battery power. Regional Settings Set the regional configuration to use, including the format for displaying numbers, currency, date, and time on the MC55. Remove Programs Remove programs that you installed on the MC55. Screen Change the screen orientation, re-calibrate the screen, and change the screen text size.
Using the MC55 2-9 Adjusting Volume To adjust the system volume using the Speaker icon in the navigation bar: Tap the Speaker icon. The Volume dialog box appears. R AF T 1. Figure 2-2 Volume Dialog Box 2. Tap and move the slide bar to adjust the volume. 3. Select the On or Off radio button to turn the volume on or off. You can also adjust the system volume using the Sounds & Notifications window, or use the Up/Down button on the side of the MC55.
2 - 10 MC55 User Guide Figure 2-4 Battery Icon on the Title Bar Also view the battery status using the Power window. Battery Reserve Options If the charge of the battery reaches a critical threshold, the MC55 shuts down. This threshold can be changed but affects the amount of time that data can be retained. Tap Start > Settings > Power icon > RunTime tab. A warning message appears. R AF T 1. Figure 2-5 Warning Message Read the warning message and tap ok. D 2. Figure 2-6 RunTime Tab 3.
Using the MC55 2 - 11 Main Battery Temperature Notifications The temperature notification system implements three levels of notification when the temperature within the battery exceeds specific temperature thresholds: • Level 1: Temperature Watch; this level is similar to main battery low warning. It indicates that the battery temperature has reached the first threshold level. The user should move to an environment within proper operating temperature.
2 - 12 MC55 User Guide LED Indicators The MC55 has three LED indicators. The Scan/Decode LED indicates status for scanning. The Charging/Battery Status LED indicates battery charging and status. The Radio Status LED indicates WAN radio status. Table 2-6 describes the LED indications. Charging/Battery Status LED Radio Status LED R AF T Scan/Decode LED Figure 2-9 LED Indicators Table 2-6 LED Indications LED State Indication Scan/Decode LED Solid Green Successful decode/capture.
Using the MC55 2 - 13 Resetting the MC55 There are two reset functions, warm boot and cold boot. A warm boot restarts the MC55 by closing all running programs. A cold boot also restarts the MC55, and also resets the clock. Data saved in flash memory or a memory card is not lost. If the MC55 is not functioning properly, perform a warm boot first. If the MC55 still does not respond, perform a cold boot.
2 - 14 MC55 User Guide Locking the MC55 Use the Device Lock feature to prevent use of the device. Note that when locked, the MC55 does not respond to screen or keypad input. To lock the device, tap the Device unlocked icon. The icon changes to locked. Device Locked Icon Figure 2-10 Device Locked/Unlocked Icons R AF To unlock the device and free it for use, tap Unlock. T Device Unlocked Icon Figure 2-11 Unlock Device Window D Tap Unlock on the Unlock window.
Using the MC55 2 - 15 Keypads The MC55 offers two types modular keypad configurations: Numeric and alpha-numeric. Numeric Keypad Configuration R AF T The numeric keypad contains application keys, scroll keys, and function keys. The keypad is color-coded to indicate the alternate function key (blue) values. Note that an application can change keypad functions so the MC55’s keypad may not function exactly as described.
2 - 16 MC55 User Guide Table 2-8 MC55 Numeric Keypad Descriptions Key Blue Key (left) Description Use this key to launch applications or access items (shown on the keypad in blue). Press the Blue key once to activate this mode, followed by another key. A single press displays the following icon at the bottom of the screen, until a second key is pressed: Use this key to access the secondary layer of characters and actions (shown on the keypad in orange).
Using the MC55 2 - 17 Table 2-8 MC55 Numeric Keypad Descriptions (Continued) Key Description In default state, produces the numeric value on the key. In Alpha state, produces the lower case alphabetic characters on the key. Each key press produces the next alphabetic character in sequence. For example, press and release the Orange key and then press the ‘4’ key once to produce the letter ‘g’; press and release the Orange key and then press the ‘4’ key three times to produce the letter ‘i’.
2 - 18 MC55 User Guide Table 2-9 Numeric Keypad Input Modes Orange Key (Alpha Lowercase Mode) Numeric Mode Orange + Shift Keys (Alpha Uppercase Mode) Key Blue+ Key SHIFT + Key 1st Press 2nd Press 3rd Press 4th Press * 1st Press 2nd Press 3rd Press 4th Press * * * * 1 F1 ! * * * 2 2 F2 @ a b c A B C 3 3 F3 # d e f D E F 4 4 F4 $ g h i 5 5 F5 % j k l 6 6 F6 ^ m n o 7 7 F7 & p q r 8 8 F8 * t u v 9 9 F9 ( w x y 0 0 F10 )
R AF Figure 2-13 QWERTY Keypad Configuration T Using the MC55 2 - 19 D Figure 2-14 AZERTY Keypad Configuration Figure 2-15 QWERTZ Keypad Configuration
2 - 20 MC55 User Guide Table 2-10 Alpha-numeric Keypad Descriptions Key Blue Key Action Launches applications (shown on the keypad in blue). Press the Blue key once to activate this mode temporarily, followed by another key. This displays the following icon at the bottom of the screen, until a second key is pressed: Press the Blue key twice to lock this mode. This displays the following icon at the bottom T of the screen: Press the Blue key a third time to unlock.
Using the MC55 2 - 21 Table 2-10 Alpha-numeric Keypad Descriptions (Continued) Key Action Shift Changes the state of the alpha characters from lowercase to uppercase. Press the Shift key once to activate the cap mode. This displays the following icon at the bottom of the screen: Press the Shift key a second time to return to the normal state. Turns the display backlight on and off. Backspace Produces a backspace. Enter Executes a selected item or function.
2 - 22 MC55 User Guide Table 2-11 QWERTY Keypad Input Modes (Continued) Key Normal Shift + Key Orange + Key y Y _ U u U - I i I = O o O “ P p P áü A a A # S s S D d D F f F 4 5 6 R AF G OK T Y Blue + Key g G ( h H ) j J / k K : l L ‘ z Z 7 x X 8 c C 9 v V % B b B & N n N ! M m M ? , , < @ ENTER Enter . . > 0 .
Using the MC55 2 - 23 Table 2-12 AZERTY Keypad Input Modes Key Normal Shift + Key Orange + Key Blue + Key a A * Start Menu Z z Z 1 Menu E e E 2 Phone R r R 3 T t T + Y y Y U u U I i I O o O p P áü q Q # s S 4 d D 5 f F 6 g G ( h H ) j J / k K : l L ‘ M ? Q S D F G H J K D L _ - = “ R AF P T A M m Shift Shift W w W 7 X x X 8 C c C 9 V v V % B b B & N n N ! , , < @ Backspace backspace OK Note:
2 - 24 MC55 User Guide Table 2-12 AZERTY Keypad Input Modes (Continued) Key Normal Enter Enter . . TAB Tab Space Space Star * Shift + Key > Orange + Key 0 Blue + Key . Back tab * * * T Note: An application can change the key functions. The keypad may not function exactly as described.
Using the MC55 2 - 25 Table 2-13 QWERTZ Keypad Input Modes (Continued) Key Normal Shift + Key Orange + Key y Y 7 X x X 8 C c C 9 V v V % B b B & N n N ! M m M , , < ENTER Enter Space . Star ? @ R AF TAB T Y Tab Blue + Key Back tab Space . > 0 * * * * Note: An application can change the key functions. The keypad may not function exactly as described. PIM Keypad Configuration D The PIM keypad contains application keys, scroll keys, and function keys.
2 - 26 MC55 User Guide Table 2-14 MC55 PIM Keypad Descriptions Key Blue Key (left) Description Use this key to launch applications or access items (shown on the keypad in blue). Press the Blue key once to activate this mode, followed by another key. Use this key to access the secondary layer of characters and actions (shown on the keypad in orange). Press the Orange key once to lock the keypad into Alpha state.
Using the MC55 2 - 27 Table 2-14 MC55 PIM Keypad Descriptions (Continued) Key Description In default state, produces the numeric value on the key. In Alpha state, produces the lower case alphabetic characters on the key. Each key press produces the next alphabetic character in sequence. For example, press and release the Orange key and then press the ‘4’ key once to produce the letter ‘g’; press and release the Orange key and then press the ‘4’ key three times to produce the letter ‘i’.
2 - 28 MC55 User Guide Table 2-15 Numeric Keypad Input Modes Orange Key (Alpha Lowercase Mode) Numeric Mode Orange + Shift Keys (Alpha Uppercase Mode) Key Blue+ Key SHIFT + Key 1st Press 2nd Press 3rd Press 4th Press * 1st Press 2nd Press 3rd Press 4th Press * * * * 1 F1 ! * * * 2 2 F2 @ a b c A B C 3 3 F3 # d e f D E F 4 4 F4 $ g h i 5 5 F5 % j k l 6 6 F6 ^ m n o 7 7 F7 & p q r 8 8 F8 * t u v 9 9 F9 ( w x y 0 0 F10 )
Using the MC55 2 - 29 Table 2-16 Special Characters (Continued) Special Characters Key L n N o O p P r R s S t T u U y Y z $ “ ) ! * % # _ ? D - R AF l Z / ( + .
2 - 30 MC55 User Guide Function Buttons T The MC55’s buttons perform certain functions. Scan/Action Button Action Button R AF Up/Down Button Scan/Action Button Power Button Figure 2-17 Function Buttons • Power: Press the red Power button to turn the MC55 screen on and off. The MC55 is in suspend mode when the screen is off. For more information, see Powering On the MC55 on page 1-9. Also use the Power button to reset the MC55 by performing a warm or cold boot. See Resetting the MC55 on page 2-13.
Using the MC55 2 - 31 • Drag: Hold the stylus on the screen and drag across the screen to select text and images. Drag in a list to select multiple items. NOTE Motorola recommends using the spring-loaded tip of the stylus to write on the screen, and the back end of the stylus to tap the screen. Use your finger to press the Power button and keypad buttons. CAUTION To prevent damage to the screen, do not use any device other than the Motorola-provided stylus.
2 - 32 MC55 User Guide Data Capture The MC55 offers three types of data capture options: • Linear scanning • Imaging • Digital camera. To perform data capture a scanning enabled application must be installed on the MC55. A sample scanning application can be downloaded from the Motorola Support site at http://support.symbol.com.
Using the MC55 2 - 33 Digital Camera MC55 with an integrated digital camera have the following features: • Omnidirectional reading of a variety of bar code symbologies, including the most popular linear, postal, PDF417, and 2D matrix code types. • Advanced intuitive aiming for easy point-and-shoot operation.
2 - 34 MC55 User Guide Press the scan button. Ensure the red scan beam covers the entire bar code. The Scan/Decode LED lights red to indicate that scanning is in process, then lights green and a beep sounds, by default, to indicate the bar code was decoded successfully. R AF 3. T Figure 2-19 Linear Scanning Correct Incorrect Figure 2-20 Linear Scanner Aiming Pattern Imager Scanning Ensure that a scan-enabled application is loaded on the MC55. 2. Aim the scan window at the bar code. D 1.
Using the MC55 2 - 35 Linear bar code PDF417 symbol Symbol View Finder (Aiming Pattern) Correct R AF T Figure 2-22 Imager Aiming Pattern: Bar Code Centered Incorrect Correct Figure 2-23 Imager Aiming Pattern: Bar Code Not Centered Figure 2-24 Pick List Mode with Multiple Bar Codes in Aiming Pattern Release the scan button. D 4. NOTE Imager decoding usually occurs instantaneously.
Figure 2-25 Sample Scan Application with Preview Window Move the MC55 until the red aiming reticle is on the bar code to scan. The aiming reticle turns green when the MC55 is able to decode the bar code. R AF 4. T 2 - 36 MC55 User Guide Figure 2-26 Digital Camera Scanning Release the scan button. The Scan/Decode LED lights green and a beep sounds, by default, to indicate the bar code was decoded successfully. D 5. Taking Photos To take a photo: 1. Tap Start > Programs > Pictures & Videos icon.
Using the MC55 2 - 37 1. Tap Start > Programs > Pictures & Videos icon. 2. Tap Camera on the command bar. 3. Tap Menu > Video to set shooting mode to video. The available recording time displays on the screen. NOTE 4. By default, the time limit for recording videos is set to 30 seconds. Press the Enter key to begin recording. Viewing Photos and Videos R AF To view photos and video clips: 1. Tap Start > Programs > Pictures & Videos icon. 2. Tap the picture or video clip to view. D 3.
D R AF T 2 - 38 MC55 User Guide
D R AF T Using the MC55 2 - 39
D R AF T 2 - 40 MC55 User Guide