Co dairy BA) © 2001 SYMBOL TECHNOLOGIES, INC. All rights reserved Symbol reserves the right to make changes 10 any product to improve reliability. function, or design Symbol does not assume any product liability arising out of, or in connection with, the application or use of any product. circuit, or application described herein. No license is granted, either expressly or by implication, estoppel, or otherwise under any patent right or patent.
FCC RF EXPOSURE INFORMATION WARNING Ls Read this information before using your phone In August 1996 the Federal Communications Commission {FCC of the United States with its action in Report and Order FCC 96-328 adopted an updated safety standard for human exposure to radio frequency electromagnetic energy emitted by FCC regulated transmitters. Those guidelines are consistent with the safety standard previously set by both U.S. and international standards bodies.
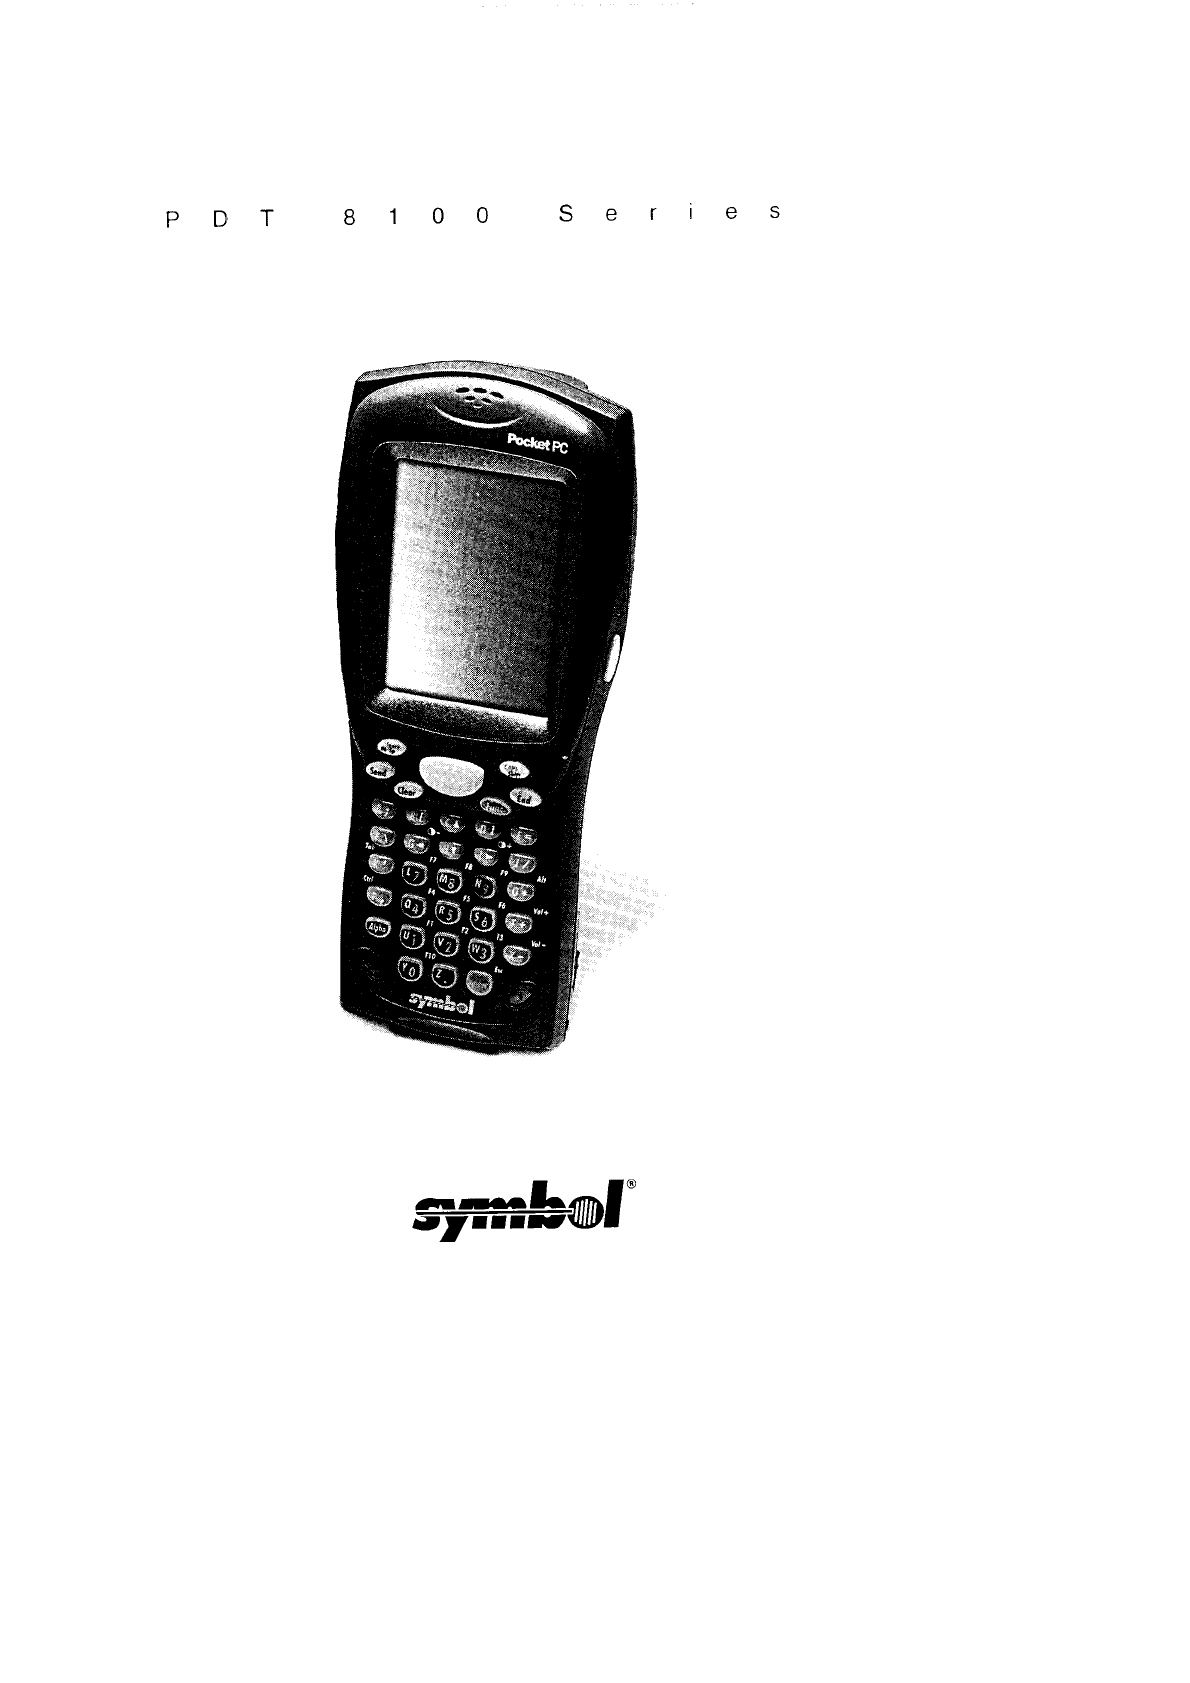
Quick Reference Introduction Congratulations on your purchase of Symbol Technologies’ PDT 8100 Terminal Its unique combination of features make this product superior for use in a wide range of applications. These features include: . .
» Scanning with the PDT 8100 on page 24 + Resetting Your PDT 8100 Terminal on page 24 « Host Communications on page 26 « Maintaining the PDT 8100 on page 27 « Troubleshooting on page 28. The PDT 8100 Product Reference Guide (p/n 72-50932-xx), available from your Reseller or from Symbol Technologies, details the applications available for the PDT 8100. Accessories Each PDT 8100 requires one 1550 mAh lithium-ion battery.
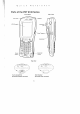
Sse merino Quick Reference Parts of the PDT 8100 Series Front View Side View LCD (Screen). Power.
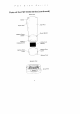
Parts of the PDT 8100 Series (continued) Back View Stylus — Stylus Sia I {DA Port Battery Cover Reset Button Switch Battery—"" ! Compartment _~ Lithium-ion Battery Battery Door Battery Door Latch Latch “Battery Door Bottom View Serial Port
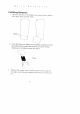
Installing Batteries 1. Slide the fatties on the battery door up and lift the battery door away from the PDT 8100. TTT Insert the lithium-ion battery in the battery compartment with the battery tether positioned properly (as shown below) making sure the battery snaps into place. 3 Replace the battery cover pressing down firmly along the top edge while sliding the latches down into the locked poi.
Charging the Battery Before using your PDT 8100 for the first time. charge the humiliation battery in the terminal for about 2 1/2 hours, using the CRD 8100 Cradle or the Synchronization Cable. Follow these same procedures to recharge the battery Your terminal is equipped with a memory backup battery which automatically charges from the fully-charged lithium-ion battery. This backup battery retains data in memory when the terminal's battery is removed.
Terminal Status LED —— 3. The Terminal Status LED turns red {may take up to one minute) to indicate charging. then turns off when the battery is fully charged. The terminal's battery is fully charged after approximately 2 1/2 hours Charging a Spare Battery To recharge a spare battery. insert it in the spare battery charging slot in the back of the cradle. so the contacts are facing down an towards the back of the cardie.
approximately 2 1/2 hours. See the CRD 8100-10008 Quick Reference Guide (p/n 72-50974-xx) for more information Insert the Synchronization cable into the bot tom of the terminal 2.
15-Pin Serial Port Connector To connect to the Micro-D RS-232 pint at the top of the terminal use an ITT Cannon brand mil-spec connector (MD OM-158SB) with captivated jack screws {mil p/n to protect the connector's contacts from damage during insertion and removal Attaching the Hand strap “1 Install the plastic clip on the back of the terminal using the screw, 2.
Inserting a Compact Flash Card The PDT 8100 contains a slot for a standard compact flash card which includes a locking mechanism that prevents the card from coming noose if the PDT 8100 11s dropped. Insert the compact flash card carefully to ensure it engages this locking mechanism 1. Pen the battery door and remove the battery 2. Remove the flash card cover at the top of the battery compartment by puling the top out. and lifting the cover up Com pa, Flash SN cad 7 ON Cover” 3.
Quick Reference Removing a Compact Flash Card 1. Open the battery door and remove the battery and flash card cover 2. Use the stylus to press the flash card release button inside the flash card compartment Starting the PDT 8100 Press the red power button to tum the PDT 8100 on and off. if the terminal does not power on. perform a hard reset. See Performing a Hard Reset on page 25. BU HON wo As the terminal initializes its unique Flash File system.
PDT roe os Aligning the Screen To align your PDT 8100 so the cursor on the touch screen aligns with the tip of your stylus 1. If necessary, adjust the contrast on the PDT 8100 30 the screen is readable. See Controlling the Back light on page 13. 2. Remove the stylus from its storage silo on the back of the PDT 8100 3. Tap the center of each target that appears on the screen with the tip of the stylus, Tap the target firmly and accurately at each location on the screen.
Using the PDT 8100 Controlling the Back light Turn the back light on and off by pressing the Back light button Power Button Back light Button Adjusting the Contrast Keyboard Keys Description or , key Function + “17 | Decrease contrast (lighten the ” | Function +2" | Increase contrast (darken the i 37-key Function + °G" | Decrease contrast {lighten the acre | Function + "1" | Increase contrast {darken the key Function + "Y" | Decrease contrast frighten the screen Function + "W Increase con teas! (darken the
Using the Keyboard Note: Key functions can be changed by an application Your keyboard may not function exactly as described. For more detailed keyboard information refer to the POT 8100 Product Reference Guide Using the 28-Key Keyboard The 28-key keyboard uses an alphanumeric keypad that pr the 26-character alphabet numbers anc a characters. The keyboard is color-coded {0 indicate which key {Alpha-Numeric. Fun) to press to produce a particular character or action. The keyboard default 1s numeric.
Using the 37-Key Keyboard The 37-key keyboard uses an alphanumeric keypad that produces the 26-character alphabet numbers and assorted characters. The keyboard is color-coded to indicate which modifier key (Alpha-Numeric. Fun) to press to produce a particular character or action. The keyboard default is menu, producing the gray number or white character on that key. Scan key Caps/Shift Space! . . key Backspace Key End key Send key...
Key Apps Back light Ew Escapement Rawer sows on tt freeman on ee em Prose End to move the cursor to the ¢ s Enter after enter | farm an application feel i . rating the POT 814 Press Scan to ¢ scan triggers.) #0 bar codes.
Using the 47-Key Keyboard s an alphanumeric keypad that produces and assorted The 47-key keyboard use: the op-character alphabet (AZ). numbers characters. The keyboard is color-coded © indicate which modifier wey (Alpha-Numeric, Fun) to press to produce a particular it is the key value character of action. The keyboard detail lower Case yellow letting on that Key i producing the gray number _Capsicum \ ! key or i Sean key. space! Backspace End key key . Function key Send key" Clear key .
Key Cap Shi Emphasize th Press Fun « + Shift also ¢ S00 keys CGH Fun + Enter 1 from an application & e PDT 81¢ Power Seo Starting Crass Scan to scan bar codes scan riggers. The Send key is application dependent Press Fun + Bk-Sp to enter a bank spe Press Bk-Sp to er malformation entered on the dig lay | one character al a ima F | ron I Sean | [ | Using the Stylus The stylus selects items and enters information. The stylus functions as a mouse.
Today Screen When you turn on your terminal for the first time each day (or after 4 hours of inactivity}, the Today screen appears. You can also display it by tapping 8, then Today. On the Today screen, you can see important information for the day.
e Terence Navigation Bar and Command Bar The navigation bar at the top of the screen displays the active program and current time, and allows you to switch to programs and close screens. The command bar at the bot torn of the screen contains menus and buttons to perform tasks in programs. RIS 3 Today [3 Calendar fiz] contacts £ Internet Explorer iz] Notes I~] Tasks 04 Inbox rt Programs — [3 Settings —] QJ) Find...
Input Methods Enter information in any program by typing with the 28-, 37-, or key keyboard, the soft keyboard, or writing using Character Recognizer. Eno Getting Nate Tap ta select an input method change options. Tap to show of bids the input pans New Edit Tools & ap to see hows to ete letters: The letter you write is converted to typed text that appears an the screen The Character Recognizer input panel is divided into three writing areas.
Quick Reference Recognizer and for demos of all characters, tap on the Character Recognizer input panel, Letter Area Huber Punctuation Area Sol TTT TTT “bol Ppp al 1 Clad, seal] Sal Je “lag GITE lel Sh TT Blu 519, Fakir [xo CTU Del | Opaque | I Fai | | space
Scanning with the PDT 8100 The PDT 8100 has an integrated scanner which collects data by scanning bar codes. See the PDT 8100 Product Reference Guide for information on configuring your terminal for scanning. To scan bar codes with the PDT 8100: 1. Aim the scanner at the bar code. 2. Press the scan trigger. Ensure the red scan beam covers the entire bar code. The green scan LED lights and a beep sounds to indicate a successful decode.
Quick Reference To perform a soft reset: Keyboard Keys ’ 28-key Back light « Down Arrow + Function 37-key Back light + Alpha + Function ’ 47-key Back light + End + Function Performing a Hard Reset A hard reset also restarts your PDT 8100 terminal, but erases all stored records and entries. Therefore, never perform a hard reset unless a soft reset does not solve your problem. Note: You can restore any data previously synchronized with your computer during the next Active Sync operation.
5. Realign the screen as described on page 12. Note: With a hard reset, Formats, Preferences, and other settings are restored to their factory default settings. Host Communications The PDT 8100 Series terminal can communicate with a host PC either directly through its communications port using an RS-232 serial cable, the cradle, or tirelessly via the Spectrum24® wireless LAN.
1. Attach an RS-232 serial cable to the serial port in the bottom of the PDT 8100. 2. Attach the other end of the cable to the serial port on the printer. 3. Run your application's print function. To print from an rd A-compliant printer: 1. Point the Ir DA port on the back of the PDT 8100 at the Ir DA port on the printer, at a maximum distance of 39 inches (1 meter). 2. Run the application's print function. Note: The PDT 8100 must have software configured to communicate with the printer you are using.
PD 81 00 Series Troubleshooting Problem Cause Solution PDT 8100 does not turn on Lithium-ion battery not charged Charge or replace the lithium-ion battery in the POT 8100, Lithium-ion bat trey not installed properly. Ensure battery is installed properly. System crash. Perform a hard resit. See Resetting Your PDT 8100 Terminal on page 24. Rechargeable lithium-ion bat troy did not charge. Battery failed Replace battery. If your POT 8100 terminal still does not operate.
Quick Reference Problem Cause Solution Fail to anticommunist from Bring the terminal closer to the care with FDA printer is mare printer and attempt intercommunicate. than 1 mater (39 ions again. inches} Construction inter: Check the path to ensure no ob freed with projects were in the way communication Application is not Printer support must be included enabled to run with the application to run Ir DA IDA printing. printing on the terminal. See your System Administrator.
Problem Cause Solution PDT 8100 turns itself off PDT 8100 is inactive Your PDT 8100 turns off after a period of inactivity. This period can be set from ene to five minutes. in one-minute intervals, Check the Power dialog box {in the System tab under Start/Settings). and change the setting if you need a ranger delay before the automatic shutoff feature activates. PDT 8100 doesn't recon prize my handwriting Character strokes written incorrectly with the stylus.
Problem Cause Solution A message ap pears stating that your PDT 8100 terminal memory is full Too many gites stored on the ter: final Delete unused memos and records. You can save these records on your computer Memory allocation to low. Adjust the memory allocation. Select Start, then Settings. and deject the System tab. Tap Memory and adjust the slider, Too many applicant sons installed on the terminal. if you have installed additional applications on your POT 8100. remove them to recover memory.
Genning Application is not loaded — 4 1 our PDT 8100 | terminal does not Distance between exit window and bar code is in correct Terminal is not programmed for the bar code. Terrain is not programmed to general A hip. Battery Verity th at the units loaded with a scanning application Sea your System Administrator. Be sure you 27€ wit scanning range Be sure the terminal is pros rammed to accept the type of bar code you are scanning ey if you are expecting 3 beep Ona cod decode and don't hear one.
Quick Ret Terence END-USER LICENSE AGREEMENT MICROSOFT WINDOWS FOR POCKET PC DATA EXCHANGE COMPONENT: MICROSOFT ACTIVE SYNC, VERSION 3.1 IMPORTANT-READ CAREFULLY: This End-User License Agreement ("EULA is a legal agreement between you (either an individual or a single entity) and the manufacturer (“Manufacturer”) of the special purpose computing device ("SYSTEM with which you acquired the Microsoft software product(s) identified above SOFTWARE". The SOFTWARE includes computer software.
DESCRIPTION OF OTHER RIGHTS AND LIMITATIONS. . + Speech/Handwriting Recognition. If the SOFTWARE includes speech and/or handwriting recognition component(s), you should understand that speech and handwriting recognition are inherently statistical processes. halt recognition error are inherent in the processes; that it is your responsibility to provide far handling such errors and to monitor the recognition processes and correct any errors.
or Quick Reference COPYRIGHT. All title and intellectual property rights in and to the SOFTWARE (including, but not limited 10, any images. photographs, animations. video. audio, music, text, and “applets” incorporated into the SOFTWARE}, the accompanying printed materials, and any copies of the SOFTWARE, are owned by MS or its suppliers (including Microsoft Corporation). You may not copy the printed materials accompanying the SOFTWARE.
. Maintain a natural position + Adduce of eliminate excessive force + Keep objects that are used frequently within easy reach « Perform tasks at correct heights « Reduce or eliminate vibration « Reduce or eliminate direct pressure « Provide adjustable workstations « Provide adequate clearance + Provide a suitable working environment « Improve work procedures Regulatory Information Radio Frequency Interference Requirements For a Class B Device: Note.
Quick Reference CE Marking and European Union Compliance Products intended tor sale within the European Union are marked with the CE Mark which indicates compliance to applicable Directives and European Norms (EN, as follows. Amendments to these Directives of ENs are included: Applicable Directives « Electromagnetic Compatibility Directive 89/336/EEC = Low Vantage Directive 73/23/EEC.
Safety Information 3 The GSM version gives off radio frequency signals in the 900 MHz. 1800 MHz and 19g; MHz frequency bands. The following recommendations are in line with guidelines 4 concerning public exposure to radio frequency electromagnetic energy, issued by various European and international agencies. Unite a mobile phone. the transmitter antenna on the GSM version would not {under normal circumstances) be close to the head, and therefore high field strength is not usually encountered.
Quick Reference Hearing Aids Some digital wireless phones may interfere with some hearing aids. In the event of such interference you may want 1a consult your hearing aid supplier to discuss solutions Other Medical Devices The GSM version transmits radio frequency energy and as such has the potential 1o interfere with inadequately protected medical devices.
Quick Reference in accordance with Clause 5, IEC 825 and ENB0S2S, the following information is provided to the user: ENGLISH NeWSes ans STA LIAR J ITALIAN. pe FINISH Sun PORTUGUESE ARIA E ALUDRA € ASE TOUCHE ia Lisa 54 inns RF Devices Symbol's BF products are designed to be compliant with the rules and regulations in the locations anti which they are sold and will be labeled as required.
Quick Reference DECLARATION OF CONFORMITY Wo. Symbol Cartilaginous. inc of One Symbol Plaza, Huntsville, NY 11742-1300. USA declare under our sale responsibility that the product(s Sanctum, LAURASIA, Type i Ratio Card Spectrum. AZTLAN. Type 1 Radio Card Spectrum, LA121, Type Ii Radio Card fo which this declaration relates. is in conformity with the following standards and/or after affirmative documents.
Service Information Before you use the unit, it must be configured to aerate in your facility's network and run your applications, If you have a problem running your unit or using your equipment, contact your facility's Technical or Systems Support. If there is a problem with the equipment.