
User's Manual
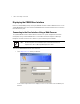
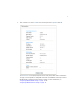
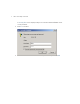
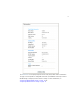
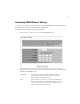
Table Of Contents
- CB3000 Overview
- Installing the CB3000
- Prerequisite Requirements
- Verifying the Package Contents
- Verifying the Installation Site
- Installing the CB3000
- Displaying the CB3000 User Interface
- Connecting to the User Interface Using a Web Browser
- Connecting to the User Interface Using the Discovery Tool
- Configuring CB3000 WLAN Settings
- Configuring CB3000 Ethernet Settings
- Configuring CB3000 Security
- Configuring CB3000 Basic Encryption
- Testing Device Connectivity
- Where to Go From Here?
- CB3000 Troubleshooting
- Technical Specifications
- Customer Support
- Regulatory Compliance

CB3000 Client Bridge Install Guide
15
3. Select an ESSID (network) for the CB3000 to connect to.
4. Click Apply to implement the updated settings.
5. Click Cancel to revert the WLAN Settings screen back to the last saved configuration.
The CB3000 is now ready to have its Ethernet settings configured.
ESSID (Wireless LAN
Service Area)
The following options are available for CB3000 network
connection:
Select Attach to any ESSID automatically to enable the CB3000
to randomly select a target ESSID for connection.
Select the Specify the ESSID checkbox to manually enter the
name of the target ESSID or use the drop-down menu to select the
ESSID. The list of ESSIDs available to the CB3000 from the
drop-down menu does not refresh as devices come and go from
range of the CB3000.
Available Networks Click View to display the Available Networks screen. Use this
screen to view a list of available ESSIDs (networks) available to the
CB3000 for connection. Select the checkbox to the left of the target
ESSID and click the
Connect button to associate with that access
point (Infrastructure mode) or networked peer (Adhoc mode). Unlike
the networks displayed within the drop-down menu, the networks
within the Available Networks screen can updated by clicking the
Refresh button.