CB3000 Client Bridge Installation Guide
Copyright Copyright (c) 2005 by Symbol Technologies, Inc. All rights reserved. No part of this publication can be modified or adapted in any way, for any purposes without permission in writing from Symbol. The material in this manual is subject to change without notice. Symbol reserves the right to make changes to any product to improve reliability, function, or design. No license is granted, either expressly or by implication, estoppel, or otherwise under any Symbol Technologies, Inc.
i Contents CB3000 Overview . . . . . . . . . . . . . . . . . . . . . . . . . . . . . . . . . . . . . . . . . . . . . . . . . . . . . 1 Installing the CB3000 . . . . . . . . . . . . . . . . . . . . . . . . . . . . . . . . . . . . . . . . . . . . . . . . . . 1 Prerequisite Requirements . . . . . . . . . . . . . . . . . . . . . . . . . . . . . . . . . . . . . . . . . . 2 Verifying the Package Contents . . . . . . . . . . . . . . . . . . . . . . . . . . . . . . . . . . . . . .
ii CB3000 Client Bridge Install Guide To the Installer This guide is intended for the technician responsible for installing the CB3000 Client Bridge. It is also assumed that the technician is familiar with Ethernet LAN-based networking concepts. The purpose of this document is to provide specifications, features and guidelines for use during default device installation and configuration.
1 CB3000 Client Bridge Install Guide CB3000 Overview The Symbol CB3000 Client Bridge is an IEEE 802.11a/b/g compliant wireless LAN Ethernet adapter. The CB3000 operates in both 2.4GHz (GigaHertz) and 5.2GHz frequencies. The CB3000 extends wireless networking capabilities to printers, scales, medical equipment, manufacturing machinery, bar code readers, time clocks, point-of-sale and other data collection devices.
2 Prerequisite Requirements The following hardware and software resources are required to install and operate a CB3000: • • PC to be used during device configuration. The PC must have an RJ-45 Ethernet port and a CDROM drive. The PC must be running the following: • Windows 2000 or XP operating system • Internet Explore 4.0 (or higher) or Netscape 4.1 (or higher) An access point (for infrastructure mode operation) or a networked client (for Ad Hoc mode peer-to-peer operation).
3 CB3000 Client Bridge Install Guide Verifying the Installation Site Mounting options for the CB3000 include table top, wall or under a counter mounting using the keyholes and mounting hardware provided with the unit. Before installing the CB3000, verify the installation site meets the following requirements: • • • • • The Environmental Specifications as defined in the “Technical Specifications on page -23” section of this guide. The site should have access to a properly rated power source.
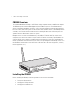
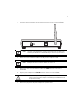
4 1. Screw the antenna clockwise onto the antenna connector on the rear of the CB3000. NOTE The back of the CB3000 also contains a Kensington lock mechanism for attaching the CB3000 to an immovable objects in order to prevent theft. 2. Attach one end of an Ethernet cable to a RJ-45 jack on a computer or hub. NOTE Configure the PC for a static IP address of 10.10.1.10. 3. Connect the other end of the Ethernet cable to the LAN connector on the rear of the CB3000. 4.
5 CB3000 Client Bridge Install Guide The built-in power converter automatically selects and adjusts the power for the appropriate voltage. 6. Verify the installation by checking the status of the LEDs on the front of the CB3000. The CB3000 Power, Radio and LAN LEDs provide the following functionality:.
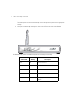
6 Radio LEDs Activity Description 802.11a 802.11b/g OFF Connectivity disabled 802.11a Orange ON 802.11a radio connectivity 802.11a Orange Blinking 802.11 a radio traffic 802.11b/g Green ON 802.11b/g radio connectivity 802.11b/g Green Blinking 802.
7 CB3000 Client Bridge Install Guide Displaying the CB3000 User Interface Connect to the CB3000 by directly entering the CB3000’s IP address within a Web browser or use the Symbol CB3000 Discovery Tool to locate the CB3000 within the network and launch the user interface from the Discovery Tool.
8 2. Enter a default user name of admin and a default password of Symbol. Click OK. The Information screen displays high level device name and network address information. The page is read-only with no configurable data fields. The CB3000 is now ready to have its WLAN settings configured, then its Ethernet Settings. For more information, see Configuring CB3000 WLAN Settings on page -13 and Configuring CB3000 Ethernet Settings on page -16.
9 CB3000 Client Bridge Install Guide Connecting to the User Interface Using the Discovery Tool Use the Symbol Discovery Tool to locate and identify CB3000s. In addition, you can double-click a located device within the Discovery Tool window to launch the Web interface. After power-up, the CB3000 sends several DHCP packets requesting an IP address. If the CB3000 does not receive any replies within 20 seconds, it uses a default IP address of 10.10.1.1.
10 3. Select the CB3000 Discovery Tool menu item. The CB3000 Discovery Tool screen displays and automatically begins a device search for other CB3000’s. 4. Double-click on one of the CB3000’s listed within the Discovery Tool window. .
11 CB3000 Client Bridge Install Guide A Security Alert screen displays stating issues could exist with the CB3000’s current security certificate. 5. Click Yes to continue. 6. Enter a default user name of admin and a default password of Symbol. Click OK.
12 The Information screen displays high level device name and network address information. The page is read-only with no configurable data fields. The CB3000 is now ready to have its WLAN settings configured, then its Ethernet Settings. For more information, see Configuring CB3000 WLAN Settings on page -13 and Configuring CB3000 Ethernet Settings on page -16.
13 CB3000 Client Bridge Install Guide Configuring CB3000 WLAN Settings Use the WLAN Settings screen to define a CB3000 network (operating) mode of either Infrastructure or AdHoc, select the ESSID (Wireless LAN Service Area) for CB3000 connection and assess the available networks available for CB3000 connection. NOTE The configuration of the WLAN Settings screen should come before the configuration of the Ethernet Settings screen or any other CB3000 configuration activity.
14 2. Select a network (operating) mode for the CB3000. Network Mode Select either Access Point (Infrastructure) or Ad-hoc (Peer-to-Peer). Select Access Point (Infrastructure), to enable the CB3000 to transmit and receive with an access point within the CB3000’s subnet. For information on configuring the CB3000 for AdHoc (Peer-to-Peer) operation, refer to the CB3000 Client Bridge User Guide available on your product CDROM or from the Symbol Web site www.symbol.com/services/downloads.
15 CB3000 Client Bridge Install Guide 3. Select an ESSID (network) for the CB3000 to connect to. ESSID (Wireless LAN The following options are available for CB3000 network Service Area) connection: Select Attach to any ESSID automatically to enable the CB3000 to randomly select a target ESSID for connection. Select the Specify the ESSID checkbox to manually enter the name of the target ESSID or use the drop-down menu to select the ESSID.
16 Configuring CB3000 Ethernet Settings Use the Ethernet Settings screen to specify the name of the CB3000 and assign network address information required as part of the CB3000 basic configuration: To configure required Ethernet settings for the CB3000: 1. Select Settings -> Ethernet Settings from the CB3000 menu tree. 2. Configure the Ethernet Settings screen to assign a device name and set network address information the CB3000 uses to. Device Name Specify a device name for the CB3000.
17 CB3000 Client Bridge Install Guide IP Address The IP Address refers to the IP address the outside world uses to address the CB3000. Subnet Mask A Subnet Mask (or filter) is used to determine the subnet the CB3000 IP address belongs to. Gateway IP Address The Gateway IP Address is the address of the device providing the connection to the network (often a cable modem or DSL router).
18 Configuring CB3000 Security NOTE For testing basic connectivity as described in this guide, there is no reason to enable Secure 802.1x authentication (an advanced authentication scheme). For details on configuring Secure 802.1x authentication, refer to the CB3000 User Guide available on the CB3000 product CDROM or go to the Symbol Web site (http://www.symbol.com/services/downloads) and download the guide.
19 CB3000 Client Bridge Install Guide 3. Use the Authentication Type drop-down menu to specify whether a shared key is implemented between the CB3000 and its associated device or no key is used (Open System). If a shared key is used, both the CB3000 and its connected device are required to use the same single key (as selected from 1 to 4) to interoperate. A shared key increases the level of security within the network as opposed sending information without one (Open System). 4.
20 5. Select 128-bits from the WEP Encryption drop down menu. For WEP 128 (104-bit key), the keys are 26 hexadecimal characters in length. 6. Optionally, specify a 4 to 32 character Passphrase and click the Generate Keys button. The passphase is helpful for entering WEP keys without having the remember all of the characters comprising the key. The passphase can be any alphanumeric string.
21 CB3000 Client Bridge Install Guide Testing Device Connectivity The CB3000 Web interface has a Troubleshooting screen with an ICMP Ping Test function. For the purposes of completing the CB3000 basic configuration and connection verification, this screen will be used to ping the CB3000’s associated device. To test CB3000 device connectivity: 1. Select Tools -> Troubleshooting from the CB3000 menu tree. 2.
22 d. Click the ICMP Ping Test button. Results of the ping test displays on the Status line. If the Status line displays Success, the CB3000 can interoperate with its associated access point. Proceed to Where to Go From Here? on page -22. Where to Go From Here? Once basic connectivity has been verified, the CB3000 can be fully configured to meet the needs of the network and the users it supports.
23 CB3000 Client Bridge Install Guide Technical Specifications CB3000 Technical Specifications Weight ~ 2.8 ounces (~80 grams) Dimensions 7 in. wide x 4 in. deep x 1.2 in. high (17.78 cm. wide x 10.16 cm. deep x 3.05 cm high) excluding external antenna and foot stand Protocol Support THCP/IP, DHCP Standards Conformance IEEE 802.11b High Rate IEEE 802.11 IEEE802.3 IEEE802.1d HTTP IEEE 802.11a IEEE 802.11g IEEE802.1x IEEE802.
24 CB3000 Technical Specifications (continued) Receive Sensitivity 802.11g (Nominal Temperature Range) 11Mbps: 8% PER @ -84 dBm 54Mbps: 10% PER @ -69 dBm Operating Temperature 0 – 50° Celsius Storage Temperature 20 – 70° Celsius Operating Humidity 10 – 90% relative humidity, non-condensing Storage Humidity 5 ~ 85% relative humidity, non – condensing Power Supply Switching DC 12V, 1A Transmitted Power Other Features IEEE 802.11b: Typ. 16 ± 1 dBm @ 11Mbps IEEE 802.11g: Typ.
25 CB3000 Client Bridge Install Guide Customer Support Symbol Technologies provides its customers with prompt and accurate customer support. Use the Symbol Support Center as the primary contact for any technical problem, question or support issue involving Symbol products. If the Symbol Customer Support specialists cannot solve a problem, access to all technical disciplines within Symbol becomes available for further assistance and support.
26 Web Support Sites Comprehensive On-line support is available at the MySymbolCare Web site. Registration is free and a variety of services can be linked through this web-portal. MySymbolCare http://www.symbol.com/services/msc Symbol Services Homepage http://www.symbol.com/services Symbol Software Updates http://www.symbol.com/services/downloads Symbol Developer Program Web site http://devzone.symbol.
27 CB3000 Client Bridge Install Guide Regulatory Compliance All Symbol devices are designed to be compliant with rules and regulations in locations they are sold and will be labelled as required. Regulatory Information is available in French, Italian, German, Spanish (Spain), Portuguese and Japanese. Please see following website: http://www.symbol.com/services/manuals/ and look for your specific product.
28 To comply with FCC RF exposure requirements, antennas that are mounted externally at remote locations or operating near users at stand-alone desktop of similar configurations must operate with a minimum separation distance of 20 cm from all persons Power Supply Use only a Symbol-approved power supply (pt # 0993036903) output rated 12 Vdc and minimum 1 A. The power supply is certified to EN60950 with SELV outputs.
29 CB3000 Client Bridge Install Guide Radio Transmitters (Part 15) This device complies with Part 15 of the FCC Rules. Operation is subject to the following two conditions: (1) this device may not cause harmful interference, and (2) this device must accept any interference received, including interference that may cause undesired operation. Radio Frequency Interference Requirements – Canada This Class B digital apparatus complies with Canadian ICES-003.
Symbol Technologies, Inc. One Symbol Plaza Holtsville, New York 11742-1300 http://www.symbol.