
User's Manual
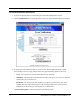
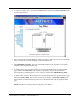
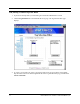
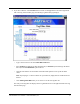
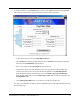
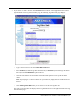
Table Of Contents
- Contents
- Section 1. Introduction
- Section 2. System Description
- Section 3. Specifications and Diagrams
- Section 4. Installing the Reader
- Section 5. Configuring the Reader
- Section 6. Notification of Events
- Section 7. Tag Selection Filters
- Section 8. Reader Server Controls
- Section 9. Ad-hoc Queries
- Section 10. Maintaining the Reader
- Access the Reader Maintenance Console
- Manage Communication Configuration Settings
- Manage System Time Settings
- Display Version Control Information and Load Firmware via FTP
- Display the System Log and/or Access History
- Shut Down and/or Restart the System, and Turn Off the HTTP Server
- Use Online Help
- Log Out of the System
- Section 11. Cautions, Notes, and Approvals
- Section 12. Warranties and Returns
- Section 13. Contact Us
- Appendix A. Error Messages and Resolutions

AR 400 Reader User’s Manual 2003-2004 Matrics, Inc. 39
4. To specify the event filter option that you want to use, click the link in the Filter By column
corresponding to each event type (not available for Threshold or Exception Events because they
provide system-wide information), and then select the appropriate Filter Option for the event:
• None - No filter. Allows all events to pass through.
• Zone Inclusive - Only allow events that occur in a specific Read Point Zone to pass through.
• Class Inclusive - Only allow events that occur in a specific Read Point Class to pass through.
• Read Point Inclusive - Only allow events that occur in a specific Read Point to pass through.
• Zone Exclusive - Only allow events that do NOT occur in a specific Read Point Zone to pass
through.
• Class Exclusive - Only allow events that do NOT occur in a specific Read Point Class to pass
through.
• Read Point Exclusive - Only allow events that do NOT occur in a specific Read Point to pass
through.
Click Set Filter Option. The Event Notifications page displays again.
5. Commit or discard your changes (refer to the “Save or Discard Changes (or Revert to Backup)”
section in this manual for more information.)
Set Host Notification Link
If the Host Notification Link is not set (or is not valid), no notifications will be sent. If you want to
receive event notifications, you must supply a valid link in the Host Notification Link field on the Event
Notifications page, and then click Set Host Link.
Set SNMP Configuration
If the SNMP host is not set (or is not valid), no Network Status Events will be sent. If you want to receive
Network Status Event notifications, you must subscribe to them by setting the SNMP configuration on
the Event Notifications page.
1. If you haven’t already done so, launch and log in to the Reader Administrator Console.
2. Click the Notifications link on the left-hand side of any page. The Event Notifications page displays.
3. Type a valid link (a static IP address) in the Send SNMP Trap To: field.
4. Type the SNMP variable (the default value is “public”) in the SNMP Community String field.
5. Click the radio button corresponding to the version of SNMP you are using.
6. Click and check the Send Server Heartbeat checkbox if you want to receive a “positive” feedback
letting you know that the Reader is up and running. The system could detect it has gone offline (i.e.,
lost power) if it doesn’t see a heartbeat within two minutes.
7. Click Set SNMP Configuration.