
User Manual
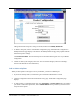

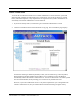
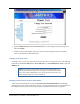

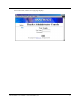
Table Of Contents
- Contents
- Section 1. Introduction
- Section 2. System Description
- Section 3. Specifications and Diagrams
- Section 4. Installing the Reader
- Section 5. Configuring the Reader
- Section 6. Notification of Events
- Section 7. Tag Selection Filters
- Section 8. Reader Server Controls
- Section 9. Ad-hoc Queries
- Section 10. Maintaining the Reader
- Access the Reader Maintenance Console
- Manage Communication Configuration Settings
- Manage System Time Settings
- Display Version Control Information and Load Firmware via FTP
- Display the System Log and/or Access History
- Shut Down and/or Restart the System, and Turn Off the HTTP Server
- Use Online Help
- Log Out of the System
- Section 11. Cautions, Notes, and Approvals
- Section 12. Warranties and Returns
- Section 13. Contact Us
- Appendix A. Error Messages and Resolutions

28 AR 400 Reader User’s Manual 2003-2004 Matrics, Inc.
4. Click Add ReadPoint to add a read point to the splitter. The Reader Configuration’s Add Read
Point page displays.
5. To add a read point to the associated splitter, enter the following information:
A unique read point Name (one that does not already exist in the system),
An optional Description to help identify the read point (for example, its location),
The read point Class to associate with this read point, and
The read point Zone to associate with this read point.
Check Disable if you want to disable this read point from add and modify operations.
6. After typing the required information, click the Add ReadPoint button. If the data is valid, the read
point is added and the updated logical view of your Reader configuration displays.
NOTE: Your physical Reader configuration is not updated until you click
Commit [refer to the “Save or Discard Changes (or Revert to Backup)”
section in this manual for more information.] If not successful, the system
should indicate the problem and allow you to correct it by repeating the
operation.