
User Manual
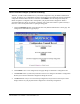
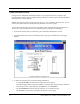
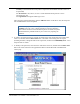
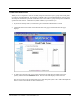
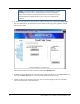
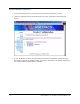

Table Of Contents
- Contents
- Section 1. Introduction
- Section 2. System Description
- Section 3. Specifications and Diagrams
- Section 4. Installing the Reader
- Section 5. Configuring the Reader
- Section 6. Notification of Events
- Section 7. Tag Selection Filters
- Section 8. Reader Server Controls
- Section 9. Ad-hoc Queries
- Section 10. Maintaining the Reader
- Access the Reader Maintenance Console
- Manage Communication Configuration Settings
- Manage System Time Settings
- Display Version Control Information and Load Firmware via FTP
- Display the System Log and/or Access History
- Shut Down and/or Restart the System, and Turn Off the HTTP Server
- Use Online Help
- Log Out of the System
- Section 11. Cautions, Notes, and Approvals
- Section 12. Warranties and Returns
- Section 13. Contact Us
- Appendix A. Error Messages and Resolutions

AR 400 Reader User’s Manual 2003-2004 Matrics, Inc. 23
Configure the Reader
The Reader Administrator Console’s Reader Configuration pages allow you to logically describe the
antenna connections of your physical Reader, so that the AR 400 Reader can communicate to other
systems the connectivity and parameters of the devices.
Before you use the Reader Administrator Console to define the configuration of your Reader, you must
gather certain information about your physical devices from the personnel who installed them. For
example, you will need to know what types of devices are connected to each port and the parameters
associated with those devices. You also need to know the network configuration parameters (such as IP
addresses, netmask and default gateway, etc.)
Once you have obtained the information you need about your physical devices, you can access the
dynamic web pages in the Reader Administrator Console, which act as a wizard to walk you through the
process of defining your Reader configuration and the association of its devices.
By default, a standard Reader configuration is displayed with a Reader link and links for four Reader
ports. A port can connect directly to a read point (antenna), or combine with a subsequent port to connect
to a splitter. The following list describes the four possible port combinations:
4 Ports -- All four ports connect directly to read points.
1 Splitter + 2 Ports -- The first two ports connect to one splitter, the other two connect directly to
read points.
2 Ports + 1 Splitter -- The first two ports connect directly to read points, the other two connect to
one splitter.
2 Splitters -- The first two ports connect to one splitter, the other two connect to another splitter.
The current Reader port status (direct port or splitter port) determines what kind of read points can be
attached to this specific port. In other words, it determines what Read Point Class types can be used with
this attached read point, essentially determining a subset of compatible Read Point Classes with these
types.
If a port connects to a read point directly, the link for the read point provides access to its
parameters.
If a port is empty, Add ReadPoint and Add Splitter links are displayed.
If a splitter is used:
o If a read point has not been added yet to this splitter, a Delete Splitter link is provided if you
want to remove the splitter, and an Add ReadPoint link is provided if you want to add a
read point to the splitter.
o If a read point has been added to this splitter, the only link provided is to access to the read
point’s parameters.