
User Manual Part 3
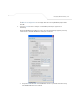
Table Of Contents
- Introduction
- 1.1 New Features
- 1.2 Feature Overview
- 1.2.1 Single or Dual Mode Radio Options
- 1.2.2 Separate LAN and WAN Ports
- 1.2.3 Multiple Mounting Options
- 1.2.4 Antenna Support for 2.4 GHz and 5.2 GHz Radios
- 1.2.5 Sixteen Configurable WLANs
- 1.2.6 Support for 4 BSSIDs per Radio
- 1.2.7 Quality of Service (QoS) Support
- 1.2.8 Industry Leading Data Security
- 1.2.9 VLAN Support
- 1.2.10 Multiple Management Accessibility Options
- 1.2.11 Updatable Firmware
- 1.2.12 Programmable SNMP v1/v2/v3 Trap Support
- 1.2.13 Power-over-Ethernet Support
- 1.2.14 MU-MU Transmission Disallow
- 1.2.15 Voice Prioritization
- 1.2.16 Support for CAM and PSP MUs
- 1.2.17 Statistical Displays
- 1.2.18 Transmit Power Control
- 1.2.19 Advanced Event Logging Capability
- 1.2.20 Configuration File Import/Export Functionality
- 1.2.21 Default Configuration Restoration
- 1.2.22 DHCP Support
- 1.2.23 Multi-Function LEDs
- 1.3 Theory of Operations
- Hardware Installation
- Getting Started
- System Configuration
- Network Management
- Configuring Access Point Security
- 6.1 Configuring Security Options
- 6.2 Setting Passwords
- 6.3 Enabling Authentication and Encryption Schemes
- 6.4 Configuring Kerberos Authentication
- 6.5 Configuring 802.1x EAP Authentication
- 6.6 Configuring WEP Encryption
- 6.7 Configuring KeyGuard Encryption
- 6.8 Configuring WPA Using TKIP
- 6.9 Configuring WPA2-CCMP (802.11i)
- 6.10 Configuring Firewall Settings
- 6.11 Configuring VPN Tunnels
- 6.12 Configuring Content Filtering Settings
- 6.13 Configuring Rogue AP Detection
- 6.14 Configuring User Authentication
- Monitoring Statistics
- Command Line Interface Reference
- Configuring Mesh Networking
- Technical Specifications
- Usage Scenarios
- Customer Support
- Index

Configuring Mesh Networking
9-5
preferred list, the user enters a priority for each bridge, resulting in the selection of the forwarding
link.
Limit the wireless client’s connections to reduce the number of hops required to get to the wired
network. Use each radio’s "preferred" base bridge list to define which access points the client bridge
connects to. For more information, see Configuring Mesh Networking Support on page 9-6.
9.1.4 Mesh Networking and the AP-51xx’s Two Subnets
The access point now has a second subnet on the LAN side of the system. This means wireless clients
communicating through the same radio can reside on different subnets. The addition of this feature
adds another layer of complexity to the access point’s mesh networking functionality.
With a second LAN introduced, the LAN’s Ethernet port (and any of the 16 WLANs) could be assigned
to one of two different subnets. From a layer 2 perspective, the system has two different bridge
functionalities, each with its own STP. The WLAN assignment controls the subnet (LAN1 or 2) upon
which a given connection resides. If WLAN2 is assigned to LAN1, and WLAN2 is used to establish a
client bridge connection, then the mesh network connection resides on LAN1.
Therefore, (depending upon the WLAN-to-LAN mapping), the access point could have multiple mesh
connections on either LAN1 or LAN2.
9.1.5 Normal Operation
Once the mesh network is defined, all normal access point operations are still allowed. MUs are still
allowed to associate with the access point as usual. The user can create WLANs, security polices and
VLANs as with any other access point. DHCP services function normally and all layer 3
communications are allowed.
WNMP is used to send information about each mesh network so information can be displayed to the
user from any access point on the system. WNMP messages are AP-AP info messages used to send
system status.
9.1.6 Impact of Importing/Exporting Configurations to a Mesh Network
When using the access point’s Configuration Import/Export screen to migrate an access point’s
configuration to other access points, mesh network configuration parameters will get sent or saved