
User Manual Part 3
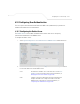
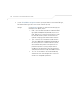
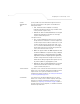
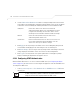
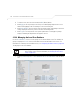
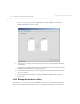
Table Of Contents

Configuring Access Point Security
6-69
Refer to the Groups field for a list of all groups in the local Radius database. The groups are
listed in the order added. Although groups can be added and deleted, there is no capability
to edit a group name.
2. Click the Add button and enter the name of the group in the new blank field in the Groups
table.
3. To remove a group, select the group from the table and click the Del (Delete) key.
The Users table displays the entire list of users. Up to 100 users can be entered here. The
users are listed in the order added. Users can be added and deleted, but there is no
capability to edit the name of a group.
4. To add a new user, click the Add button at the bottom of the Users area.
5. In the new line, type a User ID (username).
6. Click the Password cell. A small window displays. Enter a password for the user and click
OK to return to the Users screen.
7. Click the List of Groups cell. A new screen displays enabling you to associate groups with
the user. For more information on mapping groups with a user, see
Mapping Users to Groups on page 6-69.
8. Click Apply to save any changes to the Users screen. Navigating away from the screen
without clicking Apply results in all changes to the screen being lost.
9. Click Undo Changes (if necessary) to undo any changes made. Undo Changes reverts the
settings displayed on the Users screen to the last saved configuration.
10. Click Logout to securely exit the access point Symbol Access Point applet. A prompt
displays confirming the logout before the applet is closed.
6.14.4.1 Mapping Users to Groups
Once users have been created within the Users screen, their access privileges need to be configured
for inclusion to one, some or all of the groups also created within the Users screen.
To map users to groups for group authentication privileges:
1. If you are not already in the Users screen, select
System Configuration -> User
Authentication -> User Database from the menu tree.
Existing users and groups display within their respective fields. If user or group requires
creation or modification, make your changes before you begin to map them.
2. Refer to the Users field and select the List of Groups column for the particular user you
wish to map to one or more groups.