
User Manual Part 3

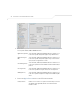
Table Of Contents
- Introduction
- 1.1 New Features
- 1.2 Feature Overview
- 1.2.1 Single or Dual Mode Radio Options
- 1.2.2 Separate LAN and WAN Ports
- 1.2.3 Multiple Mounting Options
- 1.2.4 Antenna Support for 2.4 GHz and 5.2 GHz Radios
- 1.2.5 Sixteen Configurable WLANs
- 1.2.6 Support for 4 BSSIDs per Radio
- 1.2.7 Quality of Service (QoS) Support
- 1.2.8 Industry Leading Data Security
- 1.2.9 VLAN Support
- 1.2.10 Multiple Management Accessibility Options
- 1.2.11 Updatable Firmware
- 1.2.12 Programmable SNMP v1/v2/v3 Trap Support
- 1.2.13 Power-over-Ethernet Support
- 1.2.14 MU-MU Transmission Disallow
- 1.2.15 Voice Prioritization
- 1.2.16 Support for CAM and PSP MUs
- 1.2.17 Statistical Displays
- 1.2.18 Transmit Power Control
- 1.2.19 Advanced Event Logging Capability
- 1.2.20 Configuration File Import/Export Functionality
- 1.2.21 Default Configuration Restoration
- 1.2.22 DHCP Support
- 1.2.23 Multi-Function LEDs
- 1.3 Theory of Operations
- Hardware Installation
- Getting Started
- System Configuration

System Configuration
4-5
6. Click Undo Changes (if necessary) to undo any changes made. Undo Changes reverts the
settings displayed on the System Settings screen to the last saved configuration.
7. Click Logout to securely exit the access point Symbol Access Point applet. A prompt
displays confirming the logout before the applet is closed.
4.2 Configuring Data Access
Use the access point Access screen to enable/disable data throughput to the access point’s LAN1,
LAN2 and/or WAN interfaces and display screens for changing administrator passwords.
Use the access point Access screen checkboxes to enable or disable LAN1, LAN2 and/or WAN access
using the protocols and ports listed. If access is disabled, this effectively locks out the administrator
from configuring the access point using that interface. To avoid jeopardizing the network data
managed by the access point, Symbol recommends enabling only those interfaces used in the routine
(daily) management of the network, and disabling all other interfaces until they are required.
To configure access for the access point:
1. Select System Configuration -> access point Access from the access point menu tree.
NOTE The Apply button is not needed for restoring the access point default
configuration or restarting the access point.