
User Manual Part 3

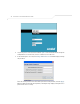
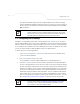
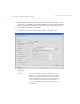
Table Of Contents
- Introduction
- 1.1 New Features
- 1.2 Feature Overview
- 1.2.1 Single or Dual Mode Radio Options
- 1.2.2 Separate LAN and WAN Ports
- 1.2.3 Multiple Mounting Options
- 1.2.4 Antenna Support for 2.4 GHz and 5.2 GHz Radios
- 1.2.5 Sixteen Configurable WLANs
- 1.2.6 Support for 4 BSSIDs per Radio
- 1.2.7 Quality of Service (QoS) Support
- 1.2.8 Industry Leading Data Security
- 1.2.9 VLAN Support
- 1.2.10 Multiple Management Accessibility Options
- 1.2.11 Updatable Firmware
- 1.2.12 Programmable SNMP v1/v2/v3 Trap Support
- 1.2.13 Power-over-Ethernet Support
- 1.2.14 MU-MU Transmission Disallow
- 1.2.15 Voice Prioritization
- 1.2.16 Support for CAM and PSP MUs
- 1.2.17 Statistical Displays
- 1.2.18 Transmit Power Control
- 1.2.19 Advanced Event Logging Capability
- 1.2.20 Configuration File Import/Export Functionality
- 1.2.21 Default Configuration Restoration
- 1.2.22 DHCP Support
- 1.2.23 Multi-Function LEDs
- 1.3 Theory of Operations
- Hardware Installation
- Getting Started
- System Configuration

Getting Started
3-3
• Config file - Readable text file; Importable/Exportable via FTP, TFTP and HTTP. Configuration
settings for an access point can be downloaded from the current configuration of another
access point meeting the import/export requirements. For information on importing or
exporting configuration files, see Importing/Exporting Configurations on page 4-36.
• MIB (Management Information Base) accessing the access point SNMP functions using a
MIB Browser. The access point download package contains the following 2 MIB files:
• Symbol-CC-WS2000-MIB-2.0 (standard Symbol MIB file)
• Symbol-AP-5131-MIB (AP-5131 specific MIB file)
3.3 Basic Device Configuration
For the basic setup described in this section, the Java-based Web UI will be used to configure the
access point. Use the access point’s LAN interface for establishing a link with the access point.
Configure the access point as a DHCP client. For optimal screen resolution, set your screen resolution
to 1024 x 768 pixels or greater.
1. Start Internet Explorer and enter the following IP address in the address field: 192.168.0.1.
The access point login screen displays.
NOTE DNS names are not supported as a valid IP address for the access point.
The user is required to enter a numerical IP address.
NOTE For optimum compatibility, use Sun Microsystems’ JRE 1.5 or higher
(available from Sun’s Website), and be sure to disable Microsoft’s Java
Virtual Machine if installed.