
User Manual Part 3

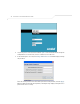
Table Of Contents
- Introduction
- 1.1 New Features
- 1.2 Feature Overview
- 1.2.1 Single or Dual Mode Radio Options
- 1.2.2 Separate LAN and WAN Ports
- 1.2.3 Multiple Mounting Options
- 1.2.4 Antenna Support for 2.4 GHz and 5.2 GHz Radios
- 1.2.5 Sixteen Configurable WLANs
- 1.2.6 Support for 4 BSSIDs per Radio
- 1.2.7 Quality of Service (QoS) Support
- 1.2.8 Industry Leading Data Security
- 1.2.9 VLAN Support
- 1.2.10 Multiple Management Accessibility Options
- 1.2.11 Updatable Firmware
- 1.2.12 Programmable SNMP v1/v2/v3 Trap Support
- 1.2.13 Power-over-Ethernet Support
- 1.2.14 MU-MU Transmission Disallow
- 1.2.15 Voice Prioritization
- 1.2.16 Support for CAM and PSP MUs
- 1.2.17 Statistical Displays
- 1.2.18 Transmit Power Control
- 1.2.19 Advanced Event Logging Capability
- 1.2.20 Configuration File Import/Export Functionality
- 1.2.21 Default Configuration Restoration
- 1.2.22 DHCP Support
- 1.2.23 Multi-Function LEDs
- 1.3 Theory of Operations
- Hardware Installation
- Getting Started
- System Configuration

AP-51xx Access Point Product Reference Guide
3-2
For installing an AP-5131 model access point
• For instructions on installing the AP-5131 on a table top, see Desk Mounted Installations on
page 2-12.
• For instructions on mounting an AP-5131 to a wall, see Wall Mounted Installations on page
2-14.
• For instructions on mounting an AP-5131 to a ceiling T-bar, see Suspended Ceiling T-Bar
Installations on page 2-16.
• For instructions on installing the AP-5131 in an above the ceiling attic space, see
Above the Ceiling (Plenum) Installations on page 2-18.
For installing an AP-5181 model access point:
• For instructions on installing the AP-5181 to a pole, see AP-5181 Pole Mounted Installations
on page 2-23.
• For instructions on installing the AP-5181 to a wall, see AP-5181 Wall Monuted Installations
on page 2-24.
For information on the 802.11a and 802.11b/g radio antenna suite available to the access point, see
Antenna Options on page 2-6. For more information on using a Symbol Power Injector to combine
Ethernet and power in one cable to the access point, see Symbol Power Injector System on page 2-
9. To verify AP-5131 LED behavior once installed, see AP-5131 LED Indicators on page 2-21. To verify
the behavior of the AP-5181 LEDs once installed, see AP-5181 LED Indicators on page 2-25.
3.2 Configuration Options
Once installed and powered, the access point can be configured using one of several connection
techniques. Managing the access point includes viewing network statistics and setting configuration
options. The access point requires one of the following connection methods to manage the network:
• Secure Java-Based WEB UI - (use Sun Microsystems’ JRE 1.5 or higher available from Sun’s
Web site. Disable Microsoft’s Java Virtual Machine if installed). For information on using the
Web UI to set access point default configuration values, see Basic Device Configuration on
page 3-3 or chapters 4 through 7 of this guide.
• Command Line Interface (CLI) via Serial, Telnet and SSH. The access point CLI is accessed
through the RS232 port, via Telnet or SSH. The CLI follows the same configuration
conventions as the device user interface with a few documented exceptions. For details on
using the CLI to manage the access point, see Appendix 8, Command Line Interface
Reference on page 8-1.