
2012
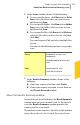
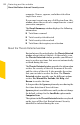
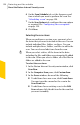
Table Of Contents
- Norton™ Internet Security Product Manual
- Contents
- 1. Getting started
- 2. Monitoring your system's performance
- 3. Protecting your files and data
- 4. Responding to security issues
- 5. Protecting Internet activities
- 6. Securing your sensitive data
- 7. Monitoring protection features
- 8. Customizing protection features
- 9. Finding additional solutions
- Index

To schedule a custom scan
1
In the Norton Internet Security main window, click
Scan Now.
2
In the Computer Scan pane, click Custom Scan.
3
In the Scans window, in the Edit Scan column, click
the edit icon next to the custom scan that you want
to schedule.
4
In the Edit Scan window, on the Scan Schedule tab,
do one of the following:
1 To run the scan at specific time intervals, select
Run at specific time interval.
1 To run the scan at specific time every day, select
Daily.
1 To run the scan on a specific day on a week,
select Weekly.
1 To run the scan on a specific day on a month,
select Monthly.
These frequency options include the additional
options that you can use to refine the schedule. Set
the additional options as required.
5
Under Run the scan, do the following:
1 To run the scan only at idle time, check Only at
idle time.
1 To run the scan only when your computer is
connected with external power source, check
Only on AC power.
1 To prevent your computer from going to a Sleep
or Standby mode, check Prevent standby.
6
Under After scan completion:, select the state at
which your computer should be after the scan is
complete. Your options are:
1 Stay On
1 Turn Off
1 Sleep
1 Hibernate
7
Click Save.
129Protecting your files and data
About the Norton Internet Security scans