
User manual
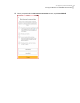
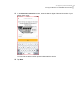
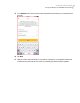
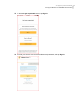
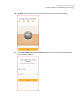
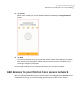

Table Of Contents
- Contents
- 1. Welcome to Norton Core
- 2. Set up your protected network
- 3. Customize your Norton Core settings
- Change your Norton Core network name and password
- Change Norton Core network band settings
- Create your Norton Core guest network
- Enable or disable Norton Core UPnP
- Add or update Norton Core port forwarding settings
- Change Norton Core DNS settings
- Set the Norton Core light brightness and understand light states
- Change Norton Core time zone settings
- Push Norton Core notifications to Android or iOS devices
- 4. Additional solutions
- Find Norton Core version details
- Set up with a replacement Norton Core router
- Norton Core software and firmware updates
- Reset Norton Core to factory settings
- Restart your Norton Core router
- Devices in your Norton Core network
- Submit Norton Core error logs to Symantec
- Send your feedback to Norton Core team
- Norton Core support
- Disclaimers

Add your wireless devices to your secure network
1
For each smartphone, tablet, printer, or other smart device that you want to add, go to
the individual device settings and turn on WiFi.
Do not forget IoT devices like smart TVs, alarm systems, thermostats, or lights. To add
a USB printer, See “Add a USB printer to your Norton Core network” on page 28.
2
Select your Norton Core network from the list of available wireless networks.
If you do not see your network name in the list, refresh the list. Make sure that each device
that you add is on the Norton Core network or it will not be protected by Norton Core.
3
Enter your network password.
Your secure wireless network is protected with WPA2-AES encryption.
4
Tap Connect/Join.
Add a USB printer to your Norton Core network
When you add a USB printer to your Norton Core network, you can print to it from any device
on your secure network. Norton Core supports only one printer at a time for your secure
network. You cannot connect more than one printer.
Add a USB printer to Norton Core
1
Connect the printer USB cable to the USB port of the Norton Core router.
2
Launch the Norton Core app.
3
On the top-left corner, tap the menu icon.
4
Tap Settings > Router.
5
In the Router Settings screen, turn on USB 3.0 Port/USB Printer.
Note: Enabling or disabling the USB 3.0 Port/USB Printer option does not impact the Security
Score of your secure network.
After you enable the USB settings, you need to add the printer using a Windows or Mac
computer to configure the printer with the gateway IP address of Norton Core.
Add a printer in Windows
Note: Before you begin, ensure that your computer has the required printer drivers installed.
You may have to install the drivers if they are not already available. You can download and
install the required drivers for your printer model from the internet.
28Set up your protected network
Add a USB printer to your Norton Core network