
User manual

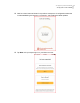
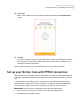

Table Of Contents
- Contents
- 1. Welcome to Norton Core
- 2. Set up your protected network
- 3. Customize your Norton Core settings
- Change your Norton Core network name and password
- Change Norton Core network band settings
- Create your Norton Core guest network
- Enable or disable Norton Core UPnP
- Add or update Norton Core port forwarding settings
- Change Norton Core DNS settings
- Set the Norton Core light brightness and understand light states
- Change Norton Core time zone settings
- Push Norton Core notifications to Android or iOS devices
- 4. Additional solutions
- Find Norton Core version details
- Set up with a replacement Norton Core router
- Norton Core software and firmware updates
- Reset Norton Core to factory settings
- Restart your Norton Core router
- Devices in your Norton Core network
- Submit Norton Core error logs to Symantec
- Send your feedback to Norton Core team
- Norton Core support
- Disclaimers

Note: You cannot have two Norton Core routers linked to the same Norton account. You can
activate only one Norton Core to your Norton account. If you have more than one Norton Core,
you need to activate the other Norton Core with another Norton account.
Create a Norton account
1
Go to the link below:
https://login.norton.com
2
Tap Create an Account.
3
In the Email address box, type your email address.
You need to specify this email address when you sign in.
4
In the Confirm email address box, type your email address again.
5
In the Password box, type a password.
Password is case-sensitive and must be between 6 and 50 characters in length.
6
In the Region drop-down list, select your country or region.
7
Tap Create Account.
12Set up your protected network
Access your Norton account