
Instructions
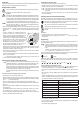


Preparation
Type labels in different languages are included in the package. Stick the language label in your
language over the German language label on the weekly timer.
Getting started, operation
Observe all safety information and other information in these operating instructions.
• Plug the weekly timer into a regular earthed mains socket (wall socket).
Important!
When delivered, the internal NiMH battery, which stores the settings in the event of a
power failure (or when replugging the weekly timer into a different socket), is empty.
The power supply for the LCD display is buffered with the NiMH, which can result in
non-optimal display contrast after start-up. After about 30 hours, the NiMH battery
should be charged to the extent that the display contrast has become normal.
The NiMH battery is fully charged after about 48 hours; when unplugging the weekly
timer from the mains voltage (e.g., during storage), the settings/programming is
maintained at full charge for about max. 6 months.
• After you have plugged the weekly timer into a mains socket, the DCF receiver in the weekly
timer takes about 10 - 15 minutes to receive the DCF time signal. During this time, the time
display shows “- - : - - ”; the radio reception symbol in the bottom left corner of the display
ashes.
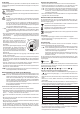
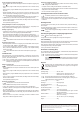
• The DCF transmitter near Frankfurt-on-the-Main has
a range of up to 1500 km, in an ideal case even up to
2000 km. In this area, the clock in the weekly timer is set
automatically (also the daylight saving time changeover).
If the DCF signal was received properly, the weekly timer
synchronises the clock daily by several signal searches in
the night (at 2 a.m., 4 a.m. and 6 a.m.), since there is the
least interference from other electric/electronic devices.
One successful reception attempt per day is enough to
keep the deviation of the time below one second.
The DCF range and the quality of the DCF signal reception might be affected when the
weekly timer is very close to other electronic devices (e.g., TV sets, computers) or to metal
parts (steel doors, heaters, reinforced concrete etc.).
• If the current time is not shown on the LC display even after 15 minutes, choose a different
socket to operate the weekly timer.
To start a new reception attempt, press the countersunk RST (reset) button (below the “RST”
button), e.g., with a toothpick.
Under adverse reception conditions, the time and the day of the week can be set
manually as well (see the next chapter).
Setting the time and day of the week manually
This is only necessary if no DCF reception is possible in the place where you have
installed the weekly timer. If you wait about 10 minutes after the initial start-up (plug-
ging the weekly timer into an outlet), the DCF reception should be completed.
Plug the weekly timer into a different socket, keep as much distance from other
electronic devices, cables and metal surfaces as possible. Start a new signal search
by briey pressing the small countersunk “RST” (reset) button.
If a successful DCF reception is carried out at night, the weekly timer takes over the
DCF time.
If you want to set the clock manually, proceed as follows:
• The weekly timer must be in the time display mode.
• Press and hold the “HRS” button for about 2 seconds until the time and the day of the week
ash on the display (if no time has been set when using the timer for the rst time, the display
shows “- - : - -”). Then release the button.
• If you do not press a button for 8 seconds, the setting mode is automatically exited.
• Set the hour by pressing the “HRS” button briey (keep it depressed in order to start the fast
skip mode).
• Set the minutes by pressing the “MIN/CD” button briey (keep it depressed in order to start
the fast skip mode).
• The “DAY/WEEK” button is used to set the day of the week (“MO” = Monday, “DI” = Tuesday,
“MI” = Wednesday, “DO” = Thursday, “FR” = Friday, “SA” = Saturday, “SO” = Sunday).
• Save the settings by pressing the “MENU” button (alternatively, do not press any button for
8 seconds). The display returns to the time display.
1500 km
2000 km
Connecting a consumer load
• Plug the device into the socket at the front of the weekly timer.
• Switch the device on (set, for example, the main switch to “I” or “ON”). Otherwise, the weekly
timer will not be able to switch it on or off automatically.
If the activation of the ON-switch in the device only sets it to standby (as found in
some stereos, televisions, etc.), the device cannot be switched automatically via the
weekly timer.
• With the “DAY/WEEK” button on the weekly timer, you can select the desired operation
mode, see next chapter.
Selecting operation mode (automatic/manual)
The weekly timer must be in the normal time display (not in the programming mode, etc.). Se-
lect the desired operation mode with the “DAY/WEEK” button; the operation mode is displayed.
The socket on the weekly timer and therefore the connected device is permanently
switched on. The switching programs are not yet active.
The socket on the weekly timer and therefore the connected device is permanently
switched off. The switching programs are not yet active.
The weekly timer works according to the program groups you have programmed and
activated.
This means:
• Programmed program group = on-times and off-times have been set
• Activated program group = Program group does not show “- - : - -” (see end of the chapter
“Programming”)
Programming
To enter the program mode, press the “MENU” button briey. The display shows the rst on-
time of the rst program group.
A program group always consists of an on-time and an off-time that must be pro-
grammed one after the other. If you have only programmed an on-time by accident,
the connected device will not be switched off until another program group is acti-
vated.
Therefore, you should always program the on-time and then the respective off-time
(e.g., for program group 1: switching on at 7 a.m., off at 8 a.m.).
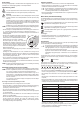
The number to the right of the clock displays the current program group; two bulb icons at the
bottom of the display indicate the on/off-time of the program group.
On-time Off-time
Pressing the “MENU” button several times switches to the next on-/off-time in the program
group. If the display shows “CD”, the countdown mode is active. The sequence of the displays
is as follows:
1 > 1 > 2 > 2 > 3 > 3 > 4 > 4 > CD > Time > 1 > 1 > ......
Proceed as follows for programming an on-time:
• First select the on-time of a program group (for example “1 ”) with the “MENU” button. The
number of the program group (1, 2, 3 or 4) appears to the right of the on-/off-time.
• Set the hours by using the “HRS” button (keep it depressed in order to start the fast skip
mode).
• Set the minutes by using the “MIN/CD” button (keep it depressed in order to start the fast
skip mode).
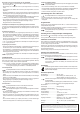
• With the “DAY/WEEK” button you can now choose on which day of the week (or on which
weekday combinations) the switching program of the program group is to be executed. The
days of the week will be shown at the top of the display.
MO DI MI DO FR SA SO Each day of the week, Monday to Sunday
MO > DI > MI > DO > FR > SA > SO Individual day
MO MI FR Monday, Wednesday and Friday
DI DO SA Tuesday, Thursday and Saturday
SA SO Saturday and Sunday
MO DI MI Monday, Tuesday and Wednesday
DO FR SA Thursday, Friday and Saturday
MO DI MI DO FR Monday to Friday
MO DI MI DO FR SA Monday to Saturday
The abbreviations stand for: MO = Monday, DI = Tuesday, MI = Wednesday, DO = Thursday,
FR = Friday, SA = Saturday, SO = Sunday
• If you do not press any button for several minutes, the settings will be saved and the display
will return to the current time.
This completes the programming mode.