
Manual
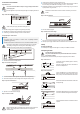
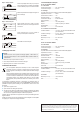

8 Connection and installation
1
Preparations for use
Do not remove the bulb when the lamp is carrying a voltage. Switch off the
power supply rst.
Remove the LED light bulb to expose the housing frame (1). See "Replacing the bulb" for
details.
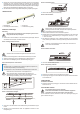
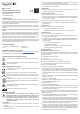
2
Step 1 - Mark the installation positions:
Aus
Off
Switch off the power supply cable before starting any work.
Mark the mounting position using the housing frame (1) of the lamp.
Mark the holes according to the mounting holes in the housing frame.
If necessary, pre-drill when mounting on wooden or metal surfaces.
3
(If required) Step 2 - Insert dowels:
Important:
– Use special dowels (not included) for surfaces made of lightweight materials
(plasterboard, gypsum etc.).
– Dowels are not required for surfaces made of wood, wood-based materials or metal.
Ensure that no existing cables or pipes (including water pipes) are damaged
when drilling mounting holes or securing screws. When drilling, also pay
attention to the routing of mains cables to avoid damaging them.
Insert the dowels into the mounting surface.
4
Step 3 - Secure the housing frame:
Guide the connection cable through the cable guide in the housing frame (1).
Secure the housing frame to the mounting surface using the screws provided.
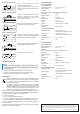
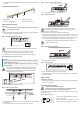
5
Step 4 - Open the connection box:
Open the cover of the connection box (3).
6
Step 5 - Connect the cable:
Make sure that the cable is de-energized when connecting (switch off the circuit
breakers). Use a voltage detector to check that there is no voltage in the
connection cable.
Lift the connection terminal out of the connection box (3).
Connect the product using a copper cable with a cross section of at least 0.75mm
2
. Observe
the colour coding of the cables when connecting; N = blue, L = brown or black.
All electrical connections must be fully plugged in and screwed tight, as a good contact is
a prerequisite for a long service life.
Cable ends of stranded wires must not be soldered. If necessary, use wire-end
ferrules.
7
Step 6 - Close the cable box:
Close the cable box (3) again.
8
Step 7 - Switch on the mains voltage:
On
Once you have made the connections, switch on the mains voltage again.
The lamp's power supply should be able to be switched on and off via a separate switch.
9 Setup
9.1 Using the LED light
Switch the power supply of the LED light on or off with your installed on/off switch.
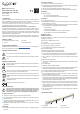
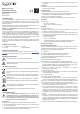
10 Replacing the bulb
The bulb of this lamp can be replaced.
Only use the bulbs indicated on the product label. Refer to the "Technical
data" section for details.
To replace the bulb, disconnect it safely from the power supply and proceed as follows:
1
Step 1 - Remove cover
Open
Let the bulb cool down sufciently (warm to the touch)
before removing it.
Open the cover (4). Slide the cover in the direction of
the arrow and then pull it off.
Step 2 - Remove the bulb
Turn the bulb (2) approx. 90º until the contacts of the
bulb and the lamp are parallel to each other at both
ends, so that you can remove the bulb from the sockets.
Remove the defective/used bulb from the sockets in the
housing frame (1).
Step 3 - Insert the bulb
Insert the new light bulb into the G13 socket. Be careful
not to bend or otherwise damage the connection pins.
Turn the bulb until the contacts are horizontal to secure
it in place.