
User manual
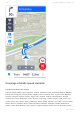


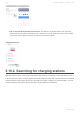


Table Of Contents
- Table of Contents
- 1. Compatibility & Requirements
- 2. Getting started
- 2.1. First start
- 2.2. Language and voice setting
- 2.3. Display modes
- 2.4. Main menu
- 2.5. Map management
- 2.6. Quick menu
- 2.7. Report menu
- 2.8. Traffic Information
- 3. Setting up your route
- 3.1. Choosing the starting point
- 3.2. Choosing the destination
- 3.2.1. Browsing the map
- 3.2.2. Searching for an address
- 3.2.3. Searching for a Place (POI)
- 3.2.4. GPS coordinates
- 3.2.5. Navigating to Recent places/Favorites/Contacts
- 3.2.5.1. Adding/removing favorites
- 3.2.6. Work, Home – Setup & Navigation
- 3.2.7. Navigating using a home screen icon
- 3.2.8. Searching by voice
- 3.3. Starting the route
- 3.4. Waypoints
- 3.4.1. Adding a waypoint while navigating
- 3.4.2. Adding a waypoint in route overview
- 3.4.3. Removing and skipping waypoints
- 4. Main menu
- 4.1. Settings
- 4.1.1. Map
- 4.1.2. Route planning
- 4.1.3. Regional Preferences
- 4.1.4. Fuel Prices
- 4.1.5. Notifications & Sounds
- 4.1.6. Navigation
- 4.1.7. Dashcam
- 4.1.8. Speed cameras
- 4.1.9. Battery management
- 4.1.10. Voice Commands
- 4.1.11. Maps and Data Storage
- 4.1.12. Backup & Restore
- 4.2. Sign in
- 4.3. Sygic Store
- 4.4. Sygic Travel
- 5. Add-ons & extra features
- 5.1. Traffic
- 5.2. Head Up Display
- 5.3. Real View Navigation
- 5.4. Dashcam
- 5.5. Cockpit
- 5.6. Mobile speed cameras
- 5.7. Static speed cameras
- 5.8. Monthly Map Updates
- 5.9. Mirrorlink Connectivity
- 5.10. Electric vehicle mode (EV mode)
- 5.10.1. EV mode settings
- 5.10.2. Searching for charging stations
- 5.10.3. Adding charging stations to your route
- 5.10.4. Charging with Sygic
- 6. Updates
- 6.1. Application updates
- 6.2. Map updates
- 7. Troubleshooting
- 7.1. “Getting position” or inaccurate GPS signal
- 7.2. Problem downloading maps
- 7.3. Crash/freeze of application
- 7.4. Trouble Downloading Sygic App
- 7.5. The app is not connecting to servers
- 7.6. Route did not calculate due to an error message
- 7.7. Reinstalling the app to solve technical issues

point displayed in the station’s details.
The following conditions must be met for the Charge command to be available. These have been
covered in this article above, but here is a summary:
• A charging point with a supported connector for your car is available
• An invoicing email and valid payment method have been set in the EV mode settings.
• The charging station allows App authorization
The next steps after pressing the Charge command are:
1. To set your car’s current battery charge level, which will improve the accuracy of the charging
estimation. This step is optional.
2. Connecting the charger with your car before pressing the Start Charging button.
3. Now you can view the estimated charging progress, based on your battery capacity and charger
power, on the screen in Sygic. If you minimize this screen or close your Sygic app while charging,
an icon to take you back to it will be on the main Sygic screen with the map.
4. To end the charging just press the Stop Charging button at the bottom of the charging progress
screen and confirm in the dialogue window. If the charging could not be stopped remotely, it will
inform you on the screen and you can either retry to rule out a temporary/random issue or stop the
charging manually directly on the charger.
Note: the chargers currently do not always communicate back to the app, so if you stop it
directly on the charger the app may still be showing that the charging process is ongoing. The
data on the screen are estimates for informational purposes. This will not affect your payment;
Sygic Sygic GPS Navigation for Android - 18.7
Page 98 of 108