
User manual
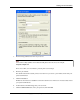


Table Of Contents
- User Guide for M-Business Anywhere™ Client
- Contents
- About this guide
- Part I. Before You Begin
- Part II. Installation
- Installing M-Business Client
- Installing M-Business Client to use a secure digital (SD) card on your Microsoft OS device
- Installing M-Business Client to use a secure digital (SD) card on your Symbian OS device
- Installing M-Business Client with self-registration
- Installing M-Business Client to use with an existing account
- Uninstalling M-Business Client
- Uninstalling M-Business Client from your desktop computer
- Uninstalling M-Business Client from your Palm OS device
- Uninstalling M-Business Client from your Windows Mobile Pocket PC device
- Uninstalling M-Business Client from your Windows XP device
- Uninstalling M-Business Client from your Windows Mobile 5 or 6 or Microsoft Smartphone device
- Uninstalling M-Business Client from your Symbian OS device
- Installing M-Business Client
- Part III. M-Business Client on the Desktop
- Configuring M-Business Client on the desktop computer
- Managing channels on the desktop computer
- Using M-Business Client on a device
- Part IV. M-Business Client on Palm OS
- Configuring a server connection on Palm OS
- Using M-Business Client on Palm OS
- Part V. M-Business Client on Windows Mobile Pocket PC
- Configuring a server connection on Windows Mobile Pocket PC
- Using M-Business Client on Windows Mobile Pocket PC
- Understanding the basics
- Searching to find content in M-Business Client
- Working with text
- Using HTML forms
- Email integration: Launching email from a web page
- Phoneto integration: Launching a dialer application from a web page
- Synchronizing remotely
- Browsing online
- Managing online cache
- Using on-device help
- Part VI. M-Business Client on Windows XP
- Configuring a server connection on Windows XP
- Using M-Business Client on Windows XP
- Part VII. M-Business Client on Windows Mobile 5 or 6, or Microsoft Smartphone
- Configuring a server connection on Windows Mobile 5 or 6, or Microsoft Smartphone
- Using M-Business Client on Windows Mobile 5 or 6, or Microsoft Smartphone
- Understanding the basics
- Searching to find content in M-Business Client
- Working with text
- Using HTML forms
- Email integration: Launching email from a web page
- Phoneto integration: Launching a dialer application from a web page
- Synchronizing remotely on Windows Mobile 5 or 6
- Browsing online
- Managing online cache
- Part VIII. M-Business Client on Symbian OS
- Configuring a server connection on Symbian OS
- Using M-Business Client on Symbian OS
- Understanding the basics
- Searching to find content in M-Business Client
- Working with text
- Using HTML forms
- Email integration: not supported on Symbian OS
- Phoneto integration: Launching a dialer application from a web page
- Synchronizing remotely on Symbian OS
- Browsing online
- Managing online cache
- Using on-device help
- Part IX. Appendix
- Index
Enabling a secure connection to a server
Depending on how your system administrator has configured M-Business Server, you may be able to enable
and disable security between M-Business Server and M-Business Client. For information on your company’s
security policy, contact your system administrator.
When you enable a secure connection to a server, M-Business Connect can use the HTTPS protocol to
connect to the server. You can connect to M-Business Server using the secure protocol only if:
♦ Your system administrator has enabled the use of secure protocols on M-Business Server.
♦ You have entered a secure server in the Hostname field in M-Business Connect on your desktop computer,
Windows XP device, or Windows Mobile Pocket PC device, or in the Server Addr field on your Palm
OS device.
♦ You have synchronized your mobile device at least once with the secure server.
♦ To enable a secure connection
1. On your desktop, choose Start»Programs»M-Business Client»M-Business Connect or
Start»Settings»Control Panel»M-Business Connect.
The M-Business Connect dialog displays.
2. On the Servers tab, select your server from the Server settings list.
3. Click Properties, or double-click on the name of the server.
The Edit Server Profile dialog displays.
4. Check the Connect to this server using a secure protocol checkbox.
Note
This checkbox is enabled only after the server in the Hostname field confirms that it can provide a secure
connection to the device. The server confirms this during the first synchronization, or when you test
the connection by clicking the Test button in the Edit Server Profile dialog.
5. Click OK.
Enabling a secure connection to a server
Copyright © 2008, iAnywhere Solutions, Inc. 53