
User manual

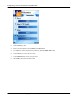


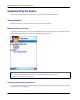

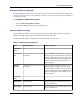

Table Of Contents
- User Guide for M-Business Anywhere™ Client
- Contents
- About this guide
- Part I. Before You Begin
- Part II. Installation
- Installing M-Business Client
- Installing M-Business Client to use a secure digital (SD) card on your Microsoft OS device
- Installing M-Business Client to use a secure digital (SD) card on your Symbian OS device
- Installing M-Business Client with self-registration
- Installing M-Business Client to use with an existing account
- Uninstalling M-Business Client
- Uninstalling M-Business Client from your desktop computer
- Uninstalling M-Business Client from your Palm OS device
- Uninstalling M-Business Client from your Windows Mobile Pocket PC device
- Uninstalling M-Business Client from your Windows XP device
- Uninstalling M-Business Client from your Windows Mobile 5 or 6 or Microsoft Smartphone device
- Uninstalling M-Business Client from your Symbian OS device
- Installing M-Business Client
- Part III. M-Business Client on the Desktop
- Configuring M-Business Client on the desktop computer
- Managing channels on the desktop computer
- Using M-Business Client on a device
- Part IV. M-Business Client on Palm OS
- Configuring a server connection on Palm OS
- Using M-Business Client on Palm OS
- Part V. M-Business Client on Windows Mobile Pocket PC
- Configuring a server connection on Windows Mobile Pocket PC
- Using M-Business Client on Windows Mobile Pocket PC
- Understanding the basics
- Searching to find content in M-Business Client
- Working with text
- Using HTML forms
- Email integration: Launching email from a web page
- Phoneto integration: Launching a dialer application from a web page
- Synchronizing remotely
- Browsing online
- Managing online cache
- Using on-device help
- Part VI. M-Business Client on Windows XP
- Configuring a server connection on Windows XP
- Using M-Business Client on Windows XP
- Part VII. M-Business Client on Windows Mobile 5 or 6, or Microsoft Smartphone
- Configuring a server connection on Windows Mobile 5 or 6, or Microsoft Smartphone
- Using M-Business Client on Windows Mobile 5 or 6, or Microsoft Smartphone
- Understanding the basics
- Searching to find content in M-Business Client
- Working with text
- Using HTML forms
- Email integration: Launching email from a web page
- Phoneto integration: Launching a dialer application from a web page
- Synchronizing remotely on Windows Mobile 5 or 6
- Browsing online
- Managing online cache
- Part VIII. M-Business Client on Symbian OS
- Configuring a server connection on Symbian OS
- Using M-Business Client on Symbian OS
- Understanding the basics
- Searching to find content in M-Business Client
- Working with text
- Using HTML forms
- Email integration: not supported on Symbian OS
- Phoneto integration: Launching a dialer application from a web page
- Synchronizing remotely on Symbian OS
- Browsing online
- Managing online cache
- Using on-device help
- Part IX. Appendix
- Index

Setting the billable warning option
By default, M-Business Client warns you whenever you start an operation that may result in charges from
your phone service provider. You can disable this warning if you do not need it, and you can re-enable it if
you change your mind.
♦ To disable the billable warning option
1. Choose Options»Settings»Billable Warning.
2. Re-enable the billable warning option by repeating step 1.
Using the Preferences dialog
Using the Preferences dialog, you can set preferences to control whether tables, frames, and images are
displayed in HTML pages, and also to control how M-Business Client works.
The following table describes the features in the Preferences dialog on your device.
Table 1. Preferences for Symbian OS
Field
Enables/disables Additional details
BROWSER
TAB
Minimum font
size
The minimum font size in which text
is displayed.
Select x-Small (the default) to allow the page to
display text down to the smallest size your device
supports. Select a larger size to force page text
to be no smaller than that. Select x-Large to force
all text to be displayed in the largest size your
device supports.
Maximum
font size
The maximum font size in which text
is displayed.
Select x-Large (the default) to allow the page to
display text up to the largest size your device
supports. Select a smaller size to force page text
to be no larger than that. Select x-Small to force
all text to be displayed in the smallest size your
device supports.
CONTENT
TAB
Show Tables Viewing tables Showing tables may not be necessary for text-
heavy synchronizing.
Show Images Viewing images. Showing images may not be necessary for text-
heavy synchronizing.
Understanding the basics
Copyright © 2008, iAnywhere Solutions, Inc. 263