
User manual


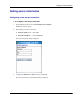

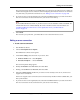

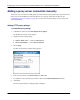

Table Of Contents
- User Guide for M-Business Anywhere™ Client
- Contents
- About this guide
- Part I. Before You Begin
- Part II. Installation
- Installing M-Business Client
- Installing M-Business Client to use a secure digital (SD) card on your Microsoft OS device
- Installing M-Business Client to use a secure digital (SD) card on your Symbian OS device
- Installing M-Business Client with self-registration
- Installing M-Business Client to use with an existing account
- Uninstalling M-Business Client
- Uninstalling M-Business Client from your desktop computer
- Uninstalling M-Business Client from your Palm OS device
- Uninstalling M-Business Client from your Windows Mobile Pocket PC device
- Uninstalling M-Business Client from your Windows XP device
- Uninstalling M-Business Client from your Windows Mobile 5 or 6 or Microsoft Smartphone device
- Uninstalling M-Business Client from your Symbian OS device
- Installing M-Business Client
- Part III. M-Business Client on the Desktop
- Configuring M-Business Client on the desktop computer
- Managing channels on the desktop computer
- Using M-Business Client on a device
- Part IV. M-Business Client on Palm OS
- Configuring a server connection on Palm OS
- Using M-Business Client on Palm OS
- Part V. M-Business Client on Windows Mobile Pocket PC
- Configuring a server connection on Windows Mobile Pocket PC
- Using M-Business Client on Windows Mobile Pocket PC
- Understanding the basics
- Searching to find content in M-Business Client
- Working with text
- Using HTML forms
- Email integration: Launching email from a web page
- Phoneto integration: Launching a dialer application from a web page
- Synchronizing remotely
- Browsing online
- Managing online cache
- Using on-device help
- Part VI. M-Business Client on Windows XP
- Configuring a server connection on Windows XP
- Using M-Business Client on Windows XP
- Part VII. M-Business Client on Windows Mobile 5 or 6, or Microsoft Smartphone
- Configuring a server connection on Windows Mobile 5 or 6, or Microsoft Smartphone
- Using M-Business Client on Windows Mobile 5 or 6, or Microsoft Smartphone
- Understanding the basics
- Searching to find content in M-Business Client
- Working with text
- Using HTML forms
- Email integration: Launching email from a web page
- Phoneto integration: Launching a dialer application from a web page
- Synchronizing remotely on Windows Mobile 5 or 6
- Browsing online
- Managing online cache
- Part VIII. M-Business Client on Symbian OS
- Configuring a server connection on Symbian OS
- Using M-Business Client on Symbian OS
- Understanding the basics
- Searching to find content in M-Business Client
- Working with text
- Using HTML forms
- Email integration: not supported on Symbian OS
- Phoneto integration: Launching a dialer application from a web page
- Synchronizing remotely on Symbian OS
- Browsing online
- Managing online cache
- Using on-device help
- Part IX. Appendix
- Index
Adding secure proxy settings
♦ To add secure proxy settings
1. In M-Business Client, choose Menu»Options»Server Options.
The M-Business Connect dialog appears.
2. Display the Proxy Settings dialog.
♦ Windows Mobile 5 or 6 — select the Connection tab.
♦ Microsoft Smartphone — choose Menu»Connection.
3. Select Change.
The first part of the Proxy Settings dialog appears.
4. Select Next to display the second part of the Proxy Settings dialog.
Enter your information in the Secure HTTP Address and Port fields, then select Next.
5. Enter exceptions to the settings in the Exclusion List.
Separate multiple addresses with semicolons.
Note
Exceptions are the host names of servers that M-Business Connect should access without going through
the proxy server.
6. Select Next to display the third part of the Proxy Settings dialog.
7. Select Finish.
Configuring a server connection on Windows Mobile 5 or 6, or Microsoft Smartphone
214 Copyright © 2008, iAnywhere Solutions, Inc.