
User manual


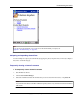


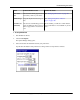

Table Of Contents
- User Guide for M-Business Anywhere™ Client
- Contents
- About this guide
- Part I. Before You Begin
- Part II. Installation
- Installing M-Business Client
- Installing M-Business Client to use a secure digital (SD) card on your Microsoft OS device
- Installing M-Business Client to use a secure digital (SD) card on your Symbian OS device
- Installing M-Business Client with self-registration
- Installing M-Business Client to use with an existing account
- Uninstalling M-Business Client
- Uninstalling M-Business Client from your desktop computer
- Uninstalling M-Business Client from your Palm OS device
- Uninstalling M-Business Client from your Windows Mobile Pocket PC device
- Uninstalling M-Business Client from your Windows XP device
- Uninstalling M-Business Client from your Windows Mobile 5 or 6 or Microsoft Smartphone device
- Uninstalling M-Business Client from your Symbian OS device
- Installing M-Business Client
- Part III. M-Business Client on the Desktop
- Configuring M-Business Client on the desktop computer
- Managing channels on the desktop computer
- Using M-Business Client on a device
- Part IV. M-Business Client on Palm OS
- Configuring a server connection on Palm OS
- Using M-Business Client on Palm OS
- Part V. M-Business Client on Windows Mobile Pocket PC
- Configuring a server connection on Windows Mobile Pocket PC
- Using M-Business Client on Windows Mobile Pocket PC
- Understanding the basics
- Searching to find content in M-Business Client
- Working with text
- Using HTML forms
- Email integration: Launching email from a web page
- Phoneto integration: Launching a dialer application from a web page
- Synchronizing remotely
- Browsing online
- Managing online cache
- Using on-device help
- Part VI. M-Business Client on Windows XP
- Configuring a server connection on Windows XP
- Using M-Business Client on Windows XP
- Part VII. M-Business Client on Windows Mobile 5 or 6, or Microsoft Smartphone
- Configuring a server connection on Windows Mobile 5 or 6, or Microsoft Smartphone
- Using M-Business Client on Windows Mobile 5 or 6, or Microsoft Smartphone
- Understanding the basics
- Searching to find content in M-Business Client
- Working with text
- Using HTML forms
- Email integration: Launching email from a web page
- Phoneto integration: Launching a dialer application from a web page
- Synchronizing remotely on Windows Mobile 5 or 6
- Browsing online
- Managing online cache
- Part VIII. M-Business Client on Symbian OS
- Configuring a server connection on Symbian OS
- Using M-Business Client on Symbian OS
- Understanding the basics
- Searching to find content in M-Business Client
- Working with text
- Using HTML forms
- Email integration: not supported on Symbian OS
- Phoneto integration: Launching a dialer application from a web page
- Synchronizing remotely on Symbian OS
- Browsing online
- Managing online cache
- Using on-device help
- Part IX. Appendix
- Index

Drag-scrolling
Drag-scrolling gives you finer control over navigation within an HTML page. When drag-scrolling is
enabled, you simply can tap and drag in an HTML page to scroll up or down, rather than using the scroll
bars. When drag-scrolling is disabled, selection of text is disabled. For instructions on how to enable or
disable drag-scrolling, see “Setting preferences” on page 141.
Tabbing with a directional pad
You also can navigate through HTML pages by tabbing with the directional pad. When you enable D-pad
right/left act like tab/backtab, your device directional pad left and right actions function as forward and back
tabs while M-Business Client is the active application. For instructions on how to enable or disable this
function, see “Setting preferences” on page 141.
Setting preferences
Setting the full screen option
M-Business Client has a full screen option that allows you to hide the menu bar/navigation button area
whenever you want to make the maximum screen space available for viewing content.
♦ To set the full screen option
1. Tap and hold anywhere within the content area of the M-Business Client screen to display the context
menu.
2. From the context menu, select Full screen.
If Full screen had a check beside it when you opened the context menu, the full screen option was on
and selecting it now turns it off.
If Full screen did not have a check beside it when you opened the context menu, the full screen option
was off and selecting it now turns it on.
Using the Option Manager
The following table describes the features in the Option Manager on your device.
Table 1. Option Manager preferences for Windows Mobile Pocket PC
Field
Enables/disables or sets Additional details
BROWSER
TAB
Understanding the basics
Copyright © 2008, iAnywhere Solutions, Inc. 141