
Installation Guide

INSTALLATION
INSTRUCTIONS
Swiss Madison
www.swissmadison.com | 19 Stults Rd, Dayton, NJ 08810 | 1-434-623-4766 | info@swissmadison.com
Share your pictures for a feature!
using #SwissMadison
1. Read the complete instruction manual before beginning installation.
2. Conrm that your model will t in intended location and plumbing xtures are
located where legally required before beginning installation.
3. Not all drawings on this manual are drawn to scale. Please refer to the model chart.
4. Two people are recommended to install and move this product.
The step-by-step guidelines in the installation instructions are a general reference for installing a Swiss Madison Sink.
Should there be any discrepancies, Swiss Madison cannot be held liable.
It is recommended to install all Swiss Madison products by hiring a licensed professional
NOTE: Drawings may not exactly define contour of china.
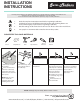
SUGGESTED TOOLS AND MATERIALS
Drill AcetoneSafety GlassesPencil
Silicone
Adhesive
Tape Measure
1. Mark faucet and drain
hole location.
Place sink in desired
location on countertop
and mark the drain hole
and faucet hole centerline
with a pencil.
NOTE: Make sure clear-
ance is suitable for
backsplash, faucet, and
plumbing for the sink.
2. Drill countertop, cut the
opening for the drain in
the countertop.
3. Install faucet and it’s
components.
4. Check alignment of the
sink to the opening in the
countertop. Use a bead of
clear silicone (or preferred
adhesive) around the
underside of the sink.
Carefully place sink on
the countertop, align, and
press rmly.
Allow sealant to set
above 60 minutes.
INSTALLERS TIP:
Use acetone or rubbing
alcohol to remove any
excess sealant
immediately after
application.