
Instructions / Assembly

— 2 —
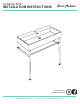
CONSOLE SINK INSTALLATION INSTRUCTIONS
1. Assemble Console
· Using the provided hardware assemble the
console as illustrated.
NOTE: Height of console is NOT adjustable.
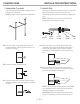
2. Install Sink
· Use your assembled console to mark on the wall
where the bottom of the sink should rest.
· Following the steps illustrated below, install your
sink.
NOTE: Make sure your sink is LEVEL before
marking and securing into place.
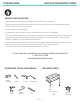
Anchor
Metal
Screw
Plastic
Gasket
Metal
Gasket
Metal
Nut
2a. Drill two holes in the required position on
the wall using a 14mm masonry drill bit, to
a depth of 75mm.
2c. Screw a fixing bolt into each anchor using
an 8mm spanner until the spanner contacts
the wall.
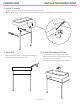
2d. Place the basin in position against the wall.
Locating the fixing bolts through the holes in
the rear of the basin. Push a plastic washer
followed by a metal washer, onto each fixing
bolt.
2e. Screw a metal nut onto each fixing bolt to
secure the basin. Caution: Do not over-tighten,
as this may damage the ceramic.
2b. Push an anchor into each hole.
NOTE: These fixings are suitable for solid walls
only. Plasterboard or stud walls may require
specialist fixings (not supplied).
CAUTION: Take care when drilling walls and
floors to avoid any concealed wires or pipes.