IPTV Middleware REMOTE CONTROL & DVR USER GUIDE TABLE OF CONTENTS Introduction ..........................................................................2 The Remote............................................................................2 What’s on TV?........................................................................3 Using the OK Button (Now Playing)..........................3 Using the INFO Button...................................................3 Using the BROWSE Button .......................
Introduction Get ready to free your TV. You’re going to love the new control you have over how and when you watch television once you’re free from the usual constraints of ordinary television. This extraordinary television service offers a powerful new DVR-giving freedom to record your favorite programs and watch them on your schedule. Using the buttons on the remote control, you can fast forward through parts you don’t want to watch and rewind to watch the things you want to see again.
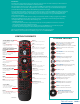
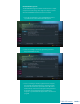
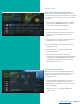
What’s on TV? When you first turn on the TV, there are three easy ways you can see what is currently showing. You can use the OK button, the INFO button, or the Browse (right arrow) button. Using the OK Button (Now Playing) 1. Press the OK button on the remote control. 2. When you press the OK button, you see what program is playing currently. In this example, the TV symbol indicates you are viewing Splash and Bubbles from channel 608.
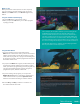
Using the Browse Button 1. Press the Browse (right arrow) button on the remote control. At the bottom of the screen you see the channel number, channel name, current date and time, program name, date and time the program airs, a progress bar showing how far along the program is, and the program that airs next. 2. Press the Right/Left arrow buttons to view what is showing later on the current channel. Or, press the Up/Down arrow buttons to view what is showing on another channel. 3.
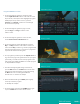
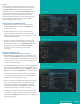
Skip Back Button example Using the GUIDE Button continue... 2. To move through the guide one channel at a time, use the Up/Down arrow buttons on the remote control. As you do this, a description of the highlighted program will display at the top of the screen. Or, press the Channel + and Channel – buttons to scroll through the channels more quickly. 3. To move through the guide one page at a time, press the Page + and Page – buttons on the remote control. 4.
Bandwidth Management The Bandwidth Management feature allows the user to adjust set top box resource usage. The usage can only be accessed when the bandwidth allowance has been exceeded. 1. Once the user attempts to exceed bandwidth allowance, a System Resource Exceeded window will appear. 2. Select a recording or current program being watched that you would like to stop. 3.
Search Search capabilities allow you to either search for a full title of a program or for a word or two within a title. You can use the Search feature in the guide to find all instances of a program by title, or you can use the Search feature to enter a partial name and search for all instances of the word to locate the desired program. This works well if you can’t recall the full name of a program or movie.
Searching continue... Search History The Search History feature will allow you to save your searches so that they can be used again at a later time. Up to 18 searches may be retained in the Search History at any given time. The oldest searches will automatically be removed as a new search is performed. Frequently-used searches may be saved to prevent removal and may be sorted to keep them at the top of the History list. 1. Select the MENU button. Select TV | Search | History. 2.
Record Programs Your DVR service gives you the freedom to record the program you are watching as you are watching it. It also allows you to record a program while you watch another, or record a program you see in the program guide. You can also schedule a series recording so you always catch all episodes of your favorite programs.
Recording continue... Create a One-Time Recording from the Guide Whether you are choosing a program from the Guide or if you are currently viewing the program when you decide to record it, the process to create a one-time recording is the same. 1. From the Guide, highlight the program you want to record and press the Record button on the remote control. The recording options will display. 2. Choose to create a one-time recording. 3.
Recording a Series continue... 3. The Series Recording Options will display. • Choose how many episodes to keep at most any given time. Options are 1 – 10 or All episodes. Use Left/Right arrow buttons to make your selection. • Choose the show type you wish to record. You may choose to record All episodes of a program or only New episodes. • Choose when to start recording.
How to Watch a Recorded Program: 1. To access the list of recorded programs, press the LIST button on the remote control. 2. From the list of recordings, use the Up/Down arrow buttons to choose the folder containing the recorded program you wish to watch. When you highlight a program, it expands to show more information, or you may need to press the INFO button, depending on your configuration. 3. To start playback of the recording, press the Play button on the remote control. 4.
Binge Mode Recording Playback When you are watching programming from a Series Recording and have multiple recordings, this mode will prompt you to watch the next recording in a series once you are done with the initial one. You can highlight Delete to delete the episode you just watched. Then, either Return to TV, Return to List, or choose the next recording in the list below.
Folders Folders allow you to organize the recordings on your DVR by user, program type, or any other way you may choose. 1. To create folders, simply choose the [New Folder] option any time you are setting a new recording. Arrow down to select Create One Time Recording and select the OK button. 2. You will then be prompted to name the folder. Enter the folder name and select Submit. 3.
Status Bar The status bar appears whenever you Skip Forward, Skip Back, Pause, Rewind, or Fast Forward a live or recorded program. It gives you information such as the channel you are viewing, the title of the program you are watching, and the length of the live buffer. Pause As you watch live TV or recorded programs, press the Pause button and the programming on the screen instantly freezes. Press the Play button to resume normal play of the program from the point where it was paused.
Using Bookmarks Your DVR is capable of marking specific spots in a recorded program, called Bookmarks. It is an easy way for you to mark your spot in a program that you might not be able to watch in its entirety, bookmark a great play in a sporting event, or the end of a commercial. 1. To work with bookmarks, press the Play button on the remote control to display the status bar. 2.
Recording Conflicts The DVR can record a limited number of programs at a time. If you attempt to record more programs than the system is capable of recording at one time, the DVR will warn you of a recording conflict. 1. You may choose to either resolve the conflict or to cancel your option to record the program. 2. When you choose “Resolve Conflict,” a guide screen will appear showing the other programs currently scheduled to be recorded. 3.
Using the LIST Button You access your recordings, the list of future recordings, and series rules by pressing the LIST button on the remote control multiple times. Current Recordings Press the LIST button one time to access the list of Recording Folders. The All Recordings Folder appears first and includes all the recordings you have stored on your DVR. If grouping is enabled in your settings, each program will also have a folder including all recordings of that program.
Current Recording Actions To view the available Actions, press the Green button on the remote control. The Actions list displays on the right hand side of the screen. To make it easy for you, the list of Actions on the screen shows the corresponding button that you could press on the remote control. It is also possible to highlight your selection and then press OK on the remote control. 1. Select Play Recording to start the currently-selected recording. 2.
Future Recordings Press the LIST button a second time to view your list of Future Recordings. These are programming events that are waiting to happen. At the top of the screen, you see the number of recordings and the amount of space you have free on the DVR. When you are in a program folder, • Delete a future recording by pressing the Red button on the remote control. • View the available Actions by pressing the Green button on the remote control.
Series Recording Rules Press the LIST button a third time to view your Series Recording Rules. These are the programs that you have set to record on a regular basis. You can make adjustments to your series recording rules from this screen. At the top of the screen you see the number of Series Rules and the amount of space you have free on the DVR. 1. Delete a rule by pressing the Red button on the remote control. 2. View the available Actions by pressing the Green button on the remote control.
Recently Deleted List If you have the Cloud DVR service, press the LIST button a fourth time to view your list of Recently Deleted recordings. By default, the most recent recording shows at the top of the list. At the top of the screen, you see the number of recordings and the amount of space you have free on the DVR. As you arrow through the list and pause at a program, you see a brief description of the program, the channel it aired on, the date, time, duration, and rating of the recording.
Create a Favorites List If you like to be able to surf within only a specific set of channels, you can create favorites lists. By default, your set top box has grouped channels into several pre-set Favorites lists including: All Channels, Subscribed Channels, Movie Channels, Sports Channels, Music Channels, Entertainment Channels, Kids Channels, News Channels, Business News Channels, Infotainment Channels, Religious Channels, Regional Channels, and HD Channels.
Access a Favorites List for Surfing 1. Press the FAV button on the remote control. 2. All favorites lists will display. Lists that you have created will display with a star. 3. Arrow down to highlight the favorites list you want to use and then press the OK button on the remote control. The list you have selected will show just above the channel number. 4. With the favorites list selected, you will browse channels only within that list.
1 TV Menu Along with being able to access almost all functions with specific buttons on the remote control, you can also access these controls through the main menu. 1. Access the main menu by pressing the MENU button on the remote control. Under TV you have options for Guide, Now Playing, Search, and What’s Hot. 2. Arrow to the right, highlight Guide, and press the OK button to view the channel guide. This is the same as when you would press the GUIDE button on the remote control. 2 3.
1 Recordings Menu Most everything that you do with the LIST button on the remote control, you can do in the Main Menu. 1. Access the Main Menu by pressing the MENU button on the remote control. Under Recordings you have options for Current, Future, Series, and Recently Deleted (if applicable). 2 2. Arrow to the right, highlight Current, and press the OK button to view the list of recorded programs saved on your DVR. This is the same as if you would press the LIST button on the remote control. 3.
1 Phone Menu If you are also subscribed to Caller ID on the TV, you can have your caller ID display on the TV as well as on your regular Caller ID device. The Recent Calls List will store recent caller ID information. Note: The Recent Calls and Voicemail options are only available if the subscriber also purchases the APMAX Voice Mail/Unified Messaging Service. 2 Messages 1. You can access the Main Menu by pressing the MENU button on the remote control. Select the Phone menu. 2.
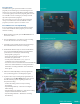
Apps Menu The Apps menu allows you to access any of the available apps that have been made available by your service provider. Note: Available applications may differ from shown image based on account availability. 1 2 Weather The Weather Application allows the current weather statistics to be viewed through multiples guides and menus. It can be accessed through the Apps category to instantly bring up an on- screen window with the most current weather information.
What’s Hot Application What’s Hot Application The What’s Hot application allows you to view local area real time information about what others in your local area are watching. The end user can easily tune to one of the “What’s Hot” programs or set a recording. 1. Select the MENU button on your remote control. Select Apps, highlight What’s Hot, and select the OK button. Settings Menu 2. A window will appear on the screen with the most current popular channel information for the local area.
Display Settings Display Settings Arrow to the right, highlight Display, and press the OK button to change how the set top box should display specific things. Typically, these items are set at the time of installation and not changed. 1. Turn Closed Captioning On or Off. 2. Set the Audio Language to English, Spanish, or French. 3. Set Audio Format to Stereo, Dolby Digital, or Dolby Digital +. Guide Settings 4. Change your Connector settings to Component or HDMI. 5. Set the TV Type to either 16:9 or 4:3. 6.
Parental Controls Arrow to the right, highlight Parental, and press the OK button to find Parental Control options to Change PIN, Edit Locked, Set Ratings, Time Restrictions, Cancel Override, and Options. Change PIN 1. Within the Parental menu, arrow to the right and select the Change PIN category for the Ratings PIN or Purchase PIN. 2. Use the arrow button to highlight change PIN and press the OK button. 3. Enter the Old PIN, arrow down and enter your New PIN. Then arrow down to confirm the New PIN.
Set Ratings Set Ratings 1. Within the Parental menu, arrow to the right and select the Set Ratings category. The Set Ratings category allows you to set access to programming based on TV and Movie ratings. This will require that a PIN be entered in order to view programming at or beyond the rating you specify. TV Rating Options 2. Use the Left/Right arrow buttons to choose a TV Rating. Options are TV-Y, TV- Y7, TV-Y7 FV, TV-G, TV-PG, TV-14, TV-MA, off. 3.
Cancel Override 1. Within the Parental menu, arrow to the right and select the Cancel Override category. The Cancel Override category allows any previous PIN overrides for an extended period of time to be cancelled. To cancel an existing override, select OK within the Cancel Override prompt. Once the override has been cancelled, the parental PIN will need to be used for all Locked and Rated channels. Options 1. Within the Parental menu, arrow to the right and select the Options category.
Recording Settings 1. From the Settings Menu, arrow to the right and choose Recording to make changes to your settings for recorded programs. RECORDINGS SETTINGS: Group Titles Group all recorded episodes with the same title rather than listing each episode individually. The Skip Forward button will toggle between Grouped and Ungrouped listings. Auto Expand Selection Choose this option to automatically display information for the selected recording.
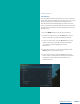
Caller ID display on the TV example Caller ID and Message Waiting Indication on the TV If you are subscribed to Caller ID, it is possible to have your Caller ID information display on the TV as it displays on your regular Caller ID device. Also, it is possible to have voice mail waiting indication show on your TV. Note: The Caller ID and Message waiting features are only available if the subscriber also purchases the APMAX Voice Mail/Unified Messaging Service.
Round-The-Clock Support 605.696.HELP(4357) 24-hours a day, 7-days a week www.swiftel.