
User Manual

Copyright Swiftech 2002 – All rights reserved – Last revision date: Sep 11, 2002
Rouchon Industries, Inc., dba Swiftech – 1703 E. 28
th
Street, Signal Hill, CA 90755 – Tel. 562-595-8009 – Fax 562-595-8769
E Mail: Swiftech @swiftnets.com – URL: http://www.swiftnets.com
Information subject to change without notice
Page 2
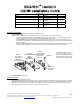
3. Place the MCX462+ heatsink over
the CPU as shown in the schematic to
the right. The step side should be
located over the socket’s cam box.
Keep the heat sink mounting screws
lined up with the standoffs. Tighten
the mounting screws in a crisscross
pattern until the screws bottom out into
the standoff.
Step side
This way
over cam box
CPU core
Crisscros
tightening
pattern
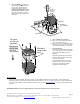
Fan guard
and fan sold
Separately
Direction of
the fan flow
(fan label
facing down)
Provided
Snap rivets
here
4. 70mm and 80mm Fan installation::
! 80mm fan: use the provided snap-rivets as
shown in schematic to the right.
! 70mm fan: remove the 4 fan brackets held by
Philips screws, and use the set of four 6-32 x
2.00” screws provided with your spare parts.
5. Recommended fans
The MCX462+ accommodates 70 and 80mm
fans in order to provide users with the widest
range of possibilities depending on their
application.
Suggested fan airflow rating for normal use
(non-overclocked processor), and operating
conditions: 30 to 45CFM
Suggested fan airflow rating for extreme
operating conditions, such as overclocked
processors or unusually high ambient
temperatures: 45CFM and above
III. Final inspection
Now that the heat sink is installed, startup your computer, go into the BIOS and observe the CPU temperature. Under normal ambient
temperature conditions, the processor temperature should never exceed 55° C (130 ° F). If it does, shut down the computer immediately, and
review your entire installation. Troubleshooting help is available on our web site at www.swiftnets.com
, or by calling customer support at 562-
595-8009.
DISCLAIMER: Swiftech assumes no liability whatsoever, expressed or implied, for the use of these products.