
Manual

Copyright Swiftech 2003 – All rights reserved – Last revision date: Sep 15, 2003
Rouchon Industries, Inc., dba Swiftech – 1703 E. 28
th
Street, Signal Hill, CA 90755 – Tel. 562-595-8009 – Fax 562-595-8769
E Mail: Swiftech @swiftnets.com – URL: http://www.swiftnets.com
Page 1
Packing list
Parts Qty Parts Qty
Heat Sink 1 Wire-Spring 1
40mm fan 1 Thermal grease – Arctic Alumina 1
Neoprene pads (strip of 4) 1
Heatsink fan Installation
1. Installation does not necessitate removal of the motherboard from the chassis.
2. Remove the existing heatsink and carefully clean the microprocessor with alcohol
3. Lightly coat the processor core with the provided Arctic Alumina thermal compound. Only a paper-thin coat is necessary! It
should be applied using preferably a razor blade, or a credit card, held between thumb and index at a 45° angle.
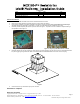
4. Install the provided neoprene pads onto the processor as shown figure 1. The pads must not be installed on chipsets featuring a
heat spreader as shown figure 2.
Figure 1 – Neoprene pads required Figure 2 – Neoprene pads MUST NOT be installed
5. Install the heatsink fan onto the processor as shown Figure 3 by simply engaging one end of the hook into a motherboard retention
loop then engaging the opposite hook. Make sure that the heatsink is centered between the two arms of the wire-spring.
Figure 3
6. Connect the fan to any motherboard 3-pin power connector.
Installation is complete!
IMPORTANT DISCLAIMER
Information subject to change without notice