
Instruction Manual

Copyright Swiftech 2010 – All rights reserved – Last revision date: 9-26-09 – U.S. patent 6,469,898 - Rouchon Industries, Inc., dba Swiftech® –151
West Victoria Street, Long Beach, CA 90805 – Tel. 310-763-0336 - Toll free (US) 888-857-9438 – Fax 310-763-7095 - E Mail: help@swiftech.com –
URL: http://www.swiftech.com - Information subject to change without notice
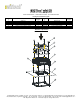
1. Install the motherboard back-plate
The MCX-V Core heatsink is shipped with two motherboard back-plates:
one for socket 1366, and one for socket 1156. The mounting screws are
adjustable and compatible with both.
Removal of the motherboard from the chassis is necessary in order to
install the back-plate to the motherboard.
By default, the heatsink is shipped bolted to the socket 1366
motherboard back-plate. You will need to remove it from the heatsink in
order to install it to your motherboard.
Select the back-plate corresponding to your application by aligning the
back-plate holes to those of your motherboard.
Peel off the protective paper and mate the back-plate to the back of the
motherboard, ensuring that all 4 standoffs are completely engaged in the
CPU mounting holes.
1. Installez la contre-plaque sur la carte-mère.
Le dissipateur MCX-VCore est livré avec deux contre plaques de carte-
mère : une pour socket 1366, et une pour socket 1156. Les vis de
montage sont ajustables, et compatibles avec les deux.
Il est nécessaire de démonter la carte-mère du boitier afin d’installer la
contre-plaque.
Par default, le dissipateur est vissé sur la contre-plaque pour socket
1366. Vous devrez la dévisser du dissipateur afin de l’installer sur la
carte-mère.
Sélectionnez la contre-plaque correspondant à votre application en
alignant les trous de la contre-plaque à ceux de la carte-mère.
Enlevez le papier protecteur et appliquez la contre-plaque à l’arrière de
la carte mère en vous assurant que les 4 standoffs sont bien engagés
dans les trous de montage du CPU.
2. Prepare the CPU
Clean the CPU with a degreaser (preferably formulated for electronics)
then apply the supplied grease to the center of the CPU.
2. Préparez le microprocesseur
Nettoyez le CPU avec un dégraissant (de préférence spécialement
conçu pour les composants électroniques), puis appliquez la pâte
thermique fournie au centre du CPU.
3. Fasten the heatsink to the motherboard
Simply mate the heatsink to the processor, and fasten all 4 thumb
screws gradually and in a cross pattern until they bottom out.
3. Montez le bloc sur la carte mère
Simplement déposez le dissipateur sur le CPU, et serrez les 4 vis de
montage progressivement et alternativement (en croix) jusqu’à ce
qu’elles soient à fond.
4. Install a fan of your choice
By default, the MCX-VCore is shipped with 80mm fan brackets. A set
of 92mm fan brackets is also included. You can also use the 92mm
fan brackets to install 120mm fans with a 120mm to 92mm fan adapter
(not included). For optimum performance, we recommend that you
always install your fan with the air blowing down i.e. towards the
heatsink.
Fasten your fan to the brackets using the provided snap rivets. A set
of additional snap rivets is also included to attach a fan guard to the
fan.
Installation is now complete.
4. Installez un ventilateur de votre choix
Par défaut, le MCX-VCore est livré avec les supports pour ventilateurs
de 80mm. Un jeu de supports pour ventilateurs de 92mm est aussi
inclus. Vous pouvez aussi utiliser ces supports de 92mm pour installer
un ventilateur de 120mm en utilisant un adaptateur de 120 à 92mm
(non inclus). Pour une performance optimum, nous recommandons de
toujours installer le ventilateur avec l’air soufflant vers le bas c’est à
dire dans la direction du dissipateur.
Attachez le ventilateur sur les supports en utilisant les rivets plastiques
fournis. Un jeu de rivets supplémentaires est aussi fourni pour installer
une grille de protection sur le ventilateur.
L’installation est à présent terminée.