These instructions are updated on a regular basis. Please visit our web site at http://www.swiftnets.com Copyright Swiftech 2005 – All rights reserved – Last revision date: 4-16-05 - Information subject to change without notice – URL: http://www.swiftnets.com Rouchon Industries, Inc., dba Swiftech – 1703 E. 28th Street, Signal Hill, CA 90755 – Tel. 562-595-8009 – Fax 562-595-8769 - E Mail: Swiftech@swiftnets.
Packing List QTY 1 1 1 1 8 1 1 1 ITEM STORM water-block, including hold-down plate, various processors mounting systems, and (2) hose clamps MCP655 pump, including mounting hardware and (2) hose clamps MCRES-Micro, including mounting hardware, ½” hose-barb fittings, and (2) hose clamps MCR220 Radiator assembly, including (2) pre-installed 120mm fans with fan guards, mounting hardware, ½” black nylon hose barb fittings, (2) 12v to 7v adapters, (2) 12v to 5v 3-pin to 4-pin Molex adapters, and (2) hose clamp
TABLE OF CONTENTS I. PLANNING..................................................................................................................................................................... 4 1. General Guidelines....................................................................................................................................................... 4 2. Tube Routing ......................................................................................................................
INTRODUCTION Congratulations on your purchase of a Swiftech™ H20-APEX liquid cooling system! This kit has been designed to facilitate the installation of the components with a minimum of case modifications. While all attempts have been made to make the installation of this system user friendly, please note that this system is intended for users that are well versed in installing computer components.
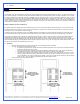
The following table contains examples on how to establish connections between the different elements of a cooling circuit based on multiple possible configurations. These are guidelines only, and may change depending on the relative position of the components inside your chassis.
4. 1. Reservoir MCR220 RADIATOR INSTALLATION Preamble: The MCR220 dual 120mm radiator ships with the fans and the Radbox chassis already pre-assembled to the radiator. It is assumed in effect that users will take advantage of our Radbox concept (external radiator installation) due to the benefits it provides and ease of installation. In such context, the following installation guide describes this type of installation.
TIP: In the package of assorted hardware coming with your Radbox, locate the 4 little nylon retaining washers looking like this: Use these to secure the screws and nylon spacers to the computer back-panel. This will hold the screws in place while you adjust the Radbox back-plate. Once satisfied with the position, bolt down the Radbox back-plate with the provided nylon nuts.
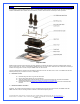
2. STORM WATER-BLOCK INSTALLATION If you followed our general guidelines listed on page 5, your motherboard should have been removed from the case, and it is now time to install the STORM water-block. Please follow the installation procedures described below, and listed per class of processor.
ITEM #QTY. PART NO. A 1 S478 B 1 storm-assy2 C 1 STORM-HOLD-DOWN-R1 D 2 1-4-straightx3-8-barb E 2 O-RING-9557K473 F 4 6-32-Acorn-nut G 4 SPRING6 H 8 12SWS0444 I 4 6-32-nut J 4 LOCK-WASHER#6 K 8 FW140X250X0215FB BLK L 4 6-32X1.
ITEM #QTY. PART NO. DESCRIPTION A 1 LPGA 775 Prescott Socket T Representation B 1 storm-assy2 C 1 STORM-HOLD-DOWN-R1Storm Universal hold-down plate D 2 1-4-straightx3-8-barb 1/4" NPSM Barb fitting - 3/8" & 1/2" supplied E 2 O-RING-9557K473 1-4'" NPSM barb fitting O-Ring F 4 6-32-Acorn-nut G 4 SPRING6 70927compressed-to-0337 H 8 12SWS0444 NYLON SHOULDER WASHER I 4 6-32-nut 6-32 nut J 4 LOCK-WASHER#6 K 8 FW140X250X0215FB BLKblack fiber washer L 4 6-32X1.
Use all parts from “common parts pack” except Philips screws: replace with the enclosed 6-32 1 7/8” long screws, instead of the 1 ¾” long supplied in the common parts pack. The following parts are only compatible with Xeon processors operating at 533Mhz and below, and are not compatible with Intel Xeon “Nocona” class processors (800Mhz Front Side Bus) which require a different retention mechanism available in option. ITEM #QTY. PART NO.
It is necessary to remove the pre-installed hold-down plate prior to installation. Simply unscrew the 4 button head screws holding the assembly together using the provided 5/64 Allen wrench, remove the hold-down plate, and re-install the screws with the provided nylon washers instead as shown below. ITEM #QTY. PART NO.
ITEM # A B C D E F G H I J K L QTY. PART NO. 1 counter-plate 1 motherboard 1 retention-frame 1 storm-assy2 1 STORM-HOLD-DOWN-R1 2 1-4-straightx3-8-barb 2 O-RING-9557K473 2 93286A041-WASHER 2 885 2 6-32x2.25-philips 2 spacer-205x140x773 2 13RS031214 DESCRIPTION Back plate AJ00264 Retention frame AJ00172 Storm Universal hold-down plate 1/4" NPSM Barb fitting 1-4'" NPSM barb fitting O-Ring zinc plated washer spring 6-32 x 2 1/4" philips screw tension limiter Nylon spacer 0.312X0.14X0.
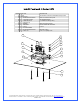
3. RE-INSTALLING THE MOTHERBOARD Now that the STORM water-block is securely fastened to the motherboard, go-ahead and install the motherboard into the chassis, following the instructions provided in your motherboard installation guide. 4. PUMP INSTALLATION General Use The MCP655 pump is a magnetically driven centrifugal pump featuring a 12 V DC motor. It requires no maintenance when used with demineralized water and the appropriate anti-fungal additives.
Permanent installation to the chassis, and exploded view Copyright Swiftech 2005 – All rights reserved – Last revision date: 4-16-05 - Information subject to change without notice – URL: http://www.swiftnets.com Rouchon Industries, Inc., dba Swiftech – 1703 E. 28th Street, Signal Hill, CA 90755 – Tel. 562-595-8009 – Fax 562-595-8769 - E Mail: Swiftech@swiftnets.
5. PREPARING THE TUBING Now that your radiator, water-block and pump are in place, it is time to cut segments of tubing and connect the devices together. Then, with one end of a tube connected to a startup component such as the water-block for example, roughly estimate the length that you will need to the next component, and cut the tube and coil squarely with a pair of scissors. Work your way through the entire circuit in the same fashion, until you are satisfied with the tube routing.
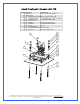
6. MCRES-MICRO RESERVOIR INSTALLATION ITEM NO. 1 PART NUMBER MCRES-MICRO 2 1-4“ NPSM x 3-8“ and 1-2“barb 3 O-RING-9557K473 4 pg7-o-ring 5 pg7-plug 6 MOUNTING HARDWARE 6a 90272A152-6-32x0500philips 6b 90760A007 6c washer-91007A614 6d WASHER-RUBBER-437X150X092 7 panel DESCRIPTION QTY.
• • • Fastening the device to the case: two mounting methods can be used Permanent mount with the provided mounting hardware as shown in figure 1. Three holes will need to be drilled for a permanent mount. Simply use the reservoir as a template to mark the hole locations, and use a 0.150” (4mm) drill bit to drill the holes. Make sure to clean up any metal shavings from the case once you are done. Easy mount, with the provided Velcro strips. This is a fairly secure mount, as we use extra strong Velcro.
Example of installation (including the MCW55 VGA cooler) Copyright Swiftech 2005 – All rights reserved – Last revision date: 4-16-05 - Information subject to change without notice – URL: http://www.swiftnets.com Rouchon Industries, Inc., dba Swiftech – 1703 E. 28th Street, Signal Hill, CA 90755 – Tel. 562-595-8009 – Fax 562-595-8769 - E Mail: Swiftech@swiftnets.
7. TROUBLESHOOTING Air keeps circulating into the circuit, long after the pump has primed: o There is a significant pocket of air trapped into the circuit. In most cases this will be due to the fact that the radiator and or the water-block where installed upside down. Temporarily dismount the device and re-orient right side-up until all the air has escaped back into the circuit. o The fluid level is too low: top-off the reservoir to the appropriate level.