User Guide: SW380B
Welcome to your Swift SW380B microscope! Whether you are a seasoned professional or a beginner hobbyist, Swift has the perfect microscope for you. This quick-start guide will introduce you to the components of your new microscope and help you begin to use it. For more information about our microscopes or customer service requests, click here. Table of Contents I. Specifications 3 II. Parts of the microscope 4 III. Assembly and set up 4 IV. Using the microscope 4 V.
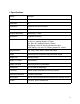
I. Specifications Model SW380B Head 360° rotatable Binocular Siedentopf Inclination 30° Eyepieces Wide-field 10X and 25X pairs Interpupillary distance 48-75mm Diopter adjustment On left tube, +/-5dp Nosepiece Quadruple revolving Objectives Achromatic 4X, NA 0.1, working distance 37.5mm 10X, NA 0.25, working distance 6.54mm 40X(Spring), NA 0.65, working distance 0.63mm 100X (Spring, Oil), NA 1.25, working distance 0.
II. Parts of the microscope III. Assembly and set up Carefully remove the microscope body from the box and set it on a sturdy, flat surface. Remove the microscope head from the box and secure it to the body with the head locking screw, using care not to overtighten. Remove the plastic covers from the eyepiece holders on the microscope's head, then place eyepieces into the holders. Locate the power cord and attach it to the microscope, then plug it in.
Clip a slide into the slide holder on the stage. Use the X-Y translational control knobs on the right side of the stage to move the stage front to back or the slide holder left to right to center the specimen over the bulb. Move the binocular eyepieces closer together or further apart until you see one image when you look through them. Adjust the bulb brightness to a comfortable intensity with the dimmer wheel.
V. Caring for your microscope As with any quality instrument, your microscope should be stored in a cool, dry place. Use the dust cover to protect the microscope when not in use. If necessary, clean the lenses with a soft brush or compressed air to gently remove dust. Avoid touching the optical surfaces directly and never disassemble the optical components of the microscope. When not using eyepieces, use the plastic covers to protect the eyepiece lens holders and ocular lens. VI.
Poor image quality No cover slip on the specimen Place glass cover slip over the specimen Slide is too thick or too thin Use a lab-quality slide Slide is placed upside down on the stage Flip the slide over so that the cover slip is facing up Oil on objective lens Wipe the lens off with soft cloth and glass cleaner Iris aperture is too narrow or too wide Adjust the iris aperture Image moves while adjusting focus Slide is shifting on the stage Reposition slide more securely in the slide holder L
Slide is not moving when using the X-Y translational control knob Slide has come unclipped from the holder Reposition slide in the holder and secure with clip Lamp does not turn on No power source Check that the adapter is fully connected or that batteries are installed Bulb has burned out Replace the bulb Lamp flickers while on Bulb is not inserted into the Check to make sure the socket correctly bulb is fully screwed into the socket Power adapter is not fully plugged in Check to make sure that t
*For customers living outside the United States, Swift Optical Instruments, Inc. will provide standard warranty service. Both inbound and outbound shipping costs (including duties and taxes) is the responsibility of the consumer. For more information or to submit a repair request, please contact our Customer Support department: Tel: 877-967-9438, option 1 Email: customersupport@swiftoptical.