
Use and Care Manual


5
Before installation
Open the package and remove all components. Inspect the components to make sure nothing was
damaged during shipping. If any part is damaged or broken, please immediately contact the supplier for
a replacement. Get familiar with the components before you start the installation of the system.
Remove the items store under the sink. Have a towel in case water dripping occurs.
Tools required: For the assembly of the components a power drill, marker, screwdriver, and an adjustable
wrench is required.
Components required: Pan Head Tapping screws for mounting receiver bracket
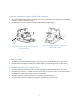
Mounting the Receiver Assembly bracket
Choose a location for mounting your bracket for under sink filter system. Note: pick a location such
that drill tool does not come in contact with other water pipes. The location should have easy access
to the receiver assembly. Also leave ample (minimum 2
1
/
2
-3”) clearance for easy removal or
replacement of filter cartridge.
Use the holes in mounting bracket to mark four holes for the bracket with a pencil.
Mount the bracket to wall using the four pan head tapping screws (Not include in the packaging).
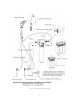
Ensure the bracket is securely mounted after fastening. (Fig. 2)
Figure 2 (a) Receiver bracket should be mounted using four bolts (b) Leave a minimum clearance of 2
1
/
2
” to 3” for easy
replacement of filter cartridge in future
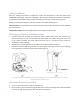
Disconnect the existing cold line
First, turn off the cold water supply off under the sink.
Use a wrench to disconnect the existing cold line faucet hose from the valve. Keep the hose attached
to the faucet. (Fig. 3 turning off the valve and disconnect cold line).