
Installation guide


C O N N E C T E D H O M E
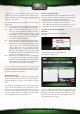
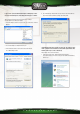
Click the icon and a list of wireless networks will appear, select your
network, check the “Connect Automatically” checkbox, click “Connect” and
follow the instructions on-screen:
Note: If you see a red cross next to the network and are unable to connect, please
refer to the troubleshooting section of this manual.
Troubleshooting
This chapter of the manual will explain a number of common issues that
you may run into and possible solutions.
• I can connect to a network but I cannot access the internet or other
computers on the network
• This issue may arise from incorrect IP settings on your computer. You
can check and adjust your settings as follows:
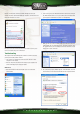
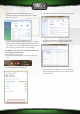
Windows XP
1 Click the start button at the bottom right of your screen and click
“Control Panel”
2 In the control panel, click “Network and Internet Connections and open
the “Network Connections” icon. If your control panel is in Classic View,
you may open the “Network Connections” icon straightaway.
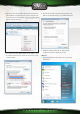
3 Right click the first connected LAN or High-Speed Internet Connection,
in this example the “Local Area Connection”, and click “Properties” from
the context menu. If you have multiple connected connections, repeat
steps 3 to 6 for each connection.
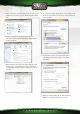
4
The connection’s property window appears. In this windows, select the
“Internet Protocol” from the list of items and click the “Properties” Button: