OPERATING MANUAL English Model Range: SVP SL SAVE THESE INSTRUCTIONS Contents Section 1 Warning: Installation Warning: Operation Warning: Disposal 2 2 3 Section 2 Instructions for use Changing the bag and filter Fitting Instructions 4 5 6 Section 3 Specifications Dimensional Information 9 9 Section 4 Troubleshooting Warranty 10 11 www.sweepovac.com Sweepovac_2017 manual.
Section 1 IMPORTANT SAFETY INSTRUCTIONS Dear Customer, Please read through these operating instructions carefully. Please study and observe the safety instructions on the first few pages of this booklet. Please observe all cautionary markings in this manual, on the vacuum bags and on the Sweepovac vacuum appliance. Please keep these operating instructions for later reference and pass them on to any person carrying out cleaning, maintenance or repair, or to any subsequent owner of the appliance.
Section 1 B6 Do not fit anything other than original Sweepovac dust bags or filters. To do so can damage the appliance, and invalidate your warranty. B7 Always remove the plug from the electrical outlet or switch off power at the electrical panel before attempting any form of user maintenance or cleaning as specified in this booklet.
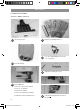
Section 2 INSTRUCTIONS FOR USE 1 Sweep dirt to a point in front of the Sweepovac. 2 Tap the lower part of the switch gently with the broom or with your foot. 3 Sweep in the dirt. 4 Clean the brush head by rubbing the bristles over the powerful suction. when the bag is full this light will come on during normal operation 5 1 - Tap the switch and the Sweepovac will turn on for 10 seconds.
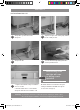
Section 2 CHANGING THE BAG AND FILTER 6 Slide out the bag drawer. 7 Hold the bag upright when removing to prevent dirt spilling out. Disposable bags should be changed every 12 weeks. Re-usable bags should be emptied every 12 weeks. The entire drawer can be carried to the garbage when emptying or changing bags. When re-inserting the bag, ensure the 3 cardboard lugs are slotted home.
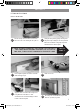
Section 2 FITTING INSTRUCTIONS Contents – What’s in the box 10 The Sweepovac unit 11 13 12 15 Dust bags x 3 and Hepa Filter x 1 T4 * No 6 flathead Philips wood screws ¾ “ long (17mm) Re-usable dust bag 14 Template for marking the cut out 16 A Jigsaw OR a Sawsall can be used to cut the opening. Tools required l Pencil or fine point marker l 1/2” to 1” drill bit l Jigsaw or sawzall l Cut out template (included) l Philips head screwdriver No 2 6 Sweepovac_2017 manual.
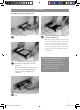
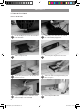
Section 2 FITTING INSTRUCTIONS How to fit the unit 17 Take the Sweepovac from the box and remove the 4 hex head screws holding the face plate on. 18 Unclip the face plate by gently releasing from the plastic clips holding it to the body. A small flat head screwdriver used gently may assist with this. Remove the faceplate. IF YOUR KITCHEN CABINETRY HAS BEING SUPPLIED WITH THE SWEEPOVAC OPENING ALREADY PRE CUT IN THE TOE KICK, THEN PLEASE PROCEED TO THE NEXT PAGE.
Section 2 FITTING INSTRUCTIONS How to fit the unit 23 Use the levelling foot to ensure the unit will sit level when fitted. 24 Slide in the power cable and locate it beside the outlet it will be plugged into. 25 Slide in Sweepovac unit. 26 Screw into place using the 4 wood screws. 27 Clip the face plate back on to the machine and insert the 4 screws.
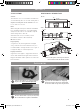
Section 3 SPECIFICATIONS DIMENSIONAL INFORMATION Switch: Front 14 78 “ 377mm The switch is on a 10 second timer and will turn off automatically after 10 seconds. Gently kick or tap the bottom part of the switch. Kick once for on. Kick once for off. 3 78 “ 99mm Note: When using the Sweepovac with the extendable hose. Hold the switch in for 3 seconds and the Sweepovac will come on for 5 minutes. Tap the switch at any time to turn off. Side 3“ 16 5mm “ 3 11 16 Automatic turn off (10 sec timer).
Section 4 TROUBLESHOOTING If suction reduces or the Sweepovac does not vacuum up the sweepings. Open the drawer and check if the bag is full. When changing the bag, make sure to hold the bag tray with the front pointing upwards. This will prevent any dirt falling back out through the opening. Replace old bag with a new bag. The filter located at the rear of the bag tray can be cleaned if it appears dirty on visual inspection. Try again. If the Sweepovac stops operating.
Section 4 WARRANTY Dear Customer, Thank you for purchasing a Sweepovac unit. The Sweepovac unit and associated products are designed and manufactured to a high standard and with normal use should last many years. The warranty period on your Sweepovac unit is 2 years from the date of purchase. To gain warranty assistance in the unlikely event of the unit not working, you will need to provide us with a copy of your proof of purchase (Invoice, sales receipt etc.).
To purchase disposable bags, filters or re-usable bags please go to: www.sweepovac.com www.sweepovac.com Sweepovac_2017 manual.